![Revolution Arena [English Version]](https://revolutionarena.com/english/wp-content/uploads/sites/4/2024/07/Revolution-Arena-ISSN-2966-2117.png)
")
Gato Roboto – Complete Walkthrough (Step by Step Guide)
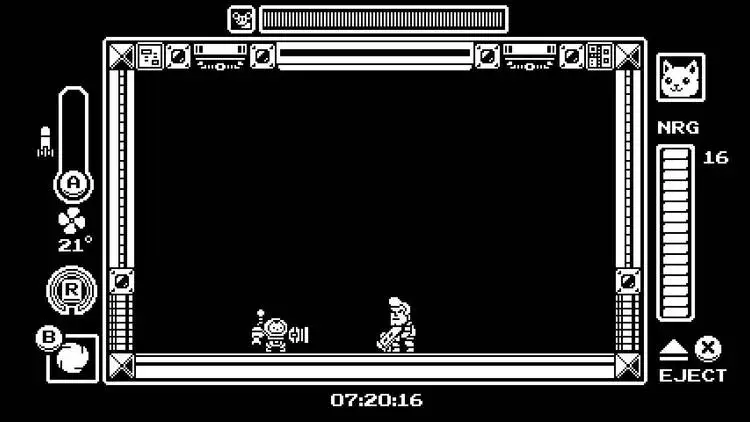
July 22, 2024Gato Roboto is a Metroidvania styled action/adventure game. You will take control of the cat, Kiki, being guided by its master, Gary. Kiki will have a handy little mech suit that you can upgrade as you progress through the game to find out what happened on an alien planet.
This walkthrough will be focused on achieving 100%. In order to obtain 100%, you only need to collect all of the items. You do not need to unlock the whole map or read every piece of dialogue. For 100%, you will need:
- 10 Healthkit Modules
- 14 Cartridge Modules
- 8 Abilities (The final two are obtained through Rebba in the Nexus. To obtain those abilities, you will need to collect 7 cartridge modules for the first and all 14 cartridge modules for the second.)
If you can get a module on your first trip within an area, I will include instructions on how to get it within that area. If you can’t, I will mention how to get that item next time you are in that level. The only levels that you can’t collect all the items in your first visits are the Landing Site and Nexus. The Nexus is a hub level that you will revisit multiple times and you will have to revisit the Landing Site for story progression later on anyway. I will include how to get those items the first time you are in those zones with the proper abilities. If you are missing a particular module and have not been following this walkthrough, I highly suggest heading straight to the module sections of this guide. You will find maps, coordinates, and instructions on how to find the module you are missing there.
Controls:
| L | Phase* |
| Left Analogue Stick | Move |
| D-Pad | Move |
| + | Pause |
| X | Exit Mech |
| Y | Fire Pistol |
| A | Fire Rocket* |
| B | Jump |
*The phase and rockets are both abilities that you will unlock as you progress in the game.
**All other buttons have no in use in the game.
For any questions or critiques, feel free to contact me at FrankTheTank3388@gmail.com or you can message me directly here on Revolution Arena.
This guide is copyrighted © 2019 to Frank Grochowski.
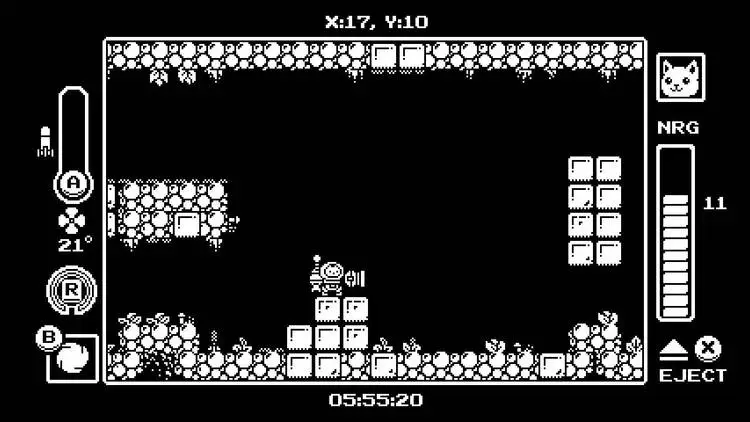
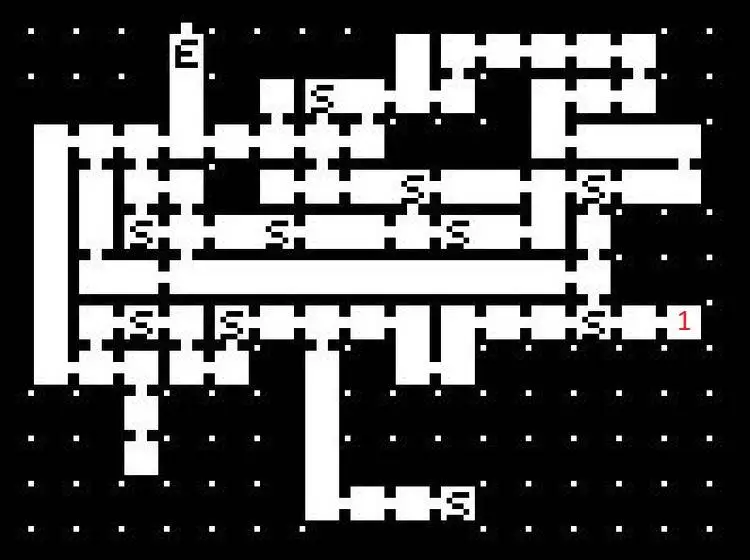
Landing Site
After a brief introduction, we will see Gary crash land his ship and the only one that can escape the ship is his cat, Kiki, who you now control. Gary will briefly question his sanity while trying to give orders to Kiki and you will soon take control. Head to the left and you will soon face your first obstacle, a tall wall. If you jump towards the wall, you’ll see that you can actually climb the wall. Keep pressing jump while holding left to get over the first hurdle. Continue to the left for your next obstacle, water, a cat’s worst nightmare! Gary will actually scare his cat into the water, helping Kiki overcome its fears, and continue onward. Fall into the hole ahead and drop all the way to the bottom of this room. Head to the right until you reach another cutscene. You will now have your mech suit! Head back to the left and the room will go into lock down. This will be your first test! You will take on some flying enemies. These will just stay high along the room and if left alone, will charge down towards you. Shooting them with your pistol will stun them in place briefly, making for an easy kill. Clear this room of enemies to open up the door to the left.
This room will also now be swarming with enemies, you will see two new enemies right off the bat. One is a tentacle monster that just kind of hangs out where it is. Just fire away at it until it dies. Touching it will damage you but it doesn’t make any movements towards you. The second is a bee hive that will slowly spit bees out. The bees will fly straight down until they are lined up with you. They will stop for a second and then fly straight at you, depending if you are to its left or right. They’re pretty easy to avoid just by jumping over them or you can just kill them with a couple shots. You can jump up and shoot up at the bee hive if you want to get rid of the hive completely. Start climbing up the platforms here and deal with the next tentacle monster you see. You will soon run into a frog, they’re pretty self explanatory, they just slowly hop towards you. Keep climbing up to the top of this room and jump up to the next room. You should now be in X:05, Y:08, shown at the top of your screen. Shoot the door to your left and enter it for a healthkit module (X:4, Y:8.) These will increase your maximum health by 1 every time you find one. They will also fill you to max health assuming you have taken some damage before picking one up.
Head back to the right to leave this room. The water will damage your mechsuit so jump onto the platform above the water. Head to the right and jump over the rest of the water. Continue to your right, dealing with the enemies in your path. Open the door when you reach it. Kill off a couple more frogs and enter the next room. This is a save room, just jump on the platform to save your game and recharge your health to full. Continue to the right and drop down the pit ahead. Head to the left once you land. Jump across the platforms while being careful not to fall in the water here. Take your time dealing with the frogs when necessary. Open up the door to the left and drop down. Now open the door to the right. You will be in room, X:11, Y12. The room will go on lockdown while there’s a flying enemy and three frogs. Just make quick work of them and leave the room to the right.
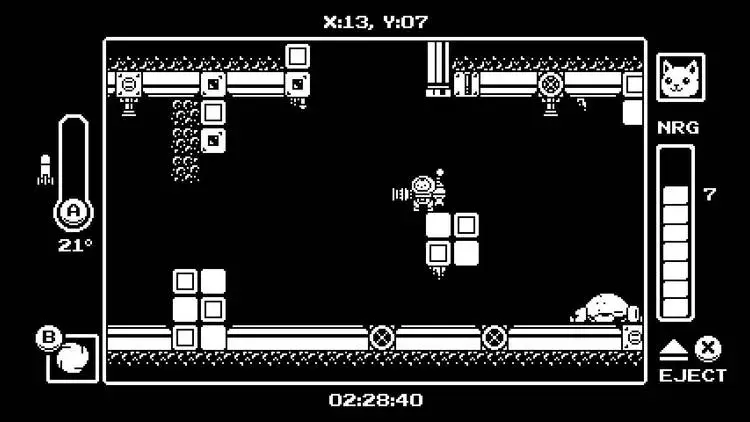
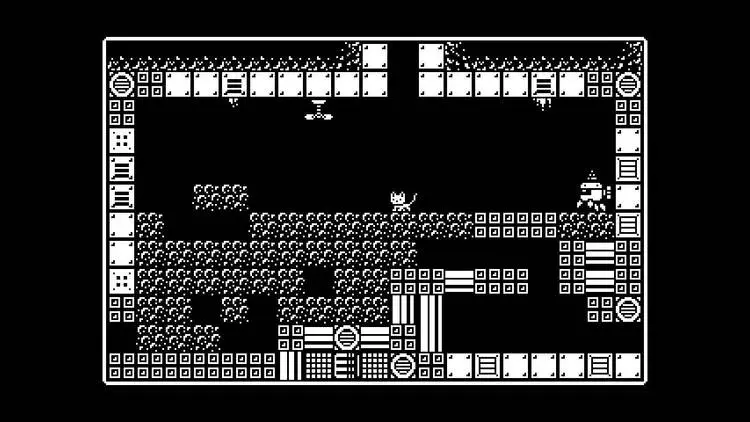
You will now have to leave the safety of your mech suit and continue on foot. Press X to exit it and crawl through the hole in the bottom right corner of this room. You will fall into an underwater maze. The maze is pretty simple to navigate, just follow the path until the first split, then go right. At the next split, just go straight down and you will see the exit to the left. Climb onto the top of the left platform here and jump across the gap to the left. Follow the path all the way to the left and you will find the Rocket Module. Now head to the right and enter the save platform to get a new mech suit. You can now fire rockets by pressing the A button. Head to the right and you will see that firing your rockets will destroy dirt blocks. Continue to the right in this room and jump to the far upper right corner by destroying the dirt blocks. Jump up to the next room, X:11, Y:13. View the image below to see where to go.
Jump to the top platforms here and head to the left. Break the dirt blocks here and climb up to the next room. Break the dirt blocks and head to the right. Enter the next room through the door to enter X:11, Y:12. Now break the dirt blocks to the right and enter the next room for a save room. Head to the right for your first boss battle in the game!
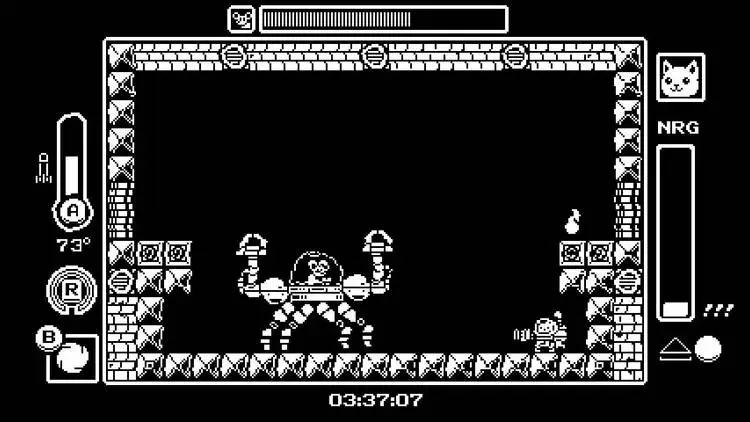
Mecha Mouse
Mecha Mouse is a simple, introductory boss. It essentially has two attack patterns you have to deal with:The mouse will stand on the ground in its mech suit. He will fire bombs that bounce in each direction. You can run under these bombs to avoid them. They will bounce off each wall and then explode about midway between the walls and the boss. Then the boss will hop in the air to the right, firing a single bomb to the left. You can just stand to the far left to avoid it as the bombs will explode before reaching the wall. It will then jump to the middle again, then to the left wall, and the middle one more time. It will always repeat the same bomb patterns. During this attack pattern, you can only damage it by shooting its helmet with your pistol or shooting it anywhere with your rockets. The rockets are easier because you have a bigger target, they have a longer range, and deal more damage. Just be careful because the blast will push you back a bit and may bump you into a bomb.Once the boss hops back to the middle after being at both walls, it will extend its legs straight up and grab onto each wall. Don’t touch its legs as they will damage you. The legs will soon retract into its body and become a laser cannon. It will move to the left and right, using its arms as a track, and fire lasers straight down. The lasers are easy to avoid as long as you keep moving left and right without slowing down, only changing direction immediately after a laser passes. Just keep firing straight up with your pistol here until it completes this pattern and jumps back down to the ground in the center of the room.Just keep dealing damage while avoiding its attacks in these two patterns. You may want to jump over bombs in the first attack pattern but make sure to just run under them, it’s a lot easier to avoid. Once you deal enough damage, you will soon find out a little secret about this mouse!
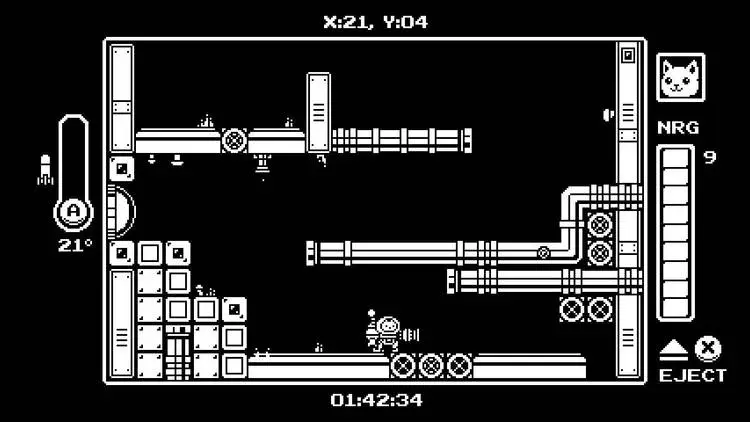
Head to the right and you will soon see a set of dirt blocks over some water. Be careful not to destroy all of them as you will need to use the dirt as a bridge to get across the water without taking damage. You will, however, want to break a small part of the bridge. When the path is clear and there’s an opening to the water, leave your mech suit and dive into the water. The image below gives you an idea of how you want to access this area.
Swim to the right and keep going right for another healthkit module (X:18, Y:12!) Swim back to your mech suit and continue along the path to your right. Destroy the dirt blocks to your right and use this platform to climb to the higher platforms so you can continue onward. Kill the frogs in your path and keep moving on until you reach room X:14, Y:10.) There’s a door to your right but you can’t do anything in here just yet. Head up the platforms while dealing with the enemies and exit this room in the top left corner.
Continue to the left until you reach Gary’s crashed shipping, where you started the game. When you reach the tall wall that you climbed over at the beginning, blow out the dirt rocks and drop straight down. You will now be in room X:7, Y:9. Head to the right and jump on the switch next to the computer. Now head to the left, destroying dirt blocks in your way, until you reach room X:5, Y:9. Drop down here and you will see a single dirt block on the right wall with a door to the left. Destroy the dirt block with a rocket shot and hop out of your mech suit. Climb through this hole and follow the path for a Cartridge Module (X7, Y10.) This will give you the bark palette, just a slightly different color that you can access from the options. Head through the hole to the right and drop down. You will enter the room you got your mech suit in at the beginning of the game. Head back to the left from here and start climbing up until you see the door on your left. Open it and enter for room X: 4, Y: 10. Break the dirt blocks and step on the button to the left. This will activate the lift to leave this level and head to the Nexus.
Nexus
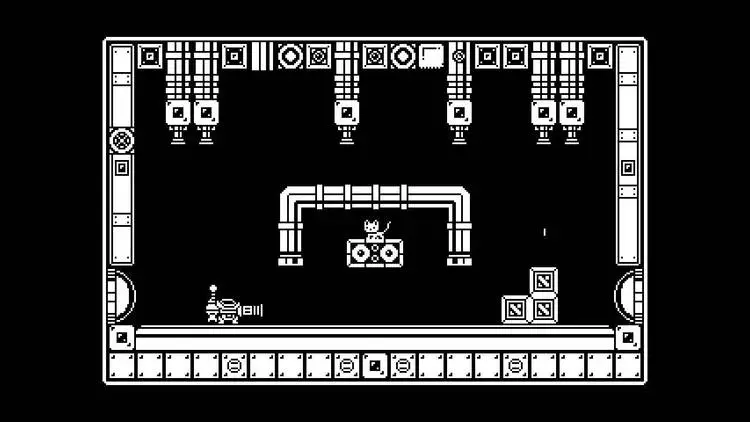
This is your first stop of many in the Nexus. The Nexus is kind of like a hub level. There are still modules to collect in here, but for the most part, it’s a level that will connect you to other levels. Once the elevator stops, you can head to the right to power up a computer. The computer will briefly talk to you, explaining how to enter the laboratory. With that out of the way, you can head back to the left for a save room. Once you save, break the boxes to the left and enter the next room for a new enemy, the armadillo. The armadillos aren’t too difficult to deal with. They just walk around slowly until they see you. Once they spot you, they will turn into a ball and jump at you. One rocket will make quick work of them and they freeze for a second when they spot you so just fire away before they can attack. When ready, climb the platforms to the left and exit the room to the left in the upper left corner. Fall down to the ground and press the button to the right to activate the elevator. Hop on to enter the Aqueducts.
Aqueducts
Drop down to the next room below. You will see a submarine to the left and an octopus below you. Kiki will have to leave the safety of the mech suit but you can quickly jump into the submarine. The octopus will just swim towards you, you can kill it or just avoid it. Head down and you will soon reach a wall. Shoot the door to the left and enter it to continue along the path. Move all the way to the left of this room while dealing with the enemies in your way. Enter the next room when you reach it. Continue downward through the path and enter the next room. This room will be on lockdown because of 4 fish that will charge at you when they spot you. Just get behind them and fire away until they all die to open up the path above. Drive the submarine straight up to get it out of the water and press X to exit it. Hop into the save room to the left to get a fresh mech suit.
Now that you have some fire power in your mech suit, enter the room to the left. This room is quite simple, just a few frogs and platforms to climb up. Exit at the top of this room. You will already have to abandon your mech suit again. Hop in the water and exit this room in the bottom left corner. Avoid the frog here and continue left for another save room which means another mech suit. Continue to the left in your mech suit until you’re forced to climb up. Enter the next door when you reach it for a lockdown room. You will fight a turret in the ceiling here. It has two attacks, a machine gun and a homing rocket. You’ll have to just keep moving to avoid the machine gun. The homing missiles can be destroyed by shooting them. It’ll just keep moving left and right unless it’s firing the homing rockets, in that phase, it’ll move to the upper left or upper right corner and stay there. Just do your best to avoid the machine gun and keep firing away at it until it dies, even while it’s shooting homing rockets since your shots will inevitably destroy them.
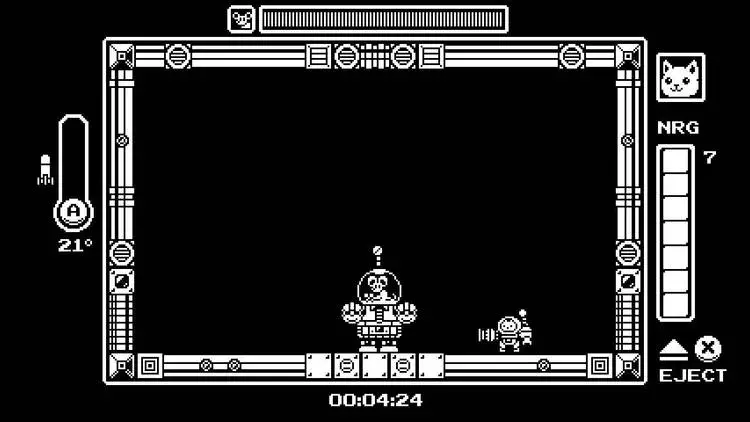
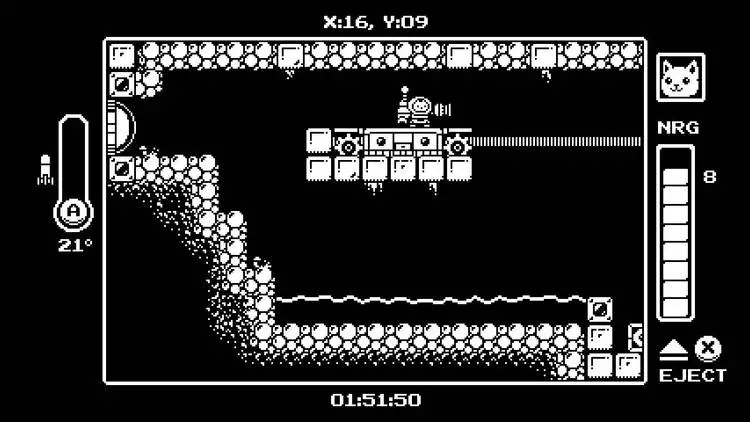
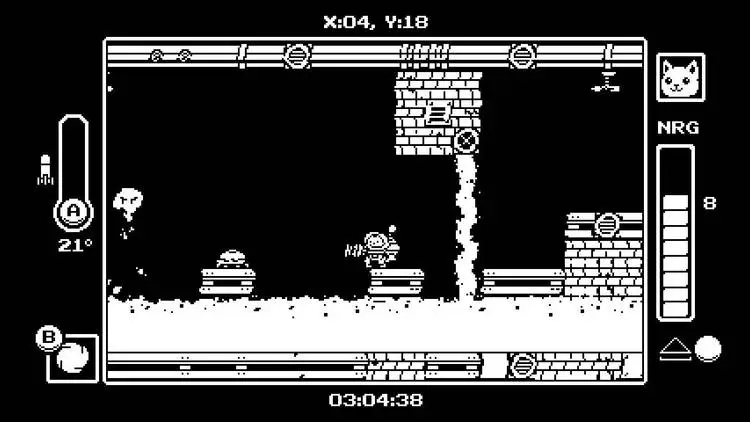
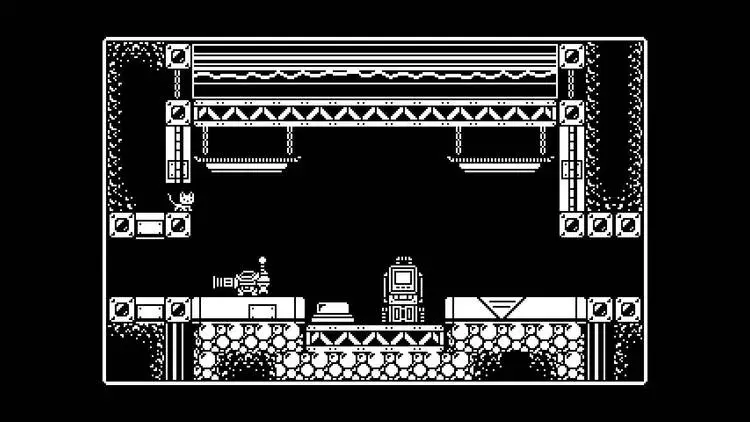
After you defeat the boss, continue to the right. You will be in a brief conversation with Gary who explains to use the treadmill. You can view the image above, just hop out of your mech suit and jump on the small platform in the middle of the screen. Run in either direction to turn the pumps on and drain some water. Continue to the right two rooms until you’re in room X:4, Y:4. Drop all the way to the ground and break the dirt blocks at the bottom. Fall into that room for a healthkit module. You can climb back up the platforms all the way to the top and head to the right, back towards the beginning of the Aqueducts stage. Drop down the next room and continue to the right for a save room. Continue to the right, jumping the gap and climbing the stairs in the next room. Break the blocks at the end of this path and drop down to continue to the right. Keep going until you reach the first room of the Aqueduct level.
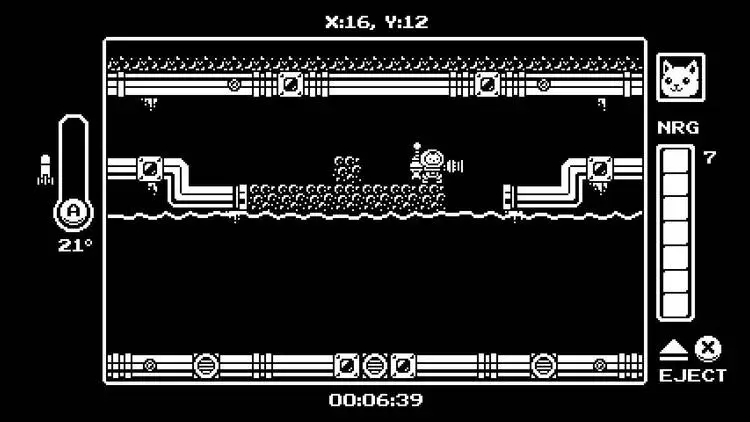
Now that you can be in your mech suit in this room, break away at the dirt blocks that were blocking your path earlier. Drop down to the platform below and it’s time to swim again. Hop out of your mech suit and swim into the submarine to the right. Dive down and enter the room to the right when you can’t dive any deeper. Go straight up into the next room here and keep going right while avoiding the enemies in your way. You will soon enter a room on lockdown with two big enemies that float around. Stay far away from these and fire from a distance. They will shake and fire bullets in every direction. If you keep your distance and keep firing away, you’ll make quick work of these. Once the room is clear, leave through the lower left door while taking note of the dirt block in the lower right corner. Follow this path until you can get out of the water.
Follow this path and climb up the tall wall when you reach it. Enter the room to the left for a save point and a mech suit. Continue to the right and put your mech suit on a platform that looks like it should move but it doesn’t. Jump out and swim to the right but be careful of a fish that will be blocking your path. You’ll have to be patient and get behind it to continue to the right. Continue ahead and you’ll climb out of the water. Hop on the treadmill here and run to the left to move the platform your mech is on. Bring it closer to you and get in. Now continue into the next room to your right. Continue along this path until you have to get out of your mech suit. Continue up and then to the left here while avoiding the enemies and underwater mines. You will soon face another turret. This turret works the same as the last except you have to deal with some water to avoid, making this room a lot trickier. Once you kill it, leave to the left and run on the treadmill at the end of this room to drain the next pump.
With the second pump working, start heading back to the far right until you’re forced to go down. You will have to destroy some dirt blocks to drop down. Once at the bottom of the room, break the blocks. View the image above to see where to go. Get out of your mech suit and enter the hole in the bottom right corner to drop down for the starboard palette (X:21, Y:6.) Get back in your mech suit and head to the left all the way for the save room to refill your health. With full health, head back to the previous room and drop straight down along the right half of the room. Continue to the left from here until you get back to the starting room. Break the blocks below and jump down to the next platform. Get out of your mech suit again and hop in the water. Sorry, no more submarine to traverse this room. Swim all the way down while avoiding the underwater mines and leave this room in the bottom right. Swim up to the top and exit this room in the top right corner.
Hop in the submarine in this room and swim straight down. Just avoid the big enemies that shoot all around if you can and go through the door in the bottom right. Kill the tentacles here while you follow the path until you reach a room in lockdown. Clear this room of all enemies, there’s a wide variety in here but there’s plenty of room to move around to dodge enemies so take your time. With the room clear, continue along the path and you will soon reach a save room for a new mech suit. Continue to the left and you will soon reach a dead end. Hop out of your mech suit and crawl through the hole to the right. Hop on the treadmill here to move the platform blocking your path. Continue up along the path. You should now be in room X:16, Y:9. Hop on the platform above the water and get out of your mech suit. View the image below to see where you want to be standing to leave your mech suit.
Once out of your mech suit, jump down to the right. Hop on the treadmill and move the platform above to the right with your mech suit on it until the treadmill stops spinning. Jump up the wall to the right and onto the platform with your mech suit. Hop in it and open the door to the right to continue through the Aqueducts. Continue to the right until you’re forced to drop down. You’ll get another save room but you’ll need to abandon your mech suit regardless. Once out of your mech, head to the right. Swim along this path and get in the submarine when you see it. Head up and into the next room for the boss of the Aqueducts.
Submarine Mouse
This boss battle is actually really annoying because of how floaty the submarine feels. The controls just aren’t very responsive in it and it can make avoiding attacks rather difficult. Not to mention, the submarine only has 5 hit points so you can die easily. There are basically two phases to this boss battle that it will cycle between.The mouse in the submarine will move around in this arm contraption while firing bullets at you. You’ll also see 4 ports on the right wall, two above and two below the boss. Arms will randomly come out of these and stop at various lengths. Sometimes they will shoot a bullet straight forward that will stop shortly after it gets fired. Sometimes these arms will go all the way across the screen so you want to be above or below them if possible. The mouse will start moving around in the middle, then along the top, then along the bottom before going into phase 2.The mouse will retract its arm and sit in the wall, surrounding itself with little blocks. The blocks will all launch towards you at once and can be destroyed from this point. You only need to destroy a couple to give yourself an opening to fit through. Then it will fire some homing rockets at you. After the homing rockets, it’ll shoot two landmines out towards you that explode around the middle of the screen. Focus on avoiding the explosions as they fill the screen.Avoid those two land mines, it’ll go back into the first phase. The submarine shots don’t even go across the screen so you’ll have to get relatively close to actually hit the mouse. You do have to hit the glass enclosure the mouse is in to deal damage. Just try to stay about a half screen’s distance away from it while moving up and down to avoid its bullets. If you can move up and down in between its bullets, the arms above and below it won’t bother you. Just get in the flow to avoid the bullets coming right out of the mouse’s submarine and keep firing away until it dies. Note, towards the end of the fight, it will start throwing homing rockets and underwater mines at you in both phases so be especially careful late in the fight.
Follow the path to the right after the fight and you will soon reach a save point for a new mech suit. Open the door to the left and hop on the treadmill to turn on the final pump. Now head back to the right until you’re forced to go down. Break the blocks in the lower right corner of this room and enter this next room here. Drop down in this room and enter the room in the lower right corner. This room will go on lockdown with a few enemies here. Clear the room and enter the next room for the spin jump module (X:24, Y:10.) This module is great, it allows you to double jump which will not only give you access to new rooms, but will help you avoid enemy fire. Head back to the right until you have to start climbing up platforms. Climb all the way to the top of this room with your new double jump ability. Break the dirt blocks and use this small platform to climb above. View the image below to see where how you can get up.
Just keep following this path while killing the enemies in your way, it’s really straight forward from here. You’ll have to destroy some dirt blocks to allow yourself to double jump up some of these platforms. You will soon reach a room that is just a big pit with a bunch of frogs. You can kill the frogs to make this a little easier. Just jump on the middle platform to the right. Jump and shoot a rocket to the left at the single dirt block. Double jump from here to the far left to make it out of this room. Once you reach the tall room that you started in, start climbing. Keep an eye on the left wall. You will see a wall you can destroy with rockets. Blow it up and enter the room. Shoot a rocket to the left to destroy the enemy on the far left platform but leave the mine on the chain. When you double jump, you’ll turn into a ball, which will allow you to bounce off enemies, dealing minor damage to them, leaving you unharmed, and allowing you to go further in the jump as well as have another spin jump! You’ll want to double jump and land on the mines here while you bounce your way to the far left end of this room. If you miss a jump, you’ll fall into the room below. You’ll have to go back to the left, climb the platforms, and try again. Drop down when you’re forced to and climb up the platforms here.
This room is tricky because it requires speed and precision. You’ll have to quickly spin jump onto every mine here before they explode to reach the next platform above. Just jump on them one at a time until you reach the next platform. Climb up and kill the few enemies in this room. Blow out the dirt wall to the left to pick up the goop palette cartridge module (X:7, Y:7.) Now follow the path up until you can’t climb any higher. Now go right until you reach the long starting room, room X:12, Y:5. Start to go down to collect some more items before leaving the Aqueduct. Go down until the next door you see on the left, enter it. Follow this path to the end while killing some enemies. You’ll find a switch next to a computer you can step on for some story dialogue. When finished, block up the dirt block with a rocket in the upper right and climb through for a port palette (X:11, Y:6.)
Head back to the long room you started in and instead of climbing up, enter the room to the right. Go to the far right and break the wall in your path. Jump on the small platform here just past it and double jump into the opening above. View the image above to see where you want to jump from. You want to time your double jump so it starts at the peak of the first jump to be able to get up to the next room. Hug the right wall while doing it too so you can actually land on the platform above. Head to the right and break the dirt block there. Crawl in as Kiki without the mech suit for a healthkit module. Now get back in your mech, head to the left for the long room you started in and climb all the way to the top. Activate the elevator to get back to the Nexus.
Nexus (Revisited 1)
Start off by climbing up and fall into the opening to the left. Break open the dirt block in the bottom left corner of this room and jump out of your mech suit. Go all the way to the end of this path for the coffee stain palette (X:9, Y:14.) Head back to your mech suit. Climb to the top of this room and exit to the right. Jump over this gap and exit this room to the upper right corner. This part is pretty tricky but you can spin jump off the far right edge of the platform, off the screen, and onto a platform in the next room up high. This takes a perfect double jump so you may want to wait until you get a better feel for the game if you keep failing the jump. You can also later unlock a phase ability which you can use to blink back to the platform you jumped from if you missed, saving yourself the trouble of wrapping around. If you are determined, there is the urine palette module (X:14, Y:13) up here. Once you get it, head back down and drop down, head to the left for a save room.
Just run to the far right, past the computer, until you reach a dead end with a door up high. There are actually two doors in this room. Climb up the platforms and enter the top door here. Follow the path to the right while avoiding obstacles. You will soon reach a lockdown room with 4 beehives and a frog. Kill the frog quick with your pistol and start destroying the blocks above with rockets. Just destroy the blocks between 2 beehives so you can fire a rocket straight up to damage both. When the bees start to come down, kill them off quick with pistol shots and focus back on destroy the hives with rockets. Once cleared, go to the right for a healthkit module (X:23, Y:14.) Now head back to the left and to the room that you had to double jump up to reach the upper door (Room X:18, Y:14.) Drop down along the right side and enter the lower right door to this room. Step on the switch here and activate the elevator to go down to the Heater Core.
Heater Core
You can start off the Heater Core by heading into the room to the right. Destroy the blocks in the middle of the room to reveal a hidden switch and some more of the story. Once that message is over, head back to the left and then to the next room. You will now see a new enemy. This is probably the easiest enemy you’ve dealt with so far. It will literally just walk slowly in a straight line. It does crawl on walls and ceilings though so be mindful at the edge of platforms. Kill it or avoid it and double jump through the bridge ahead. You’ll see some valve in the ceiling and ground ahead. Stay put for a few seconds and observe them when you see them. You’ll see them start to smoke a bit and then lava comes pouring out of it. Head to the left while being mindful to avoid them. I suggest staying put in each room for a few seconds to see when lava will block your path. Head to the next room and be careful for more flowing lava from the ceiling. Fall down to the left when it’s clear. You can hold down and press jump to fall through these little bridges here while you continue down to the bottom of this room. Be careful of the gap here, a fireball will pop up randomly. Jump over and head to the next room to the left.
Avoid the fireball and spewing lava in this next room while you circle around to exit in the top left corner. Kill the tentacle to the right and avoid the lava to exit at the top of this room. This room is pretty simple, just head to the left while killing the simple enemies here. Enter the next room for a lockdown room. This room is really simple, there’s just two slow enemies at the bottom that circle the walls. Kill them first and hop on the center platform. The two robots above will shoot a flamethrower and die in three rocket shots. Just kill them when they’re not shooting and the room becomes and easy clear. Head to the left for the first save room of the Heater Core. Continue to the left and fall to the far bottom of this room. Kill the flamethrower bot and continue to the left. There are a few platforms to jump that you have to be careful of here with lava below and fireballs popping out. Be mindful of the flamethrower bot on the next platform when you see it. I suggest waiting for it to stop firing and just jump over it. Kill the flamethrower bot in the next room by just jumping and firing rockets at it. Drop down and head around to the next room (X:8, Y:17.) This room will be on lockdown with one of the flying enemies you have dealt with plenty of times and a new enemy. This new enemy can be dangerous up close but it moves slowly. It’ll fire two mortar shots that bounce around a little bit and explode. Just keep your distance and fire rockets at it until it explodes. Head to the left for the next save room.
This room doesn’t appear to be on lockdown at first glance but it actually is. Make sure to kill all the enemies you see here. Be careful with the flamethrower bots. You want to just jump and fire rockets but don’t forget them knock you back a bit and could bump you into lava. Once the room is clear, you will have a brief conversation with Gary. Hop through the next open door in the top left corner. Head down to the bottom of this room but be careful, there are a lot of flying enemies here that if you can easily fall into if you rush too much. At the bottom, enter the door to the left. Start jumping to the left while avoiding the fireballs and lava spewing from valves in the ceiling. Be careful once you pass the first valve, the second platform actually has an enemy circling around it. It may be underneath the platform, hidden by the lava below, when you reach it. View the image below for an idea of where it is exactly.
You definitely want to kill it before jumping onto the platform with a rocket. Once you get there, you will see a flamethrower bot on the next platform. Kill it from a distance and jump to the left. Cross the bridge in the next room and enter the next room for a save room. Head out of this room and drop down through the bridge, head to the left for a fight against a large furnace. This boss doesn’t move at all. You will see four sets of valves at the top. Lava will flow down from these. This can easily be avoided just by standing between the valves. After a few cycles of this, it will shoot bursts of three or four shots at you that arc up and down towards you. Do your best to avoid these, they seem to fire randomly so it could be hard to avoid. After a few bursts, it will throw a molotov that will explode and then send flames along the floor in both directions. Avoid the point of contact and then just jump over the flames. That’s all this guy will do, just keep firing shots at him until he dies. You do have to jump and shoot at its face, above the spike on the ground, to do damage. Your best bet is to fire shots in between phases while the lava drops from the ceiling and focus on avoiding the shots that it takes. You can still deal some damage in between its shots but you’ll likely deal more damage in the lava phase.
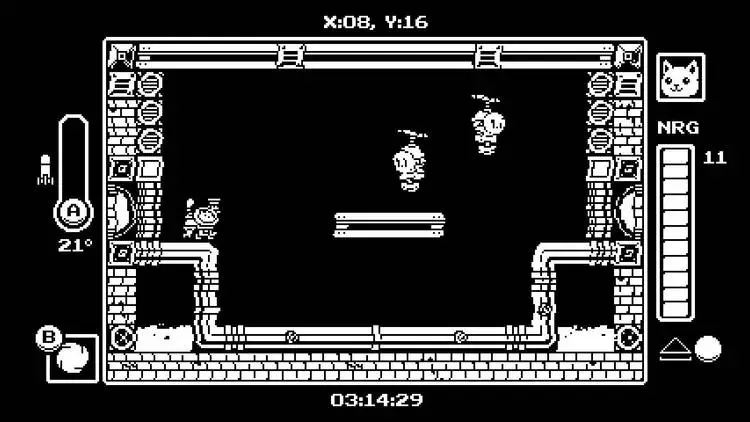
With the first furnace broken, you want to head to the right. This tunnel is tight with lots of enemies but they’re all slow. Just fire away while you head to the right. You do have to kill the ones on the ceiling as well, they will hurt you if you try to run under them. Once you reach the end of this path, start climbing up the bridges. You’ll be in a room you’ve been in before. Climb up the platforms and leave to the right at the top of the room. You can drop down to the ground and go to the right here for a save room to save your progress after that furnace fight. Once ready, head back to the room you just came from and through the door in the upper right corner. You will now be in room X:7, Y:16. The next room will go in lockdown and you’ll face some new, annoying enemies. These flying bots will fly around and drop molotovs, just like the ones the furnace threw. Once they hit the ground, flames will spread in each direction. The best way to deal with these is to just stay on one of the side platforms and just shoot straight up when they fly above. The robots will stop for a second when you hit them so standing here will be pretty safe and let you deal tons of damage quick. Just look at the screenshot below to see where the best place to stand is.
Continue to the right until you reach another room on lockdown. Take your time here, there’s fireballs between every platform. Just kill the flamethrower robots from afar with rockets. Once the room is clear, head to the next room to the right. Climb up all of these platforms. The first door you come across will lead to an immediate dead end so keep climbing up to the top. Enter the room to the left at the very top of this climb. This room is pretty tough. You’ll have to double jump across here to the next platform and quickly kill off this flamethrower bot. I suggest waiting for it to finish its attack and then jump to it, killing it with your pistol. Keep jumping across the platforms while avoiding fireballs and dealing with enemies. Note that when you double jump, you’ll turn into a ball and will actually bounce off enemies. This can help you land safely on some tight platforms. I suggest not even trying to kill them if the platform is too low. You can take some damage here and just keep jumping to the next room to the left for a conveniently placed save room.
Kill the molotov flying bot in the next room and continue to the left. Climb up when you’re forced to. The next room will have a mortar, which is easily avoidable, and some lava spewing in the left side. The mortar likely won’t even shoot into the left side, it’ll probably hit the ceiling so you can take your time with the lava. The next room will go into lockdown so make sure to kill off this mortar. There’s a molotov bot here too. You can just jump on the higher platform and fire upwards with the pistol, freezing it in place, and firing away until it dies to open up the doors. Keep going to the left from here while avoiding the lava. You will soon run into another room on lockdown. Kill the slow enemy first and quickly jump to the platform. The enemy on the left will charge at you when you’re on the same platform. It’ll go through the dirt blocks but crash into the wall. Just avoid its charges and fire away while it’s stunned at a wall for an easy room clear. Head to the left for another save room. With your game saved and your health filled to the max, drop down at the bridge.
Head to the right for another fight with a furnace. This is just like the last one with a few small changes. Added to its arsenal is some homing missiles. These are really easy to deal with, just a single pistol shot will destroy them. It will still throw a molotov after its three shots but sometimes it will throw two instead of one. The last change, which is really annoying, is it will have a fireball jumping in front of it. You likely won’t get damaged from it but it does block your shots, making this fight a bit more tedious. Just keep dealing with it the same way you dealt with the last. Continue to the right once the fight is over. Climb up the platforms here. You can head to the left in the next room until you reach the save room again to save your progress after the fight with the furnace. Now just follow the path to the right until you reach room X:8, Y:14.
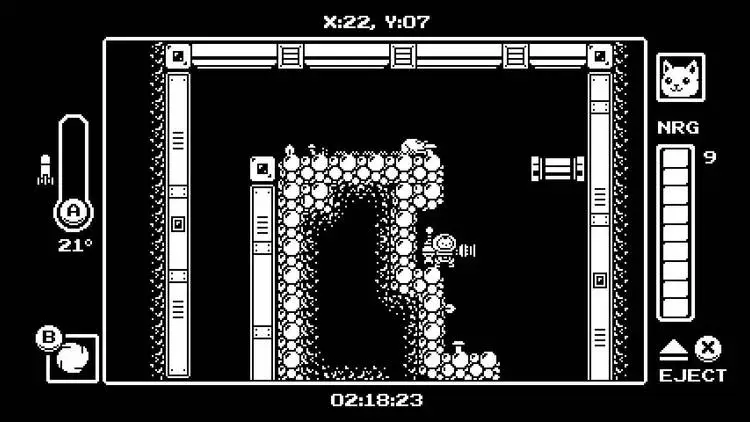
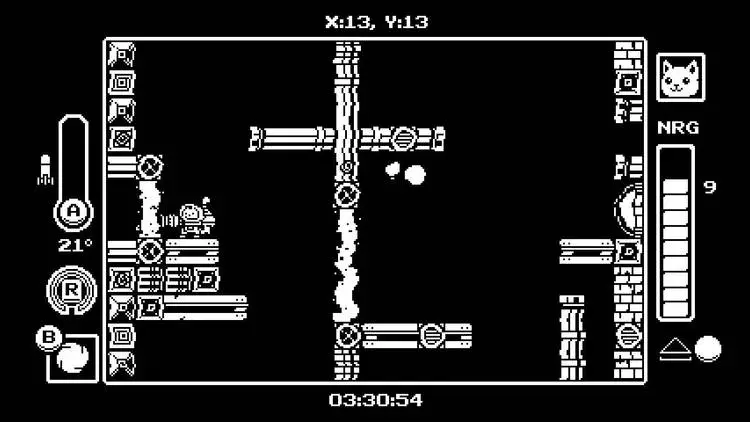
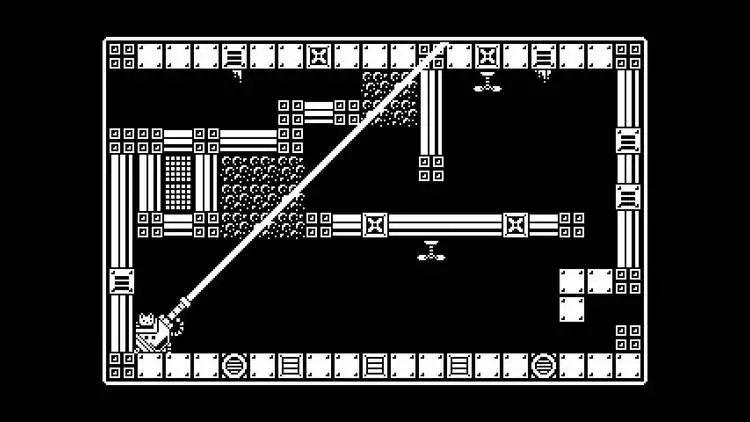
If you remember correctly, the room had lava down below that is now clear. Follow the path down but be careful of a mortar at the bottom of the room. Continue to the right through the room while avoiding the flying bots that drop molotovs and some fireballs popping out of lava. You will find the Phase module soon. It allows you to phase through lava without getting hurt. To activate the module, just press R and you will phase ahead in the direction you are facing. Phase through the lava to your right and go through the door here. Continue to the right until you are forced to go up or down. Head down and pay attention for some lava on the left. You will have to phase through that to enter room X:12, Y:15. View the image below to see where you want to go.
You’ll want to phase through the lava in this room to continue to the left. You will soon reach a room on lockdown with a flying molotov bot above, a mortar bot on the middle platform, and a flamethrower bot on the bottom. I suggest making quick work of the flamethrower bot first. Once that’s done, take shots at the flying molotov bot with rockets from down below and then just finish off the mortar bot in between its attacks. When clear, head to the left. The next room can be kind of tricky with all the obstacles. I suggest taking your time with each enemy and then phasing during each jump to avoid the lava and fireballs. Keep going to the left until you reach a large lava pit you can’t see the end of. There will be two flying molotov bots in this room. Make sure to kill both of them and have faith in this jump. You’ll have to double jump to the left and then phase through the flowing lava but you can easily make the jump to the left. Continue upwards and left along the path while being mindful of fireballs. You will soon reach a save station just ahead of a boss room.
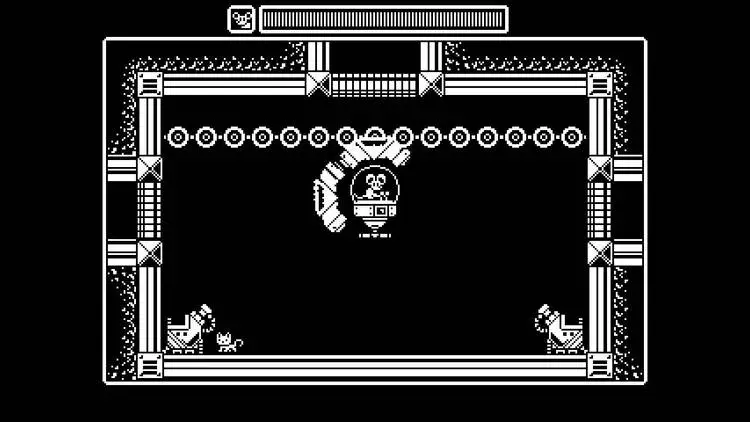
Spider Mech
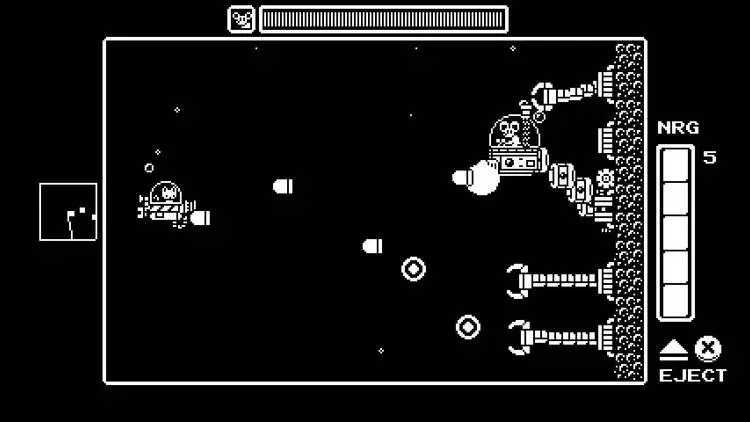
This is by far the hardest boss battle you’ve come across so far in the game. There are two stages to this boss battle, the picture above is from phase 2. The first phase, as you will see when you begin, is two platforms above in the middle and lava across the ground. There are still the platforms on the sides but thy just spit out fire the whole fight so they’re rather useless. The boss will float under one platform, starting with the right, and fire the flamethrower straight up, through the platform its under. Pay close attention to the other arm, it click its fingers a few times, at that point, it will throw a grenade towards the other. Almost immediately after shooting the grenade, it’ll stop firing the flame thrower. There are two good spots to deal damage. One is when it’s under a platform, stand on the edge of that platform it’s under towards the middle of the room and just aim down. The flamethrower won’t hit you here. Just spam rockets and pistol shots until it moves. You can also jump the platforms while its moving and fire straight down as well. After a couple movements, it’ll hide under the lava. At that point, it’ll pop back up and move to the other side of the screen while shooting the flamethrower across. Just phase double jump to the other platform to avoid the flames. Since the save room is just outside, I recommend getting used to avoiding its attacks and the timing of each. Just take your time and shoot rockets straight down at it when it moves into the open until you finish the first phase.After you deal enough damage, it’ll start sucking up all of the lava on the ground and start shooting it straight up. In the process, it will destroy the platforms in the middle. Phase jump through the lava while the lava below drains out of the room until you can safely jump to the ground.Now you will enter phase two of the fight and don’t worry, it’s actually quite a bit easier here. There’s only one pattern. It will keep walking to the right, around the middle of the screen, it will throw a grenade to the left. Once it reaches the far right wall, it will stick its left arm out, which acts as a shield, shoot lava straight up out of its right arm, and charge to the left. Once it hits the left wall, it’ll slowly walk back to the right wall and just repeat this pattern. You can only damage it by shooting the glass bubble that protects the mouse. Just keep jumping and firing away at its bubble. You can either double jump and phase through the lava when it charges or even just phase through its legs. This pattern is really simple and much easier to deal with than phase one. Just fire away and focus on saving what health you have at this point until the mouse explodes yet again.
With the boss defeated, head to the left. Jump up the platform and destroy all the vats of lava here as you climb up. A single rocket or a few pistol shots will do the trick on each one. After the room is clear, leave the room at the top. Pick up the coolant module (room X:1, Y:13.) This module will allow you to fire three rockets before you overheat, a nice upgrade over the two shots you had prior. Start to make your way back towards the save room right before the boss and save it. Drop through the bridge just to the left of the save pad and start making your way down by destroying the dirt blocks with your rocket launcher. The next room is pretty annoying but don’t worry, there’s a save room right after it. Just keep blasting the dirt blocks below with your rocket launcher There is a lot of driller bots here that you can only damage when they hit a wall. With the design of this room, you probably won’t get a chance to deal damage to any of them. Just focus on making it to the bottom of this room. Once at the bottom, head to the left for a save room.
From the save room, just keep running to the right until you find a healthkit module (room X:4, Y:17.) Now head back to the previous room and start jumping up the bridges. Head to the right at the top while digging through more dirt but be careful for those driller bots, they can get annoying here. Keep going to the right until you reach room X:6, Y:16. There will be two doors in this room. Drop down and take the lower door, save your progress here. Continue to the right here until you reach a long room with a lot of dirt blocks. Start destroying the dirt blocks once you get passed the flamethrower bot. You’ll see a small opening under the platforms to the right. Destroy all the blocks here and exit your mech to climb through the hole here. View the image below to see what area I’m referring to. Follow this path to the end for the virtual cat palette module (room X:13, Y:19.) Climb back out and get back in your mech suit.

Head to the right from here and climb all the way to the top along the right half of the room. One of the platforms near the top is tough to reach but you can do it by timing your double jump so your second jump is at the peak of the first. Follow this path up here and you will soon reach a lockdown room. Focus on the flying enemies first and then deal with the driller bot afterwards. Follow the path to the end for a healthkit module (X:17, Y:13.) Head back to the long room the left, room X:13, Y:13. Drop down until you see some blocks you can break in the middle, break them. Now climb up the platforms along the left side of the room until you reach the top. Head to the left here. Keep following this path to the left until you reach room X:4, Y:12. Break the dirt blocks at the start of this room and drop down at the bridge there. Follow this path to the room you fought the furnace in, X:3, Y:13. Break the dirt block here and hop out of your mech. Follow this path to the end for the meowtrix palette (X:4, Y:14.) Head back to your mech suit.
Now follow the path all the way to the right until you reach the long room again, X:13, Y:13. Start to head down until you reach the opening in the middle and go to the right. Enter the door you’ll see here to your right for a save room. Keep going to the right. You will soon reach an area where you can break some dirt blocks in the upper right or drop down. Break those dirt blocks and go to the next room, room X:18, Y:15. Drop down the bridges here and start breaking the dirt blocks to the right. You’ll see a small opening to the right, blocked by a dirt block. Get out of your mech suit and go in that room to pick up the chewed gum palette (X:19, Y:16.) Now get back in your mech and climb back up. The double jump to the top platform can be tough but by timing it right so the second jump is at the peak of the first and firing a rocket straight down, you can make it. You can also get out of your mech suit and carefully head to the left for the save room to get another. Once you’re out of there, head to the right, activate the lift, and return to the Nexus.
Nexus (Revisited 2)
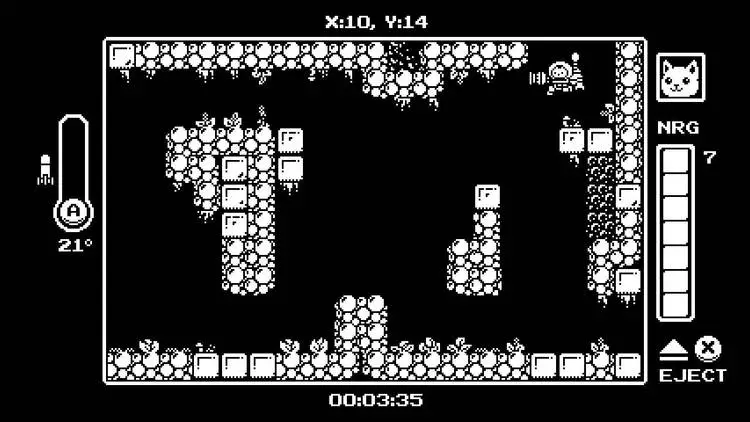
There’s really not much to do here. Once you get back to the Nexus, you want to go all the way to the left until you reach the aqueducts entrance. You can now double jump and phase to the door in the top left corner. You’ll enter a room with a couple armadillos and flying robots but these flying robots will spawn frogs. Kill the armadillos first and then go after the flying robots, finishing off whatever frogs they dropped. Once the room is clear, head to the left for a healthkit module (X:10, Y:14.) Once you got that, head all the way back to the entrance to the heater core and you’ll see the lava to the right has stopped flowing. Follow the path to the right. When you reach the elevator, activate it by climbing up the right wall to the button above. Hop on the elevator and go down to the Ventilation level.
Ventilation
You have to begin your journey through the ventilation stage by heading to the right. Follow the path and be mindful of the enemies when you reach them. I suggest just circling the outside of the room clockwise so you stay behind them at all times. Soon, you will reach a save room so make sure to save your progress. When you save, climb up and continue to the right. Don’t bother climbing the platforms here to go above, it’s too dangerous, just time your movements that you can stay on the ground. Continue around this path and exit the room to the right. This next room will require some wall climbing. Climb the left wall but slowly, there’s some spikes you can easily jump into if you rush. Once you clear the first set of spikes on the right, jump over to the right wall. Continue climbing up until you get over this wall and drop down in the middle of this room. Quickly climb up the right wall before the underwater mines go off and step on the switch at the top. Drop back down and head back up the middle path to leave the room the same way you had entered it. You’ll see steam is no longer shooting out of the opening below, fall through there. Wait for the enemies to both pass to the right down below. Once the path is clear, quickly drop down and go left for the next room to save. Fall down for the room that appears below.
This room may appear tricky at first but it’s not. The driller bot will immediately charge at you. Simply jump over it. You want to keep making this bot charge at you while you jump over it to clear up all the blocks to the lower left corner. Enter that room for a healthkit module (X:8, Y:15.) Now leave the room and continue to the right. You will soon reach another room with a driller bot and this time a flying bot. The flying bot can make this room annoying. You have to get the driller bot to charge to the right. Simply get to the right of it so it charges while making sure the flying bot doesn’t hit you. Once the driller bot clears the path, climb up and down the walls to the right for the next save location. Jump over the armadillos in the next room and continue forward. This next area can be tricky, especially if you rush it, so take your time. Jump in the water and activate a couple mines. You can quickly jump on the platform you just came from, but don’t leave the room, for the mines to explode and leave you safe. Keep doing this, going back and forth to mines, until there are no mines left. Once the room is clear, exit left in the bottom left corner of this room.
This room is a lot easier to deal with. Simply swim through the middle of the mines and quickly jump to the platform above. Just drop into the water below and quickly start climbing the left wall. The tentacles above won’t hurt you unless you jump off the platform into them. Hop on the save pad to the left to save your progress again. Exit to the left here. Climb up the wall and drop down to the left at the top. Try to land in between these two enemies. Just swim under the left one to the next room. If you die, it’s not a big deal since you just passed a save room. The next room could be a little trickier. Follow the path and avoid the three fish when you reach them. If they see you, they will charge you so just be careful. At the top, be careful swimming around the spikes. It’s easy to accidentally jump into the ceiling spikes. Leave the room to the left for another save room. Slowly set these mines off like you did the last time and take your time here. At the next jump, let the frog above jump into the water and wait for all three to float to the bottom of the water. Once they hit the bottom, quickly run to the left, don’t jump or you’ll hit the spikes, and climb to the top of the left wall. Wait for the next frog ahead to jump and jump into the opening to the left here to enter the next room. The rest of this path is safe until you reach a save room.
Fall to the right and you’ll enter a scrolling portion where the mouse pushes a spike wall from left to right. You just have to quickly follow the path to the right until you reach the end. There isn’t much room for error but fortunately the save room is right before it starts so failing doesn’t feel very punishing. You will reach an area where you have to force a driller bot to the right so do that the first opportunity you get. The rest of it is straight forward. When you enter the next room, drop down and you can save as well as getting your mech suit back! Enter the room to your right for some interesting dialogue that brings some foreshadowing to the identity of this talking mouse you keep running into. Jump onto the bridge above and enter the room to the right for the Bigshot module (X:17, Y:18.) This module will make your pistol shots much more powerful as well as have a slightly longer range. With that module equipped, head back to the save room to your left.
Continue to the left and the room will immediately go on lockdown. There’s a bee hive above that you can now reach with your pistol, as well as a flying enemy that drops molotovs that you should focus on. Kill the ground enemies first if they become a nuisance but regardless, the save room is right behind you so you can fill up on health. The next room will also be on lockdown and there are a lot of enemies here. You want to drop down from the bridge pretty much immediately and go in either direction. Just start spamming shots towards the middle. The sides will be safe from the start and you can clear the room rather quickly by getting down there as soon as possible. You’ll need to hop out of your mech suit in the next room. Fall through the opening to the right and run on the treadmill to open the path above for your mech suit. Climb back up and get back in your mech suit. Drop down and kill the enemies here to open up the door ahead to continue through this stage.
Head up to the top of this room while dealing with the enemies along the way. This room can be a bit of a pain since the platforms are small and enemies are all over. The next room from here will go on lockdown but it’s pretty simple, just kill the enemies on the ground first and then deal with the flying bot dropping molotovs. Break away the ground in the next room and follow this path to the end. It’s safe with no enemies. Just hop on the switch and save in the room after that. Now head back by climbing up all the platforms. Break open the wall to the left and climb out of your mech to continue through this area. You will see a small cannon in the bottom left, this is the first thing you can enter other than your mech suit so get in! Hold the fire button and let go when the lines merge as seen below. Keep doing this until the path is clear.
Climb around the room to get out via the top left corner. This next room will also have a couple cannons, one in the lower right and another in the top left corner. Use them to clear the path to go down to the next screen but don’t forget to save before dropping down. Fall down this next room and you’ll see it go on lockdown. There will be an armadillo to your right and it’ll be facing to the right, giving you time to hop in the cannon in the top right corner. Wall climb up there and shoot the armadillo twice to kill it and to open up the next room. The next room will have a cannon in the lower left corner. Hop it in as soon as possible and quickly fire it towards the bee hive. Just keep firing rockets as quickly as you can until this room is empty. Now climb up the wall on the right and use this platform to continue through the path above. Follow the path for a save room followed pretty much immediately by a boss battle.
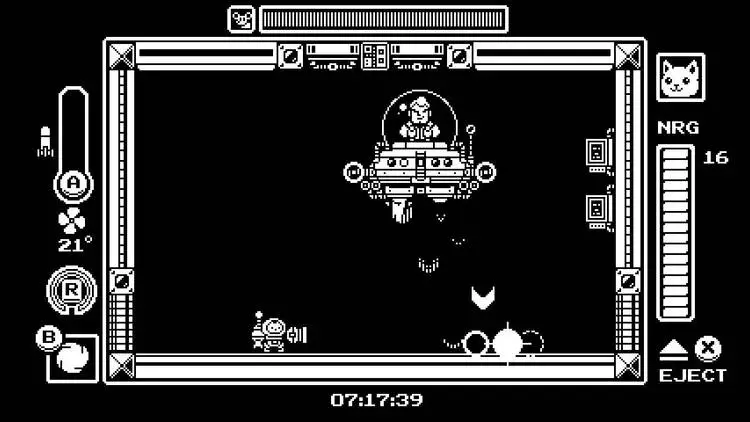
Air Mech
Considering the fact that you do not have a mech suit and can die in one hit, this boss is surprisingly simple. There are two cannons in this room, one in each lower corner. The boss will float around aimlessly, sometimes throwing bombs downward. Just hop in the cannons and keep spamming attacks. The boss will bounce around a bit but its so big and the room is so small, you barely have to even aim, it’s so easy to hit it. After a little bit, it’ll stop in the middle and you’ll see a laser go across the room. At this point, hop out of the cannon. The laser will rotate around the room, wait to see what direction it goes in, and quickly outrun it. You can climb up the walls and run across the bridge, jumping down at the other side. Just keep circling the room to avoid the laser until it stops, then hop in the cannon and keep going. If you take a hit, you’ll die, but if you’re in the cannon, you live, it just temporarily disables the cannon. You’ll see it smoke for a few seconds but you still live. The cannons only get disabled if you’re in them while they get hit. Just keep spamming rockets at this boss and outrunning the laser whenever that attack comes up until the boss dies.
With the boss defeated, head to the right and follow this path for the final switch of the ventilation level. With the switch activated, head back to the boss room and now head left. This room is kind of annoying to start but you have to jump on the air vents to float up and move the left to start climbing up that wall. It takes a few tries to time it right, it’s easy to miss that wall. Once you get up the first platform, the rest is easy, just wall climb up the right side all the way to the top, don’t bother jumping up the platforms and riding the air vents. Head to the right at the top room and you’ll reach the elevator to head back to the Nexus but don’t head up there just yet. Drop down the hole to the left of the elevator. Fall to the left and step on the save switch. Drop down here and you’ll be in that long room you had to outrun the mouse. Head to the left for the grape palette module (X:5, Y: 17.) Head to the left and ride up the air vents. Once you get to the top, head to the right and you’ll see the elevator again for the Nexus but again, don’t use it yet!
Instead, follow the path to the right. It’s all along one path and you’ve done it before so I won’t go through too many details explaining how to get through this. Head all the way along the path until you reach the room with the underwater mines. Instead of going down, climb through the opening in the upper right corner. This path is now open, step on the switch to get a mech suit. Head to the right for a room on lockdown. This room is pretty simple, just head to the right and shoot the enemies as you see them. There’s a couple tentacles on the right side that you’ll have to kill after the flying enemies. Continue to the next room when this one is clear. Head to the left and kill the flying enemies as you see them. Blow up the dirt blocks with your rockets while you head to the left. Ride up the air vents on the left side of the next room and enter the next room in the upper right. This room will go into lock down, focus on the flying enemies first and then clear the tentacles after. Pick up the Gris palette module (X:16, Y:13.) Now head up and follow the path to the left. You’ll have to jump out of your mech to get in the water and you’ll reach a familiar area. Head up via the middle path and drop down on the left. Go up in the next room. Follow the path to the left until you reach the elevator to go back to the Nexus. Now that you’ve completed everything in the Ventilation zone, it’s time to head back to the Nexus.
Nexus (Revisited 3)
Head out of here to the left and your mech suit is still waiting for you. Hop in and double jump out of here to the left. When you reach X:18, Y:15, jump up the platforms and go left in the top left corner. Hop out of your mech and jump to the left. Climb up the wall here and follow the path. At the end of this path, you will find the Swamp Matcha palette module (X:21, Y:13.) Head back to your mech suit and drop straight down in this room. Exit via the bottom of the room to talk to Rebba who will give you the Repeater ability (X:17, Y:16.) You need a total of 7 cartridge modules, which you’ll have by this point in the game if you have been following this guide. Now head to the computer to the left in room X:16, Y:15. You’ll find out you need to get the password decoder, which is on Gary’s ship. Head to the left and up the elevator to go back to the Landing Site.
Landing Site (Revisited 1)
Just head back to Gary’s ship. If you don’t remember the way, once you leave the Nexus, go right, then up the first chance you get, and right once you can’t go up anymore. The ship is right there in room X:7, Y:8. You’ll see the bottom of his ship has exploded! Just double jump in there. You can step on the switch to the right for some dialogue and pick up the decoder module to the left. Drop out of the ship. From here, we can head back to the Nexus but first let’s grab the final cartridge module in the Landing Site. Head all the way to the right here until you reach a wall. Start to go down and go right the first chance you get. You’ll enter room X:15, Y:10. Jump on the platform shown in the screenshot above, then to the top right platform, and double jump to the right to exit this room to the right. Here, you will find the nicotine palette cartridge module (X:18, Y:10.) Once you have that, head back to the Nexus. Just go left as far as you can, then up as far as you can, and then left until you clear the water past Gary’s ship. From there, go down and left the first chance you can to reach the elevator for the Nexus.
Nexus (Revisited 4)
You can head to the right to unlock the elevator with the decoder. Ride the elevator down to the Incubator.
Incubator
Start off by heading to the right. You can step on the switch for some more storyline dialogue. Look at the wall above the left exit of this room. You’ll see some dirt blocks you can destroy. Jump and fire a rocket at them. View the screenshot above and look at where Kiki is, that’s where you need to fire the rocket. Climb up and jump out of the top of this room for a hidden tamagato palette cartridge module (X:15, Y:13.) This is the last cartridge module of the game! Time to head back to Rebba in the Nexus and collect your prize! Head down and back to the level to ride the elevator back up to the Nexus.
Nexus (Revisited 5)
Simply head to the right and go down in the next room. Now that you have all of the cartridge modules, Rebba will give you the hopper module (X:17, Y:16.) Now climb back out, go to the left, and take the elevator down to the Incubator.
Incubator (Revisited 1)
From here, you have all the abilities, all the cartridges, and only need one more healthkit module, which is in the incubator. There’s no reason to backtrack to the Nexus anymore! Head to the right. This path is very simple, there’s a couple beehives up high and the rest is tentacles. After you reach the long room, you’ll enter smaller room, room X:21, Y:14. Break the dirt blocks to the right and enter this way. You will need the hopper ability to clear this area, it’s just for a healthkit module so it’s not necessary. The hopper ability will allow you to reset your spin jump charge with a phase. You want to spin jump, phase, spin jump, phase, over and over to get higher and higher to reach the top of this room. Be careful near the top because there are spikes on each side of the wall. At the top, go right. Now spin jump and phase to the right until you reach the end of this room. Drop through the bridge for the final healthkit module (X:23, Y:13.) Now climb back out and do the same thing, spin jump and phase, to get back to the left. Simply drop down the next room and continue to the left.
Break the containers to the left and go down here. Head to the right. You’ll see some orbs. Each orb has to be shot to be destroyed and they all contain a bee. Simply use rockets to just destroy a set of orbs and then kill all the bees with another rocket. Keep going right here for a save room. Now head back left and drop down. Slowly make your way to the left and be careful to avoid the frogs. Just let them jump in the water. Don’t forget, your mech suit hates water, so jump across the platforms here. The next room to the left will go into lockdown. There’s two turrets like the ones you ran into in the aqueducts. With the repeater module, you should be able to make much quicker work of them. Just stay on a higher platform below them and fire away with your pistol, only moving to avoid its own shots. Clear the room completely and continue to the left. Save your progress here.
Keep following the path to the left and phase jump through the lava and fireballs ahead. This is made slightly easier with the hopper ability but don’t worry if you don’t have it, it’s certainly not necessary. Your next room will go on lockdown. Kill the flamethrower bots below first and then just double jump to the mortar. You’ll have to time your double jump to be at the peak of the first or just shoot a rocket straight down to boost you up to the platform. Kill the mortar to unlock the room and continue to the left. Leave your mech suit on the platform at the top of this room and jump into the submarine as Kiki. Look at the screenshot below to see where you need to leave your mech suit.
Head to the left slowly and kill everything in this room. The mines can be destroyed with your submarine, it’s safer to just keep your distance and kill them than to trigger them and run. Once the room is clear, the lockdown will end. Head back to the middle and jump out of your submarine. Climb out of the water and jump onto the treadmill Keep running on it until your mech suit comes to the far left. Hop in and jump onto the next platform just to the left. Leave your mech suit again, jump in the water again, and swim to the left. Climb out of the water on the far left side and use this treadmill. Hop in your mechsuit when it’s safe and leave this room to the left. Spin jump to the moving platform to the far left here. Now head back to the previous room and enter the submarine. Move it to the left and kill the squid in this room. Go down cautiously and kill the final two enemies in this room. They’re kind of annoying since they shoot shots in every direction and are in a tight spot but this room is in lockdown so they have to die. Once these three enemies are dead, go down and get out of your submarine to continue forward. Use the treadmill at the bottom to bring your mech suit down.
From here, there are two directions. To the left, you can circle back and head back to the Nexus. Assuming you have followed this guide from beginning to end, you will already be at 100% and have no reason to go back. If you are not at 100% and would like to be, just go left, there is a save room further left, and climb up the room to the top. You’ll have to hit every switch on the way up while killing some enemies in your way to reach the next room, which will be on lockdown. Clear this room and you’ll be back to the beginning. If you do not need to backtrack for items, go to the right. Get out of your mech suit and climb up to the top left corner. Hop in the turret and blow out the dirt blocks here. Move the treadmill to open the path below and jump back into your mech suit. Spin jump up to the top and go to the right. This is the elevator to the laboratory. There is a save room to the right as well. Once you go down, you cannot return!! Make sure to only go down to the laboratory when you are ready!
Laboratory
The start of the laboratory stage can be pretty tough. They throw a lot of enemies at you. You will have to take a very long elevator ride. It starts with bullets coming down at you from the top of the screen. There’s one open spot that you’ll have to run and get to so you don’t get hurt. After a few rounds of bullets, it will drop a line of frogs in the same fashion. Nothing will happen until all the frogs are dead so you can take your time clearing here. This will cycle a few times, then they start throwing some flying enemies that charge at you. After a few of those, you will start getting some flying enemies with bullets coming at you from left to right, then right to left, and alternating back and forth. The only way to avoid those bullets is to phase through them. Those bullets will keep coming for a bit while the game keeps throwing more and more flying enemies at you. Soon, the bullets will stop coming from each side but you will see small openings on the walls, turrets will appear in these openings and alternate sides on each pass. This section is a couple minutes long of just fighting enemies. The more healthkit modules and abilities you have found, the easier this section will be. There is a save room right at the bottom of this elevator ride so you’ll get full health once you reach the end.
This next room is a bit longer but not too challenging. The only new thing you will see that might challenge you here is the crushers from the ceiling. Just stand still entering this room and you will see them come down. Other than that, there’s nothing you’re not used to and the enemies are spaced pretty far apart. Just kill the enemies from a distance and make your way across. There are also some conveyor belts but they shouldn’t pose a challenge, maybe the end of the room where it forces you into a crusher but just keep an eye for that one. Enter the next room, it will go into lockdown. You’ll face a flying bot and a new enemy. This armored bot will walk around with armor on, making it invincible, and then jump to fly around a bit before hitting the ground again. You’ll see when it’s flying, it will open up to reveal a propeller. This is the only time you can damage this robot. It’s easy to deal with, just keep your distance and wait for it to fly before attacking it. Continue to the right dealing until you’re forced to go down. Head to the left once you drop down the bridges for a save room.
Head to the right and just phase through these swinging balls. Kill a turret ahead when it pops out of its shell. Be careful after that, there are a lot of swinging balls, conveyor belts, and a crusher. Take your time here and try to stop between each obstacle rather than rushing. The next room will go on lockdown with a single flying robot that fires homing rockets. This robot is really easy to deal with, just hold fire with your pistol to keep stunning it until it dies. The next room will also be in lockdown and this one is a bit tougher. There is one of those armored bots that you can only damage when they fly, another robot with homing rockets, and a turret with a shell to the far right. Try to get the armored bot that you can only damage when it flies first, then go after the homing rocket bot, then finish off the turret. You’ll have to go down in this next room. This room is tricky so take your time. There are a few turrets with shells on each side, swinging balls, and conveyor belts on every platform. Just take them one at a time and move only when its safe. Just focus on staying alive here because the next room is a save room.
Drop down and you will face a rather intimidating robot. Don’t worry though! Even with how large this bot looks, it’ll be the easiest fight of the laboratory. Break the boxes in front of it and it’ll slowly walk towards you. It will try to punch you with an extending arm. Simply double jump over it and you’ll be in its massive blind spot, behind it! Simply fire away until it dies. Go left and start climbing up these platforms. There’s only a couple turrets and one flying bot with homing rockets. Kill them during your climb and exit in the top left. This next room will have a few crushers on sets of conveyor belts. This may look intimidating at first but fear not! Wait for the closest crusher to go back up and keep phasing to the left until you reach the next set of crushers. Do the same thing here to reach the next room safely. The next room will go on lockdown with a turret above and a large robot right in front of you. Just fire away at the large robot and then jump to the turret. Continue to the left for a homing rocket bot and an armored propeller bot. Kill them while avoiding the crusher here. Enter the next room once it’s open. This next room can be kind of tricky with two large bots. One is easy to deal with but two can annoy you. Try to get them to one side of the room and just fire away from the other, but that’s dangerous too. You can try to just quickly destroy the dirt blocks in the top left corner and just spin jumping up there. You’ll have to phase to recharge your spin jump since a simple double jump won’t get you up there. The best thing to do is probably just try to skip the bots in this room and just advance to the next.
Your next room will be pretty simple if you take it slow. There’s water down below and conveyor belts above but just focus on killing the enemies from a distance. When the path is clear, continue to the next room. This room will be in lockdown with a couple flying enemies. Try to kill the top enemies first. When the armored enemy below goes to the right, jump to the far left. Just keep your distance here and kill the armored enemy when it exposes itself. Then focus on the large bot to clear the room. Leave the room to the left for a save room and give yourself likely some much needed health at this point! Follow the path ahead for a boss battle.
Mech Gary
If you have been following this guide, you’ll have all of the abilities and power ups, making this fight pretty simple. There are a few attacks this boss has and you should note each one carefully so you know what is the best opportunity to attack.The first phase is the boss moving left and right in a waving pattern. This is the best time to attack. He will only sometimes randomly fire straight down. Just double jump and attack whenever you can. Phase when he passes over you to avoid any potential shots.The next phase will be when you deal enough damage, he will crash to the ground. He will bounce back and forth, no longer firing shots, until he eventually stops. You can double jump over him but I suggest phasing as well to avoid any potential damage.Once he stops bouncing from the above phase, he will slide left and right. Simply double jump to avoid his charges.Those three movements are the best time to attack. This is the majority of his movements. After a while, he will change it up with the following attacks:He will fly left and right in a straight line, rather than the wave pattern, and fire a turret straight down. The only thing you can do here is phase through his bullets to stay safe. You won’t really be able to deal much damage here unless you’re really quick and the damage will be limited. I suggest just focusing on not getting damage.He will also have a crusher. The movement is the same as above, just left and right in a straight line. The only difference is randomly crushing down on the ground directly below him. Again, it’s kind of tough to deal damage here so just focus on defense. Just keep running away and phasing whenever you go under him to avoid any potential attack.That’s all there really is to this battle. I suggest going into full attack mode when he’s moving in a wave pattern then going into full defense mode when he’s just going left and right in a straight line. Once you deal enough damage, the boss will bounce off the screen to the right and disappear… for now.
With the boss defeated. Head to the right for an empty room. Go ahead again to fight Gary yet again! That was fast…
Human Gary
This fight is pretty straight forward. He jump around a lot, shoots a machine gun at you, and throws grenades. When the grenades explode, fire will spread across in both directions on the floor. This boss battle is tough since he moves and attacks so often! That is, unless you cheese the fight fairly easily. You will have figured out by this point that a spin jump can damage enemies and every time you, you recharge your spin jump. Gary keeps trying to rush at you so simply spin jump and land on top of him. His health only goes down on every other spin jump so know you are doing damage! Since the boss is constantly trying to jump at you, you should easily be able to keep spin jumping onto him without ever touching the ground. If you do touch the ground, be ready to avoid his machine gun and grenades but just spin jump again onto his head. Just keep doing this for a disappointingly easy final boss fight. If you really want a challenge, you can try to kill him with weapons but there’s not much strategy other than just keeping your distance and firing away.
Once you’re done with the fight, head to the right and follow Barkley to the end of the game! Congratulations! You just completed Gato Roboto!
Abilities
There are a total of 8 different abilities in Gato Roboto. Some are required to progress through the game while others will simply help you in your progress through the game. This section will describe where to find each, when you can get them, and what they do. I also included maps for each level with abilities. The number will show the location of the ability numbered below each map.
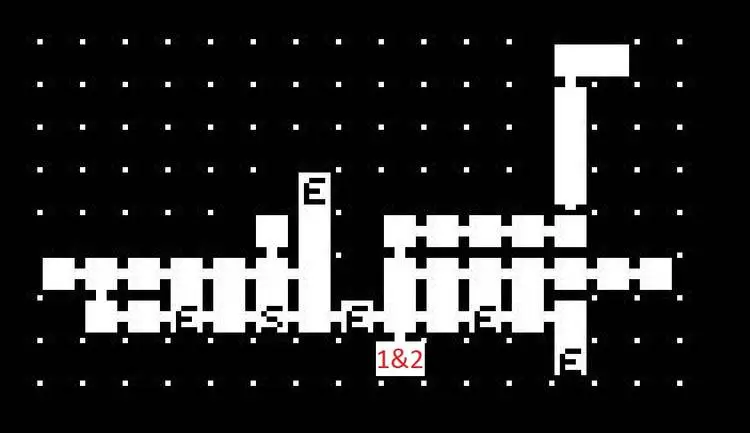
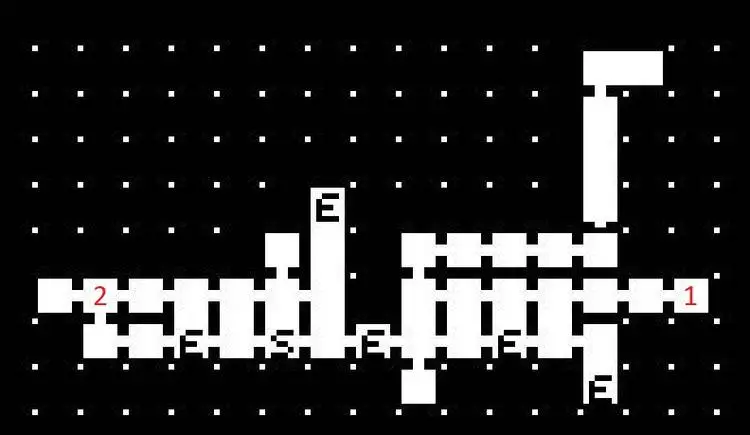
Landing Site
- Rocket Launcher – X:8 ,Y:14 – You have to pick this up to progress through the stage and it cannot be missed. It allows you to fire rockets by pressing the A button. You can see the temperature gauge for your rocket launcher on the left side of the screen. This will deal a lot of damage to enemies and destroy certain blocks to open new paths. It will also bump you back a little bit with every shot, keep that in mind if you are right next to an enemy.
- Decoder – X:8, Y:7 – This is the inside of Gary’s ship. This can only be accessed after you complete the Aqueducts, Heater Core, and Ventilation levels. The only purpose of this ability is to unlock the computer that will open up the elevator to the Incubator.
Aqueducts
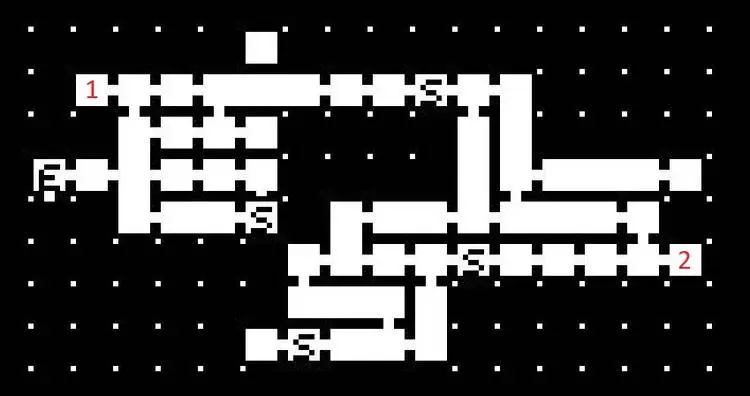
- Spin Jump – X:24, Y:10 – Once you turn off the final pump in the aqueducts, head to the right and drop down when you are forced to. Break the blocks to the right and follow the path to the lower right until you run into the spin jump module. This will give you the ability to double jump your mech. This will not only allow you to reach new places but will also help big time in dealing with enemies. Landing on an enemy will actually deal damage while spin jumping and give you a boost in the air.
Heater Core
- Phase – X:11, Y:14 – The phase is kind of like a blink ability. You will become invincible and phase ahead in the direction you are facing. This is necessary to get past lava walls. It will also allow you to go through enemies or attacks to stay safe. Activate this ability by pressing R.
- Coolant – X:1, Y:13 – The coolant is a passive module that will allow you to fire three rockets before you start overheating rather than just one. This is found two rooms after the heater core boss. You could technically miss this but considering your natural reaction will be to continue forward through a room, you probably won’t.
Ventilation
- Bigshot – X:17, Y:18 – This will be to the right once you get your mech suit back in the Ventilation level. The bigshot module will make your standard pistol shots more powerful and have a slightly longer firing range.
Nexus
- Repeater – X:17, Y:16 – Rebba is in these coordinates in the Nexus. If you bring her 7 cartridge modules, she’ll give you the repeater ability. This ability will allow you to just hold down X to fire your pistol like a machine gun.
- Hopper – X:17, Y:16 – Rebba will give you this after you collect all 14 cartridge modules. Phasing will now recharge your spin jump ability, allowing you jump pretty much any distance.
Healthkit Module Locations
There are a total of 10 Healthkit modules in Gato Roboto and they aren’t forced upon you. Each one you pick up will give you 1 extra max health. If you have taken damage before picking up a healthkit module, it will also fill your health to max as well. In this section of the guide, I will show where they are and how to obtain each one.
Landing Site
- X:4, Y:8 – This one is in plain site. You pass the door very early in the game but can’t open it without the mech suit. You have to head by this door again when you get the mech suit so just remember to open it on your travels for a healthkit module.
- X:18, Y:12 – After defeating the boss in X:14, Y:12, head to the right until you reach a set of dirt blocks you can destroy over water in X: 16, Y12. Jump out of your mech suit and dive into the water. Head to the right all the way until you reach the healthkit module.
Nexus
- X:23, Y:14 – You need the spin jump module to reach this. When in the Nexus, go to the far right until you reach a tall room with two doors on the right wall. Enter the upper door here. Just run to the right until you reach the healthkit module here.
- X:10, Y:14 – After you get the phase ability, you need to head to the entrance to the Aqueducts. Double jump and phase jump up to the top left door and clear the lockdown room. Enter the next room for this healthkit module.
Aqueducts
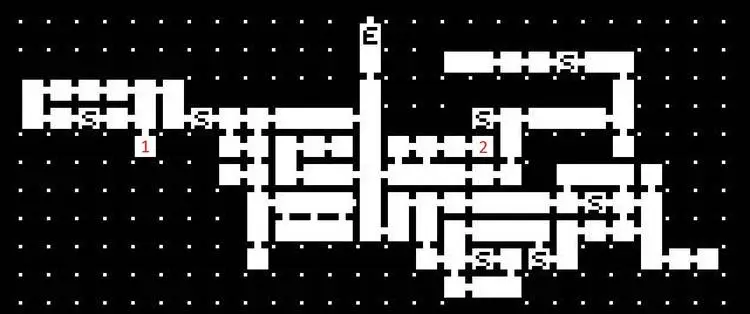
- X:4, Y:6 – After you disable the first pump, the water above this room will get drained away. Simply fall down to the bottom of the room above and break away the dirt blocks in the lower right corner to drop in. You will likely see these dirt blocks while swimming down here before you turned the pump on.
- X:16, Y6 – You will need the spin jump module to get this healthkit module. In the long room at the start of the Aqueducts, there will be two doors on the right wall. Enter the upper of the two right doors, it’ll be around the center of the room. Head to the right and break the wall of blocks with a rocket. Jump on the next platform and double jump into the opening above. You want to time your second jump to be at the peak of the first jump and hug the right wall. It’s kind of tough so just keep trying until you get up there, it has to be a near perfect jump. Once you get up there, head to the right and break the block in the lower right corner of the next room. Climb in there for this healthkit module.
Heater Core
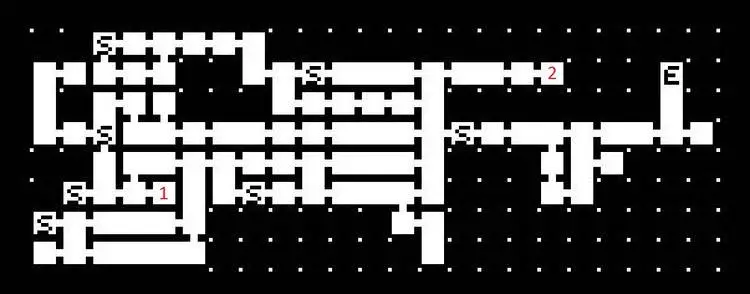
- X:4, Y:17 – From the boss room, head to the right and start digging down through the dirt with rockets. Once you reach the bottom, just keep running to the right and the healthkit module will be right there.
- X:17, Y:13 – After you complete destroy the heater core and the lava hardens up, head to the long room near the beginning of the stage. Climb all the way up to the top via the right side and head to the right. Follow this path until the end to find this healthkit module.
Ventilation
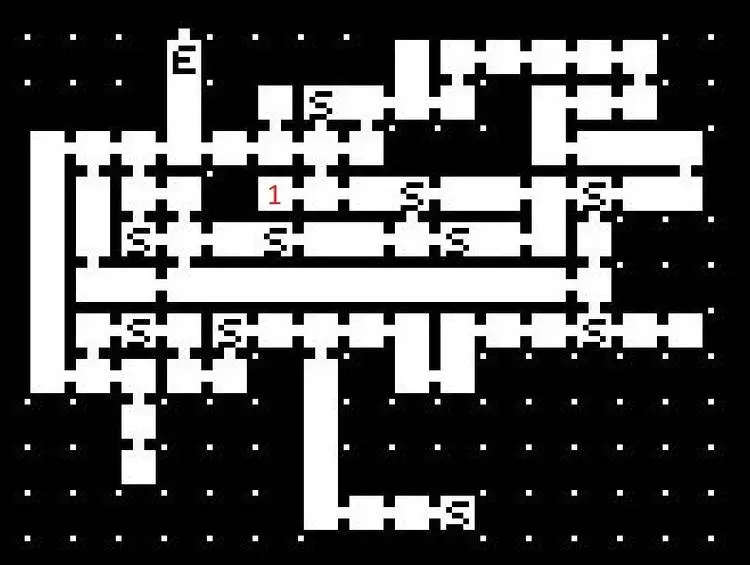
- X:8, Y:15 – It’s hard to point at coordinates since you don’t have a mech suit for a good portion of this level. In the first room you enter with a driller bot, which will be the first room after the second save room, let it drill out all the dirt blocks until you can leave the room in the lower left corner. The healthkit module is in that room.
Incubator
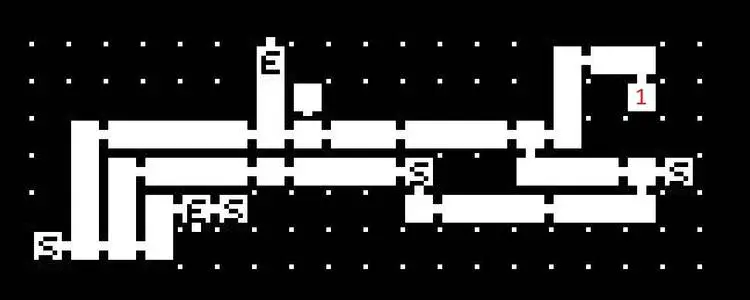
- X:24, Y:13 – You have to have collected every cartridge module in the game to reach this one. From the beginning of the Incubator, head all the way to the right until you reach a tall room. You will need the hopper module here. If you spin jump and then phase, you can spin jump again. You have to basically spin jump, phase, spin jump, phase, spin jump, phase over and over and over to get higher and higher to the top of this room. Be careful, there are spikes at the top on each wall. Once at the top. Go to the right. Spin jump and phase across this room, try to phase through the flowing lava here. Drop down at the bridge ahead for the final healthkit module of the game.
Cartridge Module Locations
There are a total of 14 different cartridge modules. In this section of the guide, I will list what they do and where to find them. Each cartridge only adds a new color palette that you can change the appearance of your game with. It’s all personal preference for which color you want to play with. You do want to pick these up though as you will need 7 cartridges to unlock the repeater ability and all 14 to unlock the hopper ability from Rebba in the Nexus level.
Landing Site
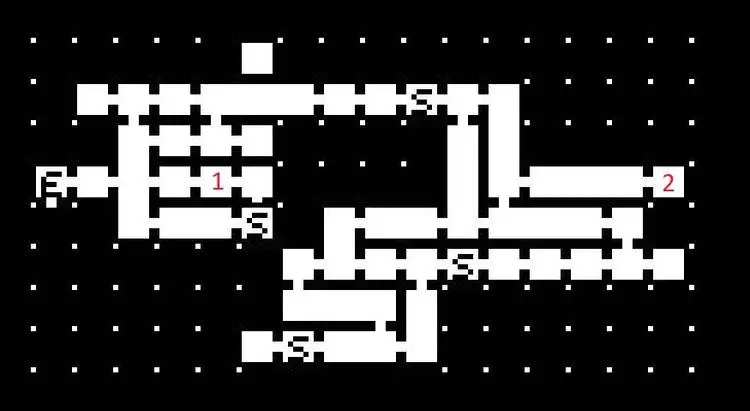
- X:7, Y:10 – This is the first cartridge module you will find. Before taking the elevator to exit the landing site and enter the Nexus, you will see a single dirt block to the right in room X:5, Y:10. Just destroy it, jump out of your mech suit, and follow the path to the right until you reach the cartridge module. This is the bark palette.
- X:18, Y:10 – This is only obtainable with the spin jump module. Whenever you get that, you can head back to the landing site. From Gary’s ship, just go to the far right until you’re forced to go down. Go right the first chance you get and spin jump to the next room. This is the nicotine palette.
Aqueducts
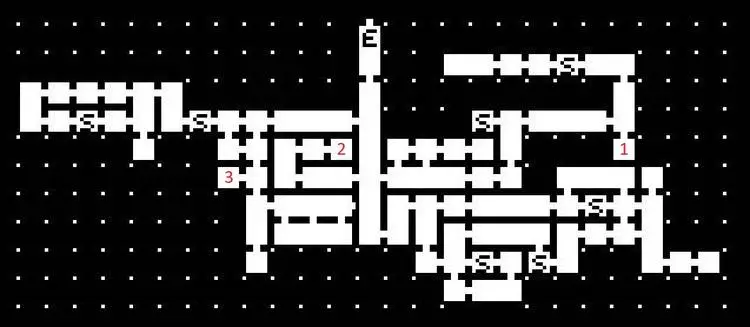
- X:21, Y:6 – After draining the second pump, you’ll head to the right and then go down. Before you go left, you’ll see a dirt block in the lower right corner. Break it open with a rocket and climb down here without your mech suit to reach it. This is the starboard palette.
- X:7, Y:7 – From the long starting room of the Aqueducts, go down to the bottom and look at the left side. There is one set of dirt blocks you can destroy with rockets and reveal a new room. Enter it with the spin jump module. You will see mines floating on chains. Simply spin jump onto the mines (your spin jump will allow you to bounce off them and perform another spin jump) and bounce across this room. Follow this path until you reach the lockdown room. In that room, blast open the dirt blocks to the left and pick up the goop palette.
- X:11, Y:6 – You can reach this after you drain all the pumps in the Aqueducts. After you clear this stage and start heading out, you’ll get all the way back to the first room, the room with the lift to the Nexus. Start climbing up and open the first door on the left side. This is not the door with the blocks you blow away, it’s just a door you shoot to open. Follow this path to the end and open a path with a rocket in the room with the computer to reach this. This is the port palette.
Nexus
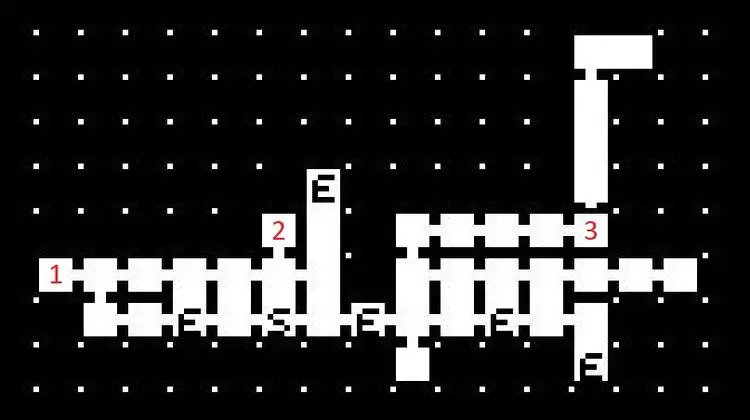
- X:9, Y:14 – Once you clear the aqueducts level, you’ll head back to the Nexus. Once you enter the Nexus, jump to the left and break the dirt block in the lower left corner of this room. Jump out of your mech suit and follow this path to the end for the coffee stain palette.
- X:14, Y:13 – This one is a really pain to get. I suggest waiting until you get the phase ability before trying just to make it easier. Head to the spot above the save platform to the left of the elevator to the landing site. You have to double jump to the right and time your second jump absolutely perfectly to land on a platform to the upper right on the next screen. If you miss, you drop down and have to circle around. I suggest waiting for the phase ability so if you miss, you can just phase back to the left and save yourself some time from circling around. This took me several attempts until I finally got it, your jump has to be perfect. Once you land on the platform, follow this path up to the urine module.
- X:21, Y:13 – After you complete the ventilation level, leave the ventilation room to the left. Head to the next room to the left, past the elevator to the heater core. Start climbing the platforms and leave this room to the upper left. You’ll have to leave your mech suit and wall climb up the left wall into the small opening here. Following this path to the end for the swamp match palette.
Heater Core
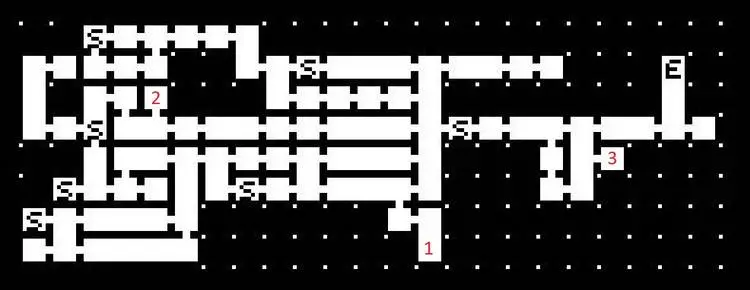
- X:13, Y:19 – After you break the lava vats when you beat the boss, head to room X:10, Y:17. Break the dirt blocks towards the right side until the path is clear. Jump out of your mech and follow this path to the end to pick up the virtual cat palette.
- X:4, Y:14 – After you break the lava vats when you beat the boss, head to where you fought the second furnace, room X:3, Y:13. Break the dirt block and hop out of your mech suit. Fall through this hole and follow the path to the end to get the meowtrix palette.
- X:19, Y:16 – This will also have to be completed after you break the lava vats. If you look at the map, there will be one room unexplored in the lower right corner of the map. You’ll have to break the dirt blocks there with your mech and climb through out of your mech to get the chewed gum palette.
Ventilation
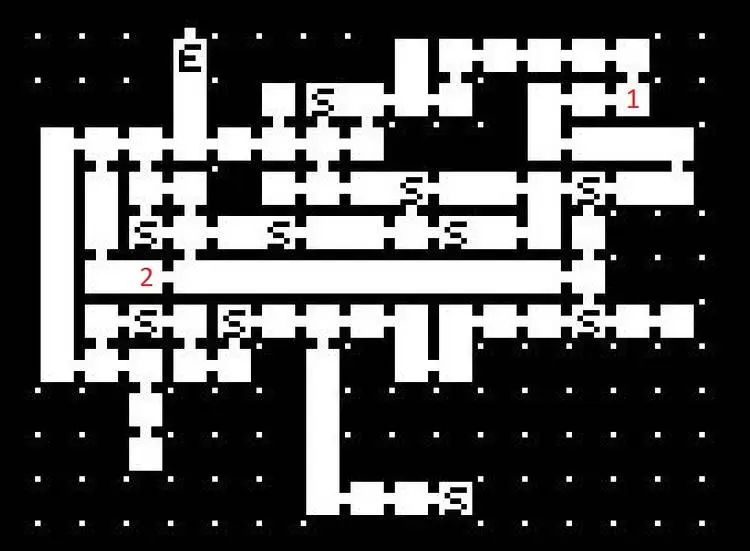
- X:16, Y:13 – After you shut off the air vents at the end of the ventilation area, head to the start. Go right and follow the path until you reach the room of underwater mines. Jump up to the upper right here and follow this path until you reach the gris palette.
- X:5, Y:17 – This can also only be reached after you complete the ventilation room. From the starting elevator, go to the left and drop down. Drop to the left and fall into the long room you had to outrun the spike wall. Just go left and it’s right there.
Incubator
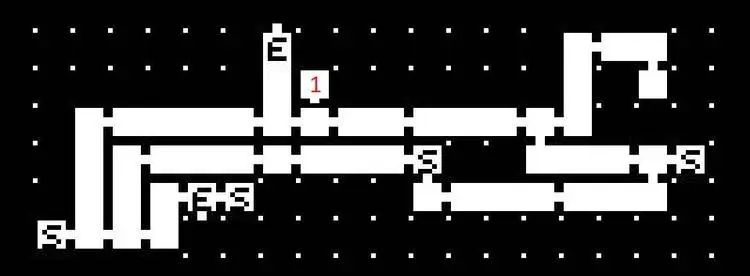
- X: 15, Y:13 – This one can very easily be missed. Once you enter the incubator, go one room to the right. There’s a switch with a computer here. Look above the left exit and you’ll see some dirt blocks on the wall. Jump and blow it up with a rocket. Climb through here and jump up into the next screen above. The tamagato palette is up here.
Maps
This section will not include any instructions and will only include maps for every level as well as locations of healthkits, cartridges, and abilities. I will simply list them with red text with H for healthkits, C for cartridges, and A for abilities. This section is meant for somebody who just wants some guidance on where something is rather than a walkthrough on how to get it.
Landing Site

Nexus
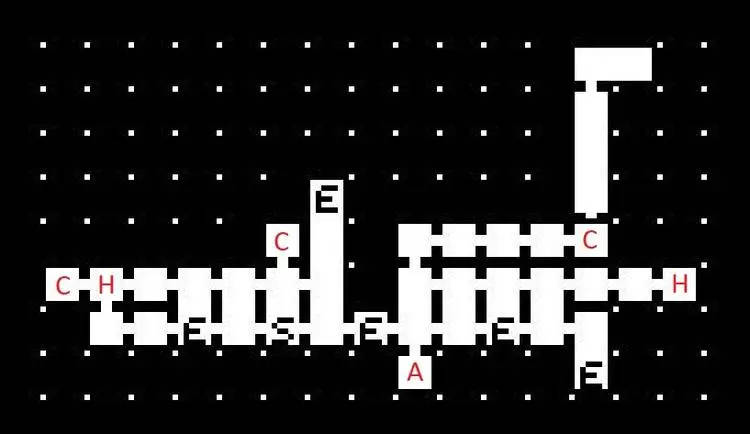
Aqueducts
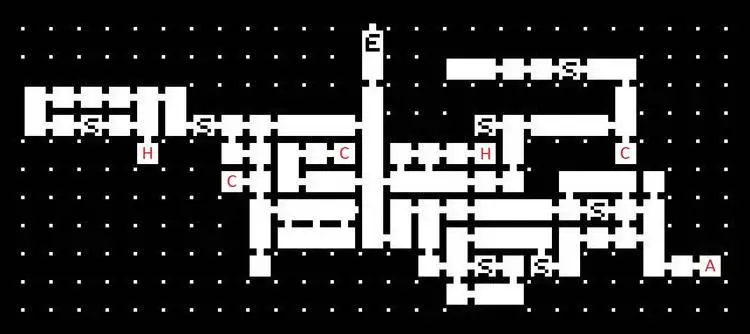
Heater Core
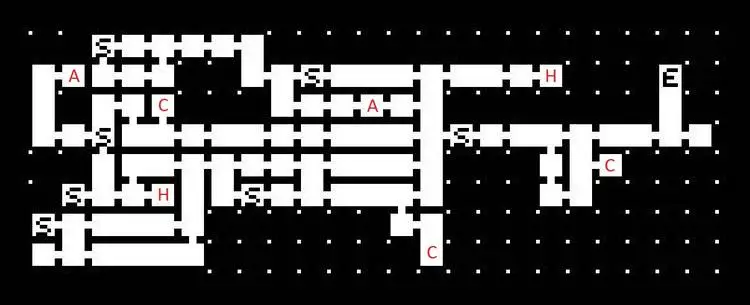
Ventilation
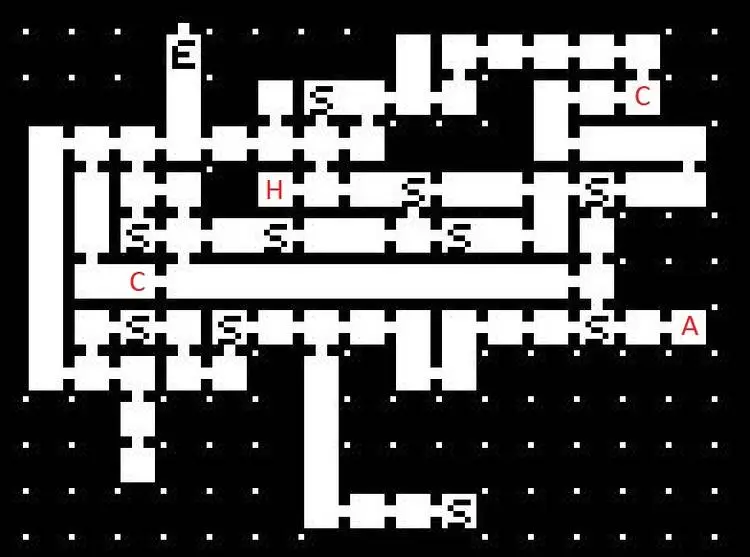
Incubator
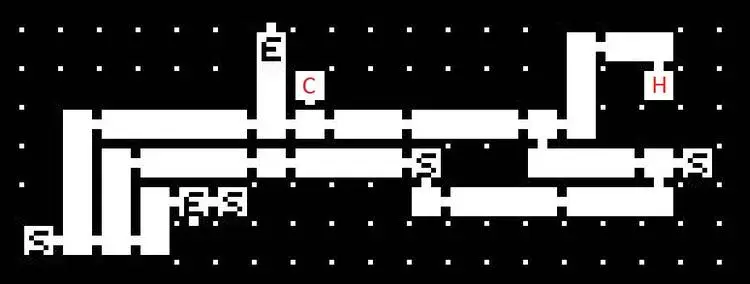
Laboratory
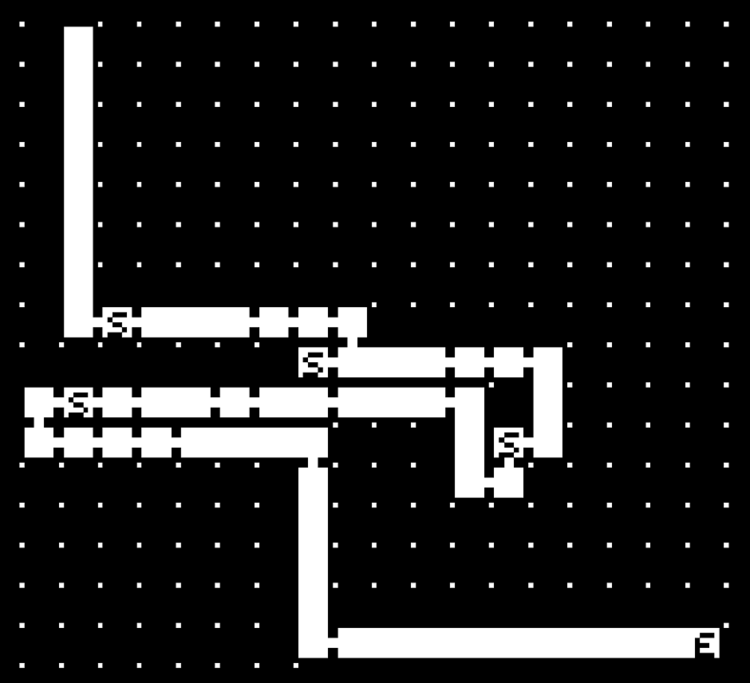
")
")
Facebook Comments