![Revolution Arena [English Version]](https://revolutionarena.com/english/wp-content/uploads/sites/4/2024/07/Revolution-Arena-ISSN-2966-2117.png)
")
SteamWorld Dig 2 – Complete Walkthrough (Step by Step Guide)
July 22, 2024Table of Contents
- Complete Walkthrough (Step by Step Guide)
- Secrets
- Caves
- Upgrades
Complete Walkthrough (Step by Step Guide) of SteamWorld Dig 2
SteamWorld Dig 2 is a Metroidvania action/adventure platformer. This cute little adventure game allows you to progress through a large world as you unlock new items and upgrades. This will also require you to backtrack a bit to unlock even better upgrades as you can open up previously inaccessible paths.
Since there aren’t levels in this game per se, I will list each section of the walkthrough as current objective. The objective can always been seen from the pause menu in the lower right corner. For brief objectives such as talking to the mayor, I’ll mix a couple together. Within each section, I will point you in the right direction to find all the secrets, artifacts, and upgrade cogs as you progress through the game.
This guide is copyrighted © 2018 to Frank Grochowski. For any questions or critiques, feel free to contact me at FrankTheTank3388 [at] gmail [dot] com
| Look Up/Climb Ladders | Up |
| Look Down/Climb Ladders | Down |
| Move Left | Left |
| Move Right | Right |
| Jump | B |
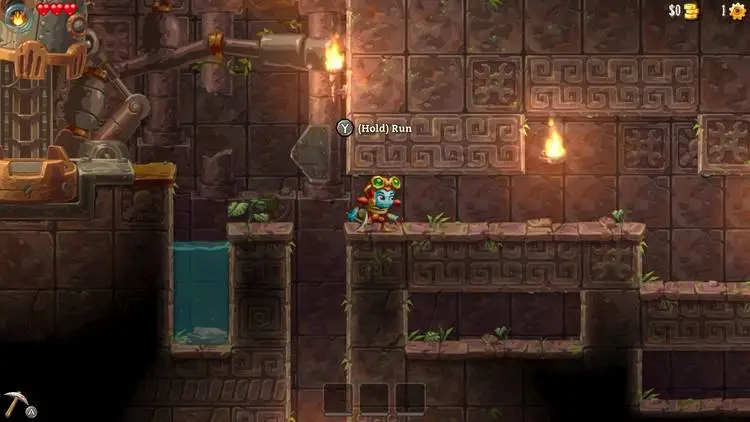
| Run | Y |
| Use Pickaxe | A |
| Use Pressure Bomb | X |
| Use Jackhammer | L or ZL |
| Use Hook Shot | R or ZR |
| Interact | Up |
| Talk to Companion | – |
| Skip | X |
| Pause | + |
Tutorial (Pre-Ojective)
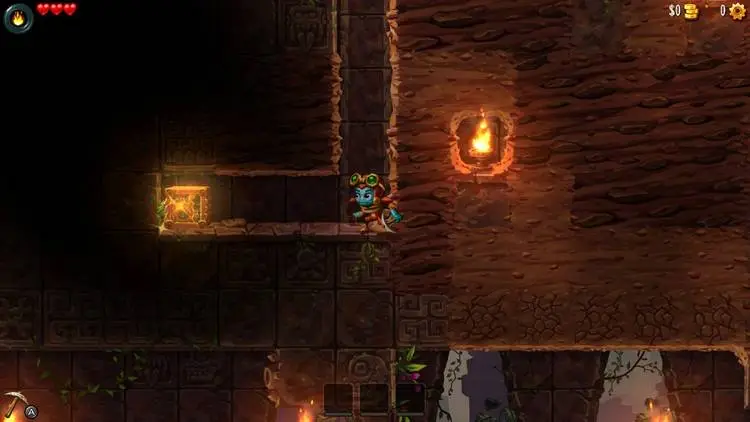
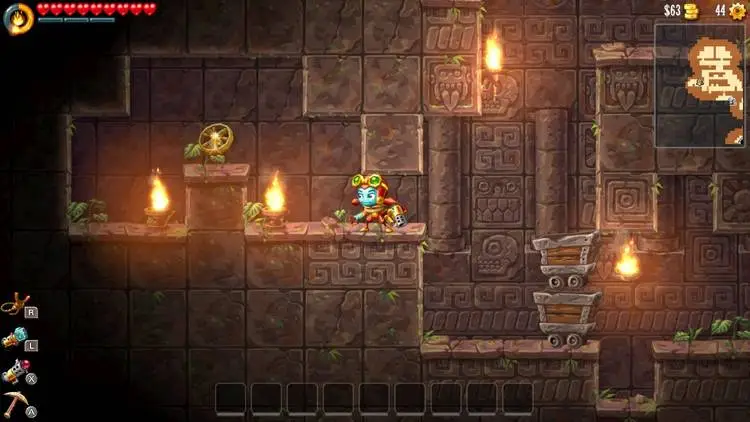
Dorothy’s mission to hunt down Rusty begins in the West Desert. This is more of a tutorial area and quite frankly, if you’ve ever played a platformer before, you won’t need help here. Fall off the cliff to your right to begin your journey. Continue to the right until you reach a tall section of sand. You will see that as you climb onto the sand, it will all collapse and disappear below you. A prompt will then appear teaching you to wall jump by holding the analog stick towards the wall and repeatedly tapping B. As you progress through the desert, an earthquake will occur, dropping you into the Temple of Guidance.
Dorothy will now find herself trapped in the Temple of Guidance! You won’t be able to climb out of here the way you dropped in so it’s time to explore to find the exit. Begin by digging through the sand to your right. Each sand block will only require one hit with your pickaxe to remove. Soon you will reach a dirt block with stones, this will require three swings of your pickaxe to break. Once you clear a path to the next open area, you can drop down. The fall into the Temple of Guidance will have caused some damage so you may want to continue to the right to pick up a health item. Once you are at full health, start heading to the left. When you reach a door blocking your path, climb onto the platform above and flip the switch by hitting Up on the D-Pad to interact with the switch. Enter the now open door to continue onward to the left. You will now see a switch on the ground. Stepping on this will trigger an arrow trap to the left. Don’t worry about it hitting you, there are sand blocks giving you coverage, this is simply an indicator of how switches work. Drop down into the pit to the left when you’re ready. Break the sand block to the right and you will see some sand blocks below with cracks in them. This is an indicator that these blocks will quickly fall apart once you touch them.
Just ahead, you will see some blocks with with a face and a down arrow for a nose. These blocks will always smash through sand blocks below until it reaches a block that cannot be broken. If you ever break a block below these, they will shake and smash through everything below until something forces it to stop. Make sure not to get in their way! Dig your way down while hugging the far left wall in this area. Make sure to stay along the left wall as much as you can and towards the bottom of this section, you will find a hidden upgrade cog. Don’t stand on the cracked sand blocks or you will fall through. Once you see them, that will be an indicator that the upgrade cog will be to the left. Below is a screenshot showing where it is exactly. See the cracked sand blocks for reference.
After picking up the upgrade cog, dig a little further to the right and fall through the cracked sand blocks. Run to the left and jump over the cracked sand blocks over the spike trap. The switch ahead will shoot an arrow from the right so either jump over it or don’t slow down! Break through the sand to the left and enter the large contraption to unlock the Sprint Hydraulics! These will allow Dorothy to run by holding Y and holding left or right. Drop back to the right and the second block from the water will actually be breakable! Hit straight down with your pickaxe to reveal a secret. Drop down there to pick up the Rejected Building Plans artifact. This is your first artifact you can pick up in the game. Refer to the image below to know where exactly you should dig to reveal the secret.
After you collect the artifact, simply wall climb out of here and continue to the right. Avoid that switch as you pass it again. Sprint onto the next switch and to the right to get through the door before it closes. Sprint again to the right and jump onto the next platform while sprinting to get over the water. You’ll have to jump to the platform to the left but to do this, you’ll need to head to the right to gain some momentum with the space. Sprint to the left and jump onto the next platform. The switch you stand on before jumping will fire two arrows going from right to left so don’t slow down and jump straight to the next platform to the left. Wall climb up here to reach a platform above. You will see another switch along with a lot of holes in the ceiling. The switch will trigger a series of arrows to fire straight down going from left to right here. Simply sprint to the right and you’ll outrun all of the arrows. Wall jump up this area to reach another platform above. Sprint over the switch and to the left to get through the open door. You will recognize this area from before. It’s time to backtrack a little bit. Continue to the left and climb up to the top when you reach the end of this path. Head to the right at the top of this path and you will reach the beginning of the Temple of Guidance.
Now that you have the sprint hydraulics, it’s time to continue forward to the right. Sprint over the switch ahead and through the open door. Sprint jump over these two gaps to the next platforms. Sprint over the cracked blocks and a door will close behind you to enter a brief cutscene between the Cultist and the Guiding Light. This is your first boss battle of the game.
| The Guiding Light Movements: Stage 1 – None Stage 2 – Very slightly hovering left and right Stage 3 – Moving left and right across a large portion of the room. Attacks: Stage 1 – Fires a single shot straight at you. This shot will break a dirt block but not go through a stone block. Stage 2 – Fires three shots straight at you. Again, these shots will break a dirt block but not go through a stone block. Stage 3 – Fires shots in every single direction around itself. These shots are just like the previous, breaking any dirt blocks but not stone blocks. Strategy: This boss is rather simple, as it should be being the first boss. The first stage will have it remain stationary and it fires a single shot at you at a time. Just stand on a ledge to the left of it and jump over its attacks. After three shots, you will see its shield go down. Sprint and jump onto the top of it and hit it 5 times to complete the first stage. After the first stage, it will launch you to the other side of the room. Just use the cover and get ready to avoid three shots at a time. A good place to hide is behind the stone blocks on the right side. You could always just stay closer and jump over its shots too, choose whatever you’re most comfortable with. After another three shot sequence, its shield will go down again. Jump on its back and hit it 5 more times to complete the second stage. We’re in the home stretch now. Keep wall jumping on the opposite side of the stone blocks from it to easily avoid its full room circle attack. After three attacks, it will lose its shield. Wait for it to be close to you as it will now be moving left and right and sprint jump onto its back. Simply hit it 5 more times to defeat this boss. |
After defeating the Guiding Light, head out of the boss room in the lower right corner. Climb up the left wall in this next room and enter the door at the top to enter the West Desert again.
Get to El Machino/Talk to Mayor
Now that we’re back above ground, head to the right. Climb the stones in your way and talk to Trader Carson & Lady Botterley. They’ll inform you that the elevator is broken so start climbing the platforms straight up! There will be a section too high to just jump to, you’ll need a running start for a higher jump to continue wall climbing up to the top of the mountain. Near the top, you’ll reach another section you’ll have to get a running start to jump up. Shortly after will be a funny little conversation between Dorothy and Fen where Fen will try to get you to fall off the cliff. Just climb a little further and up a ladder to the next area to progress through.
El Machino is the hub city in SteamWorld Dig 2. Enter the town and you will see Mayor Mic Yanker talking to his townspeople, trying to calm them down about the earthquakes going on. Explore the town and talk to the townspeople to learn more about the world of SteamWorld Dig 2. Make sure to speak to Davy Bittenbough to show him an artifact to unlock the blueprint for the Gaze of Odin. When you’re ready to progress, speak with Mayor Mic Yanker in the upper right corner of town. After you finish making your rounds through the town, climb down the ladder below the workbench to the city mine.
Mine for Resources/Sell Resources/Fix Lamp
Begin your journey through Archaea by speaking with Coral Armstrong to the right. He’ll tell you that you’re not ready to mine deeper into the mine and that you should mine in a well lit area to the left before venturing into the dark caverns below. Break through the boxes and the cactus blocking your path and start digging for treasures! The little crystals in the dirt will be Trashium, which will each give you $1. You need $6 in total to unlock a light. You will also see some red circles in the dirt. These are little beetles that will charge you once they see you. They require three hits to kill. Play smart around them and make sure to have some blank space above you so you can jump over its charge. Try to just stay behind them and not let them see you though to make quick work of them. Collect all of the trashium here and climb back up the ladder back in El Machino.
Now that you have some trashium, climb up the ladder and speak to Barnacle Jones. He’s the big robot crab to the left, a blue arrow will point right to him. After you sell him your trashium, you can go upgrade your lamp so head on over to the workbench. Go to the upgrades option and scroll down to the Rock-Bottom Lamp. Use your hard earned $6 to buy your Rock-Bottom Lamp and you’ll be ready for some serious mining! Climb back down the ladder to return to Archaea.
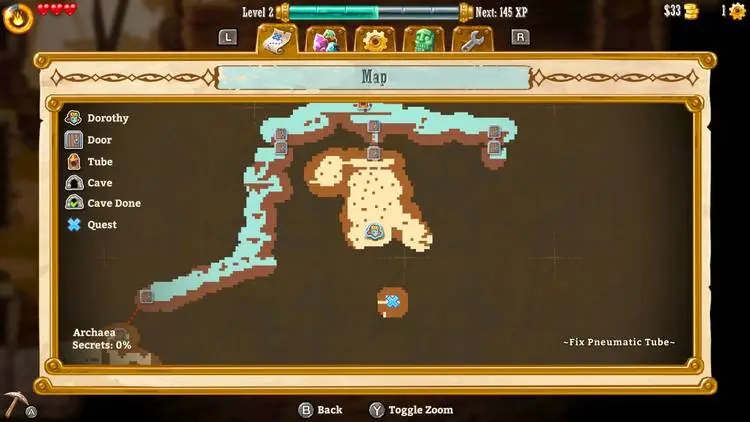
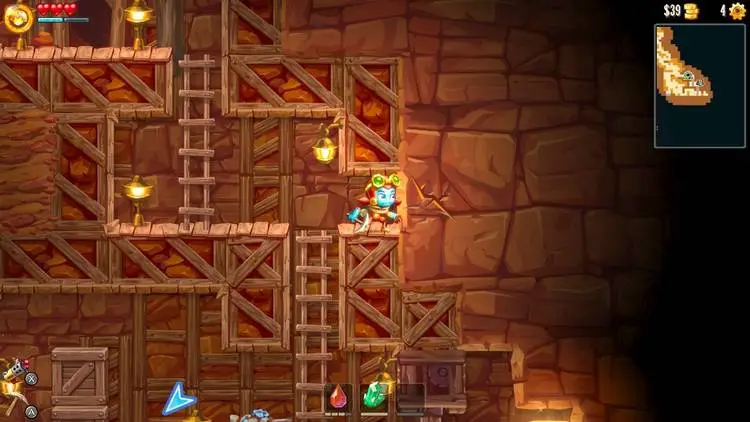
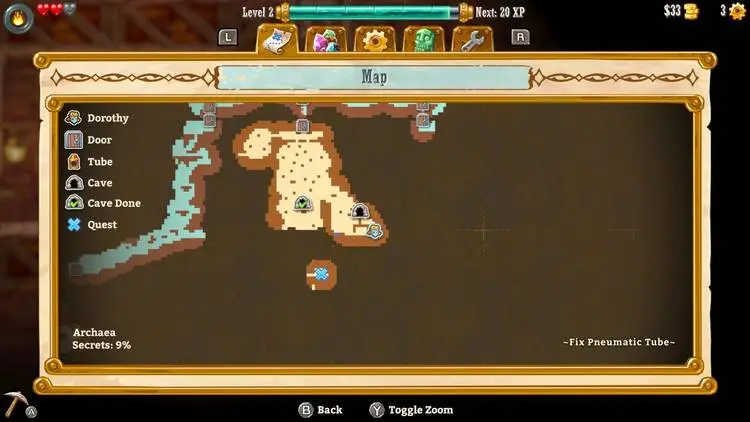
Enter Archaea/Fix Pneumatic Tube
Before you start mining, speak to Coral Armstrong. He’ll let you know that you’re ready to start digging as long as you light the lantern to the right so do just that. He’ll prompt a choice of having markers appear on your screen. For a true adventure feel, you may want to disable this option. It will guide you in the right direction in case you get lost so it has its pros and cons. Either way, you can always change your mind later using the Cogs Mods tab in a workbench.Now it’s time to start digging down to fix the pneumatic tube. You’ve really entered the heart of the game here and have to mine your way down while collecting all the ore you can. You will learn two things as you begin progressing through here.
- You have a limited inventory
- Your lantern will run out of light
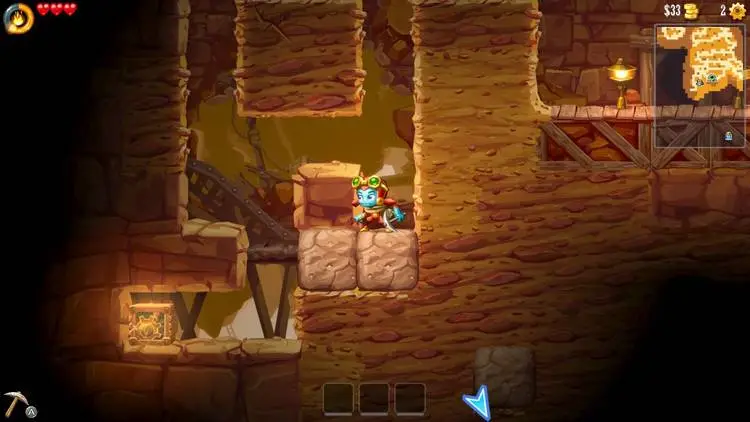
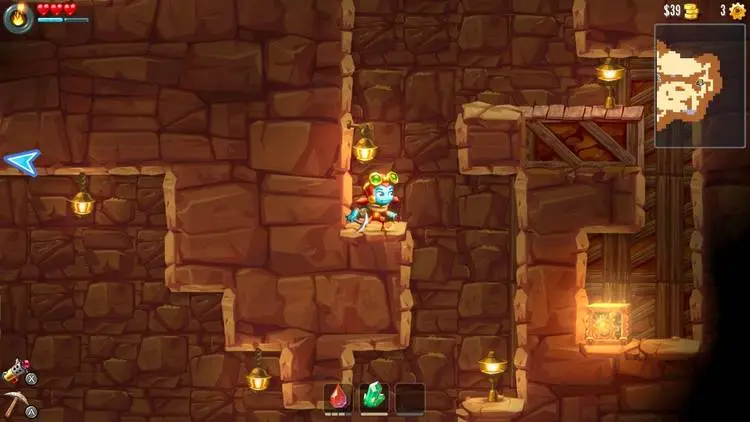
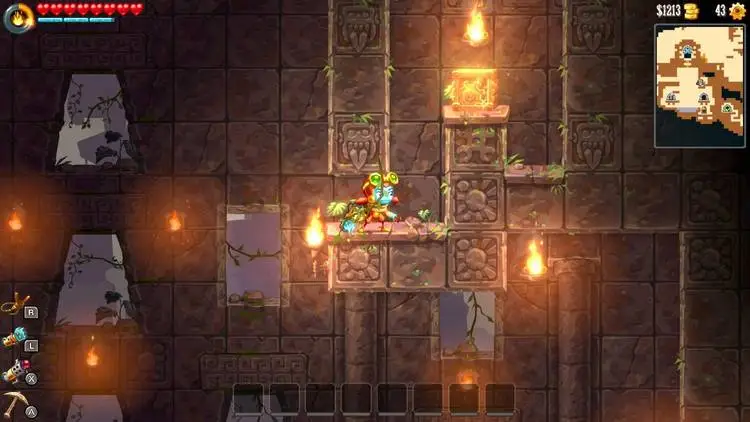
In order to keep going, you’ll have to climb back up and visit El Machino a few times and sell ore to Barnacle Jones. Simply reaching the surface will refill your lantern. I suggest working your way downward in a big snake pattern. Basically start in the top left, mine straight to the right, then go down two or three blocks, then start mining straight left. You’ll be able to see all the ore you can mine along the way and have an easy way to climb up and down this large mine shaft. There are also quite a few beetles here which are the same that you faced earlier in the game already, they shouldn’t bother you too much by now. Make periodic trips up to El Machino to empty your inventory and refuel your lamp as needed. After a few minutes of digging, you should run into a cave in the middle of the mine shaft as seen in the screenshot below. Enter it.
Once you leave the cave, dig down to the left a bit. You’ll see two large stones right next to each other. Break the cracked block to the left of them to reveal another upgrade cog. See the screenshot below for the exact location. Note that the entrance to the cave is in the top right corner of the screenshot, that’s how close this upgrade cog is.
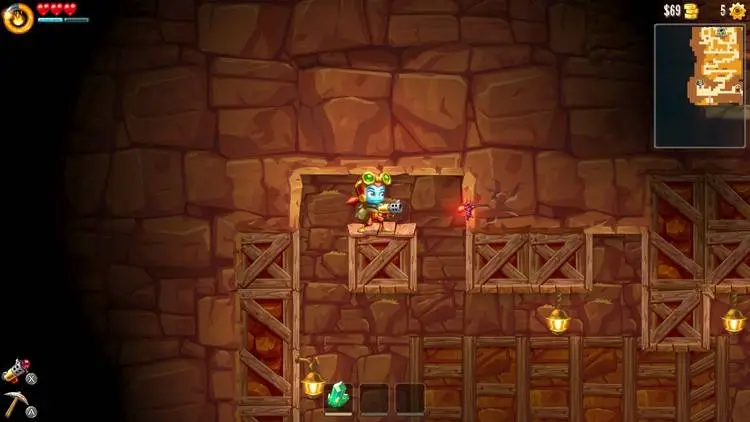
Now head back to the cave entitle Patch Work Grotto and start digging directly to the right. You’ll reach an area with a lot of cacti. Be careful when breaking them as they’ll shoot their spikes out and cause chain reactions to break other cacti. You will soon reach a wall of wooden crates. Dig down a bit to find an opening with some beetles crawling around. Kill them and climb up the first ladder. Break the cracked block to the right to reveal a switch that will open the path to the upgrade cog below. Climb back down the ladder and pick up the upgrade cog. Refer to the image below to know where exactly to break the wall.
Once you pick up the upgrade cog, climb up the ladders to enter another cave, entitled Burster’s Station. If you’re having trouble finding this cave, refer to the screenshot below for its exact location. Note the wall to the left of this little area which may make it confusing for you to find.
| Burster’s Station Start off by heading to the left and killing the beetle. Break down the sand block that blocks your way ahead. Drop down and kill another beetle down here. Slowly work your way down here and avoid the cacti on the edges. If a beetle charges at you, just jump over it and let them drop down. They’ll drop straight into water and drown for an easy kill. Once you reach the bottom of this path, stand on the red clay block on the right and it’ll crumble under you. Enter the large contraption to unlock the Pressure Bomb! The pressure bomb is a handy item that will allow you to throw a bomb in any direction that will stick to a block and then destroy it. This is the only way to break blocks you can’t normally reach. You will see two small blue bars in the top left corner below your health. This is your pressure bomb charges. You can refill it by just standing in water at any time. Break down the sand blocks to the right using your pressure bomb to continue. Break through the next sand block in your way and head to the right. Swim through the water and wall climb up to the next platform. Kill off this beetle and follow the platforms to the left and then straight up. When you’re on the upper left block here, shoot a pressure bomb straight up. You’ll see a beryl block that will drop on your head. Jump up to the next platform to the right and kill the beetle here. Break the dirt blocks on this platform so you can shoot a pressure bomb to the dirt block to your right, which will drop the large stone. Drop down on the stone and shoot another pressure bomb at the sand block to the right to open up this path. Drop back down into the water to recharge your pressure bombs before you continue through that opening. Halfway up this block, you’ll see a platform with some wooden floors. There will be a cracked block to the right. Break it and drop down for an upgrade cog. Refer to the screenshot below for its exact location, the mini map in the top right will give you a great idea of where this secret is hidden. Kill the two beetles at the top of this path and you will see a platform you can climb onto above the second beetle. Climb up there and fire a pressure bomb straight up at the sand block. Climb up there to reveal the Rattus norvegicus artifact. When you’re ready, drop back down and head to the left. Break the sand block to reach the exit to leave this cave. |
There’s not much more to note in this area until you reach the pneumatic tube below. Keep digging side to side as you reveal more ore to mine and you will soon reach a sign. Dig straight down through these blocks below for a brief cutscene with Fen. If you’re having problems breaking some of these blocks, you have to stand on top of them and hit them straight down. Follow the crack along the series of blocks to break them. At the bottom, head to the right and open up the pneumatic tube by shooting it with a pressure bomb shot. These pneumatic tubes are the method for fast travel in this game. Right now, you can only use this one and the one in El Machino but more will be unlocked as you progress through the story. Fill up your pressure bombs in the water to the right and head to the left. Break the next set of blocks in your way with a pressure bomb. Follow the path to the far left and shoot a pressure bomb straight up for a beryl ore. You’ll have to head back to the pneumatic tube to refill your pressure bombs and then head back to where that beryl ore was. Wall climb up here and shoot the cracked block to the right. This will reveal a hidden upgrade cog. Refer to the screenshot below to know where exactly to fire the pressure bomb. Once you have the upgrade cog, head back to the pneumatic tube and return to El Machino.
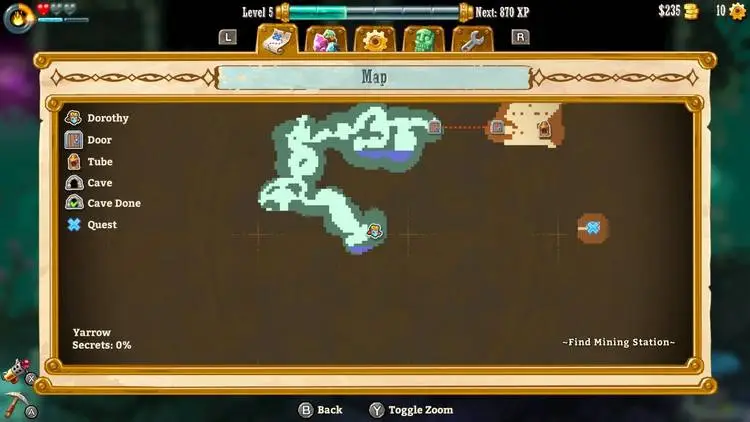
Talk to Mayor/Find Mining Station
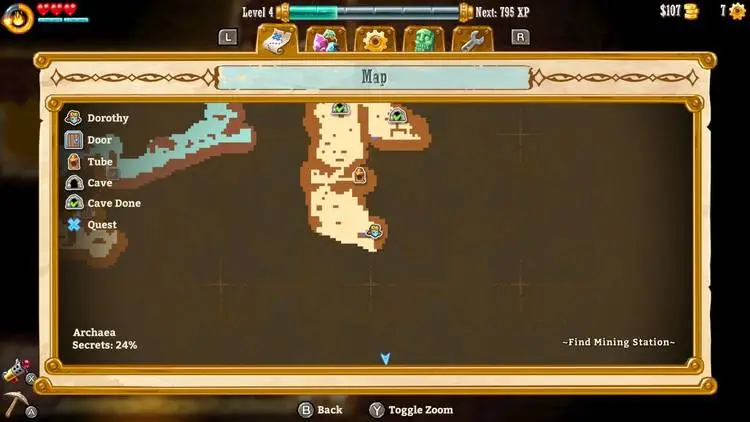
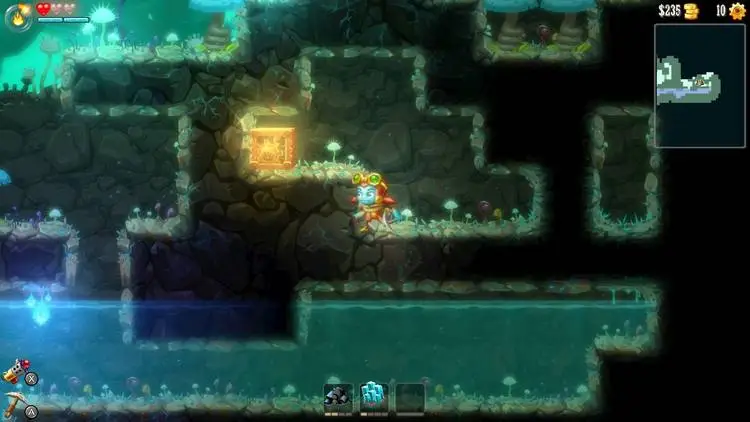
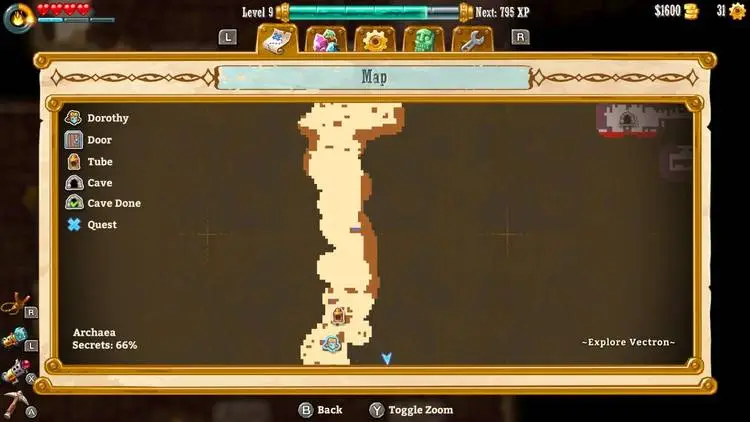
Speak with the Mayor to progress the story. When you’re ready to leave El Machino, use the pneumatic tube to go deep down into Archaea. It’s time to continue digging down through Archaea. Just keep going in a back and forth pattern to try to find as much ore as possible. Soon, along the right edge, you’ll find a little pool of water. To the right of that is a small path with a hidden cog. Refer to the map below for its exact location.
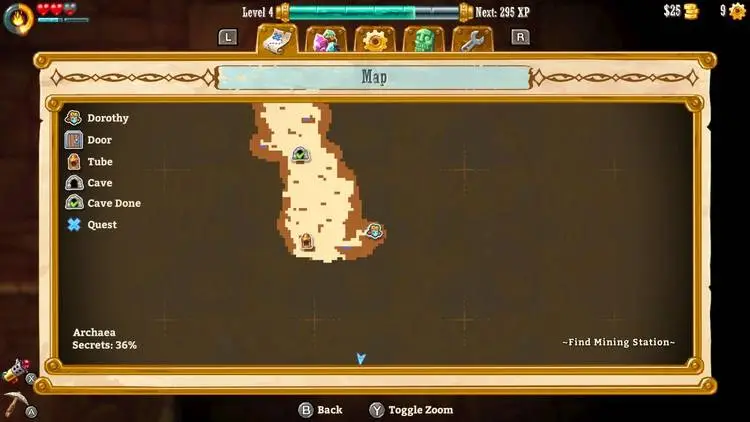
Continue working down further as you move side to side to gather as much ore as possible. On the left hand side a bit further down, you will see some cracked blocks. Break them and use a pressure bomb to release a beryl ore above in this secret area. Refer to the screenshot below for its exact location.
Just to the right of that secret, you will find a cave entitled Cave-In Catacomb. Enter it.
| Cave-In Catacomb Head to the right and go under all of the cracked blocks. Break the last block in the row, where the crack begins, and quickly sprint back to the left before the stones above crush you! Now climb up the platforms and break the next cracked block. Continue to the right once the path is clear. You will see the beginning of the cracked blocks here again at the far end. Use a pressure bomb on it to give you some extra time as you run back to the left for safety. Once all the stones clear, head to the far right for an upgrade cog. Now start heading back to the beginning of this cave. At the left end of the stones that all dropped, you will see a wall you can sprint jump to and wall climb up. Go up there and break the sand block to reveal a secret containing the Spelunky Diary artifact. View the screenshot below to find where you should wall jump up. Once you grab that artifact, head back down to the entrance of the cave to leave it. |
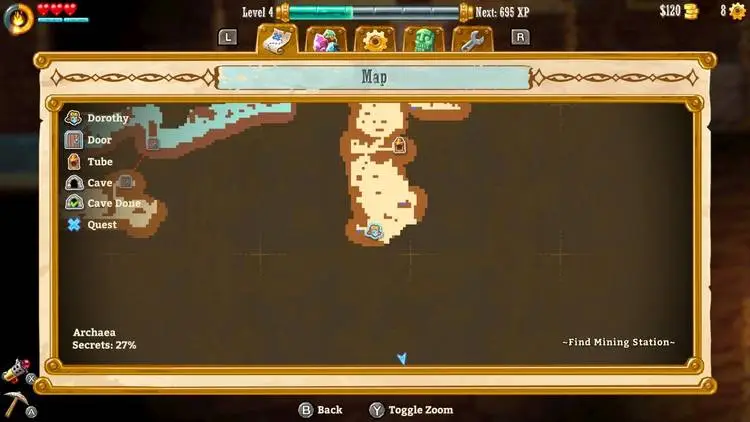
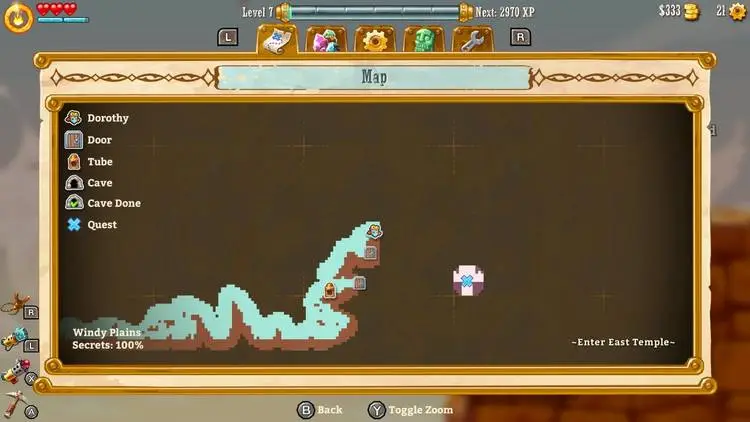
Now keep digging down while alternating left and right again to collect as much ore as possible. As you progress downward, you should find another pneumatic tube entitled Cactus Plantation. Break it open with a pressure bomb for a new fast travel location. Head directly to the right from here and kill the beetle near the water. Look up in that area for a sand block you can destroy with a pressure bomb. Break it and sprint jump up there to get the Schrodinger’s What? artifact. Pick up the beryl here as well. There’s a door to travel to the Windy Plains but you don’t need to go there just yet. For the exact location of this artifact, view the map below.
You know the drill by now. Continue digging downward while collecting more ore to sell. Very soon, you will reach another cave entitled Tick Boom Room. Enter it.
| Tick Boom Room Head to the right under the wooden platforms with the stones on them. You have to be quick here. Quickly fire a pressure bomb down and jump up and out to the left before it goes off. If you didn’t get out in time, you’ll have to break the rest of the sand, leave the cave, and reenter it to reset the room. If you do get out before the pressure bomb goes off, stand on the top stone that will fall with the wooden platforms. You can now break the sand block to the right. The upgrade cog in this cave is right up here in the top right corner of this small cave. Leave the room when you complete it. |
Continue digging your way down while collecting ore and a little further, along the left side, you’ll find another cave entitled Prickly Panorama. Enter it.
| Prickly Panorama This cave is really easy. Simply drop down below and break the sand block in your way. Hop up back to the entrance of the cave and enjoy the fireworks! All of the cacti will destroy each other and clear the rest of the room, leaving a nice, shiny azurite for you at the top of the room. Leave the cave when you pick it up. |
Keep digging a little further downward to another pneumatic tube. You’ll enter a brief conversation with Fen explaining what this wall was for that is preventing you from digging any further. Open up the pneumatic tube to the right. You may want to return to the surface just to sell off your ore. Once you’re ready, return to this pneumatic tube and go straight to the left, clearing the path, and enter the door to your next region, Yarrow.
Fen will almost immediately talk to you as you enter Yarrow. If you haven’t figured it out by now, Fen really likes danger! Humor him by immediately jumping off the cliff to your left. Don’t worry, there’s a large pool of water down there that will prevent you from taking damage. Start heading to the left and you’ll see some beetles get killed above you. There are some new dangers you haven’t seen yet and that’s just a preview! Don’t worry, it’s not too much trouble. Climb up to the surface and you’ll see a pink plant on the ceiling. It charges up three shots and fires them at you. Just stay in cover for its shots and then fire a pressure bomb at it. Continue upwards to the right and bounce up the mushrooms. You can bounce to the upper right to break some ore out of the dirt here and you’ll find that the dirt will reappear after you break it in Yarrow! You’ll likely have to drop down to collect some of the ore so do just that and backtrack to where you bounced up on the mushrooms. To the left of the mushrooms, you’ll see a large, floating jellyfish. Bounce on its back to wall climb up the left wall to reach the platform above.
Head through all the dirt to the left until you reach another new enemy, the wretched snail. This snail can be a bit tricky because it’ll fire off spikes from its back, similar to a cactus, when you get close and roll around quickly. They can be used to deal damage to other enemies in the area and you could have it kill the beetle below by just making it move. Get close when it’s just walking and quickly hit it a couple times, then run. Keep doing that until it dies. Start working your way downwards while going side to side to collect as much ore as possible. Soon you will reach an a split, there are obstacles blocking you from going left for now where all the mushrooms are so start breaking away at the dirt to the right. You’ll run into another snail. Just keep scaring it while it digs its way downwards and follow it. You can kill it if there’s an opportunity to do so. Keep digging down and to the right while hugging the far right wall. You’ll run into a pink monster that shoots at you on the ceiling. Head to the right side and you’ll see some dirt blocks there that you can’t destroy because they’re higher than you are. Let the monster destroy these blocks for you! Quickly climb through the opening and climb up for the Fifty Shades of Cliche artifact. Below is a screenshot of the map’s location for where it is exactly.
After you pick up the artifact, quickly head to the left and fall into the water. Swim all the way to the right until you reach the end. Before climbing out of the water, break the sand blocks to the right. This will reveal a hidden area. Keep swimming to the right and break the dirt block above you. Wall jump up before it reappears and keep wall jumping in space here. The dirt block you just broke will reappear beneath you. Once that happens, drop onto it and break the dirt to the left to reveal a hidden upgrade cog. Refer to the screenshot below for where it is exactly, use the mini map in the top right corner as a reference point.
Now that you have the upgrade cog, get out of the water by heading back to where you broke the sand block in the water to reach this upgrade cog and climb straight up. Use the mushrooms to bounce up to the top of this room while avoiding the shots from the cannon on the ceiling. Enter the door to enter the lower region of Archaea.
Drop down to the right and you’ll almost immediately see another pneumatic tube. Break it open with a pressure bomb for another fast travel location. This one is called Below The Wall. If you look at the map, you’ll see the objective is below and to your right, but start climbing upwards first. Climb up to the upper right of this area while collecting ore along the way and you’ll find a cave entitled Trilobite Bluff.
| Trilobite Bluff A beetle will drop to the platform above, let it step on the switch and quickly run through the door to the right. Climb up to where the beetle is from the right side. Jump over it and try to get it to charge at you while you’re to its left. You want it to drop off the edge of the platform with its charge. You may have to keep jumping at the edge so it doesn’t charge you too early. Once it drops, stand on the switch so it can pass through the door below and to the right. Now head down to the lower right and lure it down to the lower switch on the right side. Do the same thing, get it to charge at you off the edge. Once it steps on the switch, enter the door in the top right to reach the upgrade cog. Once you have it, head back out of the exit. |
Head back to the Below the Wall pneumatic tube. Work your way downward until you reach a wall you cannot dig through. Work your way to the right from here and you’ll enter a cave entitled Mason’s Station.
| Mason’s Station Step on the switch to your right and drop through the open hatch. Head to the left to kill a beetle. Climb up the platforms above that beetle and use a pressure bomb on the sand block in the top left corner to release the stone block onto the switch below. Drop down and enter the now open door to your left. Climb all the way to the top of this mineshaft here. Once you reach the top, enter that small alcove in the top right. Just run through the stone to the right to reveal a secret which holds the Photo of a Missing Love artifact. Head out of this secret area and jump over the gap to the left to the clay block. Fall through it and begin climbing the ladders to the top. At the top of the last ladder in sight, you’ll see some platforms to the right you can jump across. Jump across them and climb another ladder up to the top of this area. Kill the beetle and use a pressure bomb on the sand block to the left to drop the large stone.Follow the stone downward but be careful not to take damage from the fall. You may want to backtrack down the ladders you came up. Step on the switch next to the stone to drop it another level. Don’t follow it this time. Instead, go to the left and use a pressure bomb on the sand block on the left wall. Drop down and break the dirt block here. You should land to the left of the stone block. Step on the switch here and follow it down. Drop down as low as you can and head to the left through the open door. Drop through the clay block and enter the contraption here to unlock the Jackhammer! This useful tool will smash through blocks you otherwise couldn’t break. Before continuing, climb the contraption and shoot a pressure bomb at the ore above the machine to pick it up. Climb up the platforms to the right and use the jackhammer to power through these bricks. Continue to the right through the next set of bricks when you reach the mineshaft for some more ore and an upgrade cog. You can now exit this cave. |
Now that you have the jackhammer, just use it on the wall to the right of the cave and you’ll find Josh Yonker who gives you a secret item. It’s the Blood Quest mod which will double your chance of blood stones from killing monsters but the trade off is that they also do double the damage. Head back to the pneumatic tube but don’t use it yet. Dig down to the left with the jackhammer through the bricks. Break the cacti here and keep digging along the far left wall until you reveal a secret with an upgrade cog. Once you get that, head back up to the pneumatic tube. Enter it and the objective marker will point you into El Machino but don’t head there just yet. Use the fast travel to get to the Above the Wall pneumatic tube. Head to the left and you’ll see an upgrade cog under the ground. Use your jackhammer through the ground to pick it up. Once you pick that up, head back to the pneumatic tube and return to El Machino.
Talk to Mayor/Enter Shiner Country
Not much is required in this trip to El Machino. All you really have to do is talk to the mayor to give you a new mission. Your new objective will be in The Oasis which is even deeper into Archaea. Get whatever upgrades you want by this point and clear your inventory of ore. Use the pneumatic tube again to head to the Below the Wall pneumatic tube. Begin heading down towards the Mason’s Station cave again. Dig down along the right wall and you’ll see a set of bricks that are a different color from the rest. Break through these with your jackhammer to reveal a secret with some ore in there. Now climb back out of this secret and continue digging side to side throughout this area until you run into another cave entitled Rupture Rock Hollow.
| Rupture Rock Hollow There are a few hidden items in this cave so you’ll have to run it a few times. You’ll notice a lot of cracked blocks, it’s really a race to the finish. Drop down to the left and head to the right. Break the beginning of the crack line and head back to the entrance by quickly wall jumping back up. Collect the ore when the path opens up and continue to the right. Break the next crack line and race the crumbling blocks to the right. When you reach the far right wall that you have to wall climb up, just stand next to the wall and fall when the blocks below you crumble. You’ll land on a hidden platform below containing the Glowing Goo artifact. After you get that, just drop down to reset the cave. Get to the same point but this time, wall climb up to the top. Keep moving to the left and keep wall climbing in place before you fall down from the crumbling blocks. Once you get past this sequence, continue to the left and break the last block to reveal a path below to an upgrade cog. Pick it up, break the sand, and return to the exit.Note – There is another upgrade cog in this cave but we can’t get it without another item. You’ll have to come back here. |
Keep digging downward while collecting more ore and you’ll fall into a large cavern that you find you cannot climb out of! Don’t worry, you’ll be unlocking a pneumatic tube shortly. Keep digging downward along the middle of this area and you’ll find a door that will send you to The Oasis. Enter it. Once in the Oasis, start running to the right and talk to Schwifty Shawn to enter Shiner Country, which you’ll find out is really just a colony of human miners.
Talk to Rosie/Enter Mining Station
Now that we’re in the Oasis, you can talk to all the locals. You’ll soon find out they’re mostly crazy but that’s what years underground will do to you! There’s a pneumatic tube at the bottom level of the Oasis you can break open with your pressure bomb so make sure to do that. You can teleport to the surface to sell your ore if you’d like to clear out some inventory space. When read, speak to Rosie at the top of the Oasis. When ready, enter Rosie’s storage, it’s the cave she opens up for you in the top right corner of the Oasis.
| Rosie’s Storage Fall to the left and just follow the path down to the contraption in the lower left corner. This will unlock the Hook Shot. You can use this by using the Right trigger. Head to the right a little and you’ll be under the bridge. Use the hook shot straight up to launch yourself onto it. Now head to the right and use your hook shot straight up again to the next bridge. Head to the right again and you’ll see another bridge above. Don’t hold your hook shot too much because you want to stop in between the bridges. If you went too far, just drop down to the left and try again. Once you’re on the lower bridge, break the block to the right and climb up to get the Rosie’s Dumbbells artifact. Now climb to the top of these bridges and use your hook shot on the cactus to your left. You’ll see this is a great tool to destroy cacti. Jump to the left and sprint jump over this next large gap to continue to the left. You’ll see some more cacti straight above. Break them with your hook shot and climb up there for some more ore to collect. Now drop down, pick up the upgrade cog to your left, and exit the cave. |
Simply talk to Rosie again to be given the next objective in your adventure.
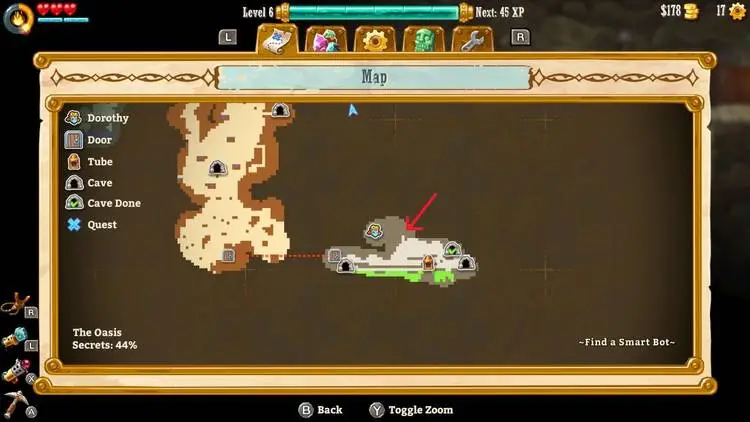
Find a Smart Bot/Enter East Temple
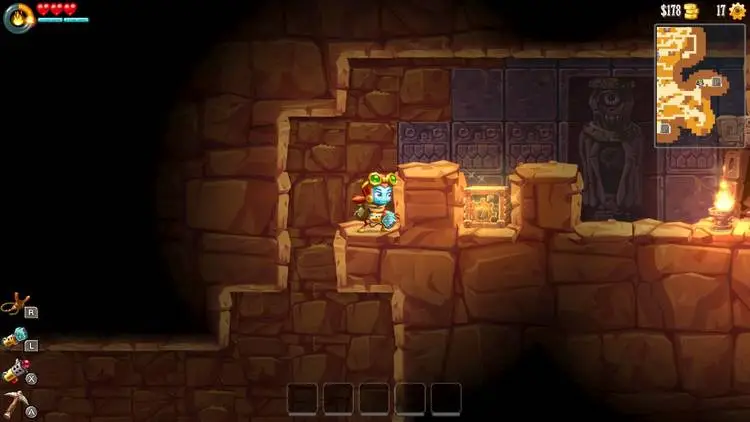
Before leaving the Oasis, there’s a secret in the top left corner. From the platform Rosie is on, jump to the left and use a hook shot straight up. You’ll see a small opening in the ceiling. Hook shot up there and you will find a secret area with the Six-Pack O’ Moon Juice artifact. View the screenshot below for the exact location you want to hook shot to.
Let’s do a little more backtracking before returning to the surface. Head out of the Oasis the way you entered and back into Archaea. Climb up to where you first fell down that you learned you won’t be able to go back. Now that you have the hook shot, you can! That being said, don’t actually go back all the way up this way. Once you reach that cavern with the taller ceiling, head to the right. You’ll see a small section with three stone blocks above and then a wall to your right. Hook shot up the middle ceiling block for a secret containing a hidden upgrade cog and a door to the Temple of the Destroyer. Don’t go in there quite yet, we’re just not ready for it. You can pick up that upgrade cog though! Refer to the screenshot below for where to hook shot through and a picture of the minimap in the top right corner for reference. The door in the bottom left corner of the mini map is the door to the Oasis.
Now drop down and start digging down and to the right of the door to the Oasis. Follow the stones that surround the door to the Oasis and you’ll find a sand block below the Oasis door. Break it to reveal a secret that has a rare ore in it. Now you can break the block to the left to enter the Oasis again. Just use the pneumatic tube from here to head back to El Machino. Head to the upper right platform and you’ll see a sand block blocking a ladder. Destroy it with a pressure bomb. Climb up it to talk to Professor Sherman. Professor Sherman and Dorothy will discuss what may be causing the earthquake and the Professor agrees that Dorothy’s theory may in fact be true. He will send you to the east, through the Windy Plains, to the Temple of the Destroyer. If you haven’t already, sell any ores you have and leave town to the right. Climb down the ladder to enter the Windy Plains. Climb down the ladders here as you make your way down the cliffside. You’ll see three consecutive ladders rather early. At the base on the third ladder, use your hook shot to the left and you’ll see one lone sand block. Drop down a little to hook shot to it again and break it to reveal a secret vein of ore. Keep falling down the left wall while shooting hook shots to slow you down. You’ll see another lone sand block. Break that down and enter this secret area for a cave entitled Rock Falls.
| Rock Falls Head to the right and you’ll see some stone blocks on top of sand. You have to be quick and break all of the sand blocks while constantly moving to the right. If the stone blocks fall and you don’t pass them, you’ll have to reset the room. Once you get to the water on the right side of the cave, the logical way to proceed would be to wall climb up the right wall but don’t do that! Instead, from the water, hook shot upwards and work your way to the top without breaking the sand block under the three stone blocks in the upper right corner here. Get on top of the stone blocks and break the sand block here to reveal a secret containing the Rocket Black Box artifact. Now jump over the gap to the left and do the same thing, break the sand while you quickly progress under it. Wait under the large boulder at the end of this path for all the smaller stone blocks to fall. Once all the small stone blocks are down, break the sand block under the boulder and quickly run! You can pick up the ore in the upper right here and climb over the large boulder. Follow the path the rest of the way for an upgrade cog and leave the cave. |
Jump to the platform to the right and climb the two ladders here. Run to the right edge of this platform. Drop off and keep hook shotting the wall to the left to ease your fall. You’ll find a Ninja Cat Action Figure artifact here. Break the block to the left and safely work your way down to the ground. When you reach the ground, break the sand blocks to the left to reveal a secret. This secret contains a door to the middle of Archaea. There is a pneumatic tube very close to where this leads if you want to head to town from here. If you haven’t collected it yet, the Schrodinger’s What? artifact is right through this door as well. When you’re ready, continue east through the Windy Plains. You’ll soon see an upgrade cog. Just break the block above it with your jackhammer and collect it. Continue to the right and you’ll find out why they call it the Windy Plains. Wind will continue to push you to the left. It’s more of a mild inconvenience than anything else just to slow you down a bit. Just be weary of any cacti in the area. The wind could push you into them if you’re not careful. Stay along the ground and you’ll find another upgrade cog. Backtrack a little from the upgrade cog and climb the platforms when you can. You’ll have to jump across them to the right. You can use hook shots as needed to make sure you don’t miss any jumps. The wind will continue to get stronger. Use your hook shot to keep yourself from flying away, you can even use it on the ground if it’s pushing you back on a small platform. Over the large rock wall you have to climb, the wind finally dies down. Continue to the right and work your way up the platforms using your hook shot to the temple entrance pneumatic tube. Don’t enter the temple just yet though! Jump just to the right of the pneumatic tube and hook shot straight up. You’ll see a cliff you can climb with a well timed release of the hook shot. What you want to do is release it before you hit the ceiling and move slightly to the left to boost yourself over the wall. Climb up to the very top of this area for the Inflatable Friend artifact. Right below the artifact is a door to a hidden part of the temple with some goodies in it. Enter that door. Just jump across a couple platforms for an upgrade cog in plain sight. Keep heading to the far right wall and slide down to the ground. Break the right ground block to reveal a secret with an upgrade cog in it. Head back down to the pneumatic tube and enter the temple via the door to the right. If you’re having trouble finding this area with the artifact and upgrade cog, refer to the screenshot below.
Run into the temple a little bit and you’ll find a cult member who’s worshiping your friend Rusty! After the cult member notices Fen, he’ll attack you! Just avoid its flaming spears and fire a pressure bomb at it. Sprint jump to climb up the left wall and you’ll find a pull of water at the top to refill your water supply. Climb up and to the right and you’ll see some dripping lava over a large brazier. Break the blocks above it with your jackhammer so the lava will drip in and power up the switch below. Don’t drop down just yet. Jump to the upper right corner of this room and you’ll find a single stone block different from the rest. Break it with your jackhammer to reveal a hidden upgrade cog! Now drop down and flip the switch in the middle of this room for the next objective.
Confront Prophet
Drop down through the open pit and start digging side to side here. You’ll find a new type of enemy down here, the firefly bot. They will drop down and start flying towards you. Just one hit with your pick axe will launch them away from you, causing them to explode. They can even kill other bots. These are actually really easy to deal with because of that. Keep digging down while going side to side to collect as much ore as possible while fighting off cultists and firefly bots. You’ll soon reach the entrance shaft pneumatic tube. From there, head straight to the right. You’ll see two large boxes with an upgrade cog in the middle of it. Look for the stone blocks that don’t fit in the bottom left of the outer block and the top right of the inner block. Break them with your jackhammer to collect the upgrade cog inside. Keep working your way down the temple and head to the lower left of the entrance shaft pneumatic tube. You’ll find a cave there entitled The Batcave.
| The Batcave Head to the right side of this cave and you’ll see some fireflies. If there’s more than one, kill them both. There’s a spot they’ll respawn from in the top right corner. When there’s only one, lead it down to the middle of this room. You want to get directly under it and hit it straight up the center to break some sand blocks up there. Once the path is clear, hook shot up there and wall jump to the top for an upgrade cog. Drop back down and lead a firefly up to here. Once you get a firefly in this area, stand on the block where the upgrade cog was. Hit it straight to the left to reveal a secret containing the Ginsa Shark Tooth artifact. Head back out of this cave. |
Now just continue working your way downward into the temple of the destroyer. There’s quite a bit of digging until it forces you down into a conveyor room maze. Just take your time and collect as much ore as you can while dealing with any monsters in your way. When you reach the conveyor room, just follow the path the only way you can until you see a split to go either down or to the upper right. Take the upper right path and break the sand block at the end to reveal a secret. Follow the path for a gold ore you can pick up. Break the dirt block before the crusher to escape this area. Drop back down to the left and you’ll reach the same split as before. Drop down and you can go either left or right. Begin by dropping to the left. Just fall to the small platform to the left and run to the left again through these blocks for a secret with some ore. Climb back up out of this secret before the crushers kill you. Now jump up and to the upper right platform from here. Head to the right and you’ll see an upgrade cog below you. Continue right and you’ll see a set of stone blocks you can break with your jackhammer. Break them and collect the upgrade cog. Now head back out where you jackhammered the blocks. Enter the cave to the upper right.
| Floor Is Lava You’ll see a lot of floor switches in this room. Stepping on a single one will close the next door and you have to turn the lever to open them again. There’s an artifact in this cave that you can only get if you don’t touch any switches throughout the whole cave. Keep that in mind. You’ll have to leave the cave and reenter it to reset it for that artifact. Start by sprint jumping over the first batch. Now drop down and wall climb along the left. Just use hook shots to move your way to the far right wall here along the floating blocks. At the end of this set, move to the left and climb up this narrow passage. Hook shot the ceiling as you move up to the upper right here while avoiding all of the switches. Break the sand block in the top left of this room to release the stone below. Fall onto it and use a pressure bomb on the sand block to the left. Drop down through the new opening for an upgrade cog. The door to the artifact at the end will remain open only if you didn’t touch any switches. It is the Piece of Red Cloth. Once you’re done here, break the sand block in the ground and leave the cave. |
After you complete the cave above, drop down to the right and break the sand blocks. Follow the conveyor belts and jump off when you see the pneumatic tube. Break it open for the Conveyor Maze fast travel point. Follow the conveyor belt to the left and you’ll see a crusher below at the end. Jump to the conveyor belt above the end with the crusher and break the sand block in the top left corner with a pressure bomb to reveal a hidden upgrade cog. There’s also a secret at the crusher. You have to be very quick though and you’ll probably die on your first try. Drop down and quickly shoot a pressure bomb at the center block, just in front of the crusher. Jump out before it kills you! If you didn’t make it in time, you’ll just have to head back but it should remain open. Drop down and pick up the Theremin artifact. Climb out through the path to the left. This area is rather empty of landmarks but you need to jackhammer a lot. Make note of all the water locations to limit how much you have to run back and forth. Also remember, you could always go back to El Machino to refill your water tank and you might as well sell you’re ore while you’re there. Continue to the left while alternating up and down and avoiding the lava drops while killing the fireflies. Soon, closer to the top, you’ll find the Lava Dripper Hallway pneumatic tube. Continue upward and to the left from there for a cave to appear rather quickly named Lava Shooters.
| Lava Shooters Slide down the wall to the left in between lava drops. You’ll notice sliding is the same speed as the lava drops which is rather convenient. Once at the bottom, hook shot onto the conveyor belt on the ceiling to pass over all the lava down there. Climb up the wall to the left in between lava shots and alternate left and right to avoid the spikes when they get in your way. Now start heading to the right and avoid the fireballs here. At the end of this path, slide down the conveyor belts. The second will be rather tricky with lava dropping down. You want to let go of the wall to drop faster and quickly hold on to slow down before you hit the lava shot. Once you reach the bottom, jump across the blocks to the right to find a platform with an upgrade cog. Now head back the way you came and go to the left along the lower conveyor belt while dropping to avoid the lava shots and quickly hook shotting back up. Climb up the path here while avoiding the alternating fireballs. Another upgrade cog will be at the end of this path. Don’t head for the exit just yet. Instead, keep climbing up to the right where the fireballs are coming from but be careful not to get hit. At the top, break the stone block with the crack in it to open a secret to attain the Fossil artifact. Break the stone block at the end of this path and head for the exit of the cave. |
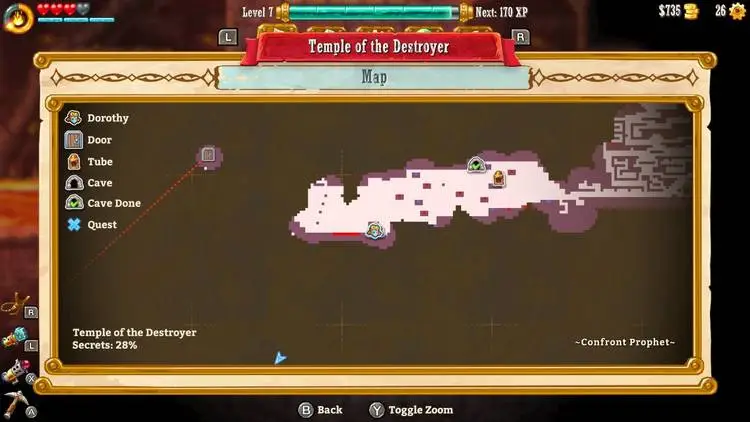
Continue to the left while collecting ore. You’ll run into more lava so be careful. Try to stick closer to the ground as you will find the Roasted Romp cave. If you see a long pool of lava on the ground, you’ve gone too far. It’s just to the right of the long pool of lava before you reach the large open cavern. View the screenshot below for its exact location, Dorothy is standing right on it.
| Roasted Romp This part can be kind of tricky. Platforms will rise and drop in the lava. You have to time your jumps across them without touching the lava to reach the end of this section. At the end, drop beneath the fists popping out of the wall. Once they start pushing out, jump up to the left of the fists and break the cracked block at the top. Collect the upgrade cog up here. Hook shot up and go right. Break the block at the end to leave this secret area. Collect some ore and continue to your right. These platforms below will act as trampolines and shoot you up when you touch them. Work your way to the right while avoiding the spikes. At the end of the path, stand on the top crusher and the crushers below you will push in before you fall. Just stay put and you will slowly drop down. After the first set of crushers, another set will try to actually crush you. Just drop down without grabbing a wall and you’ll be fine. Head to the right and grab the other upgrade cog in this cave. Now head for the exit to your left. |
Head a little further to the left while being mindful to avoid the lava and you’ll reach a large, open cavern. Climb up the platforms and the golem altar pneumatic tube will be in plain sight here. Keep climbing the platforms to the left and you’ll reach a large broken down robot. Stand right next to it and sprint a little to the right. Jump and quickly wall climb the left wall. You have to get a sprinting start for some extra height to your jump. Once at the top, jump and hook shot to the right. Keep working your way to the right along the ceiling here. After the spot with the staircase pattern, the ceiling will have steel plates and you won’t be able to hook shot. Make sure to just hook shot straight to the right to the next platform. Fall down the platforms to your right for the Weird-Looking Stone artifact. Head back to the pneumatic tube and start digging straight down. You will soon run into the Grim Hollow cave.
| Grim Hollow Begin this long cave by heading to the left. You will soon see a wizard that will have crystals circle around a spot you’re in and then shoot fireballs in every direction when they form together. Just make sure to avoid the fireballs for now and keep heading to the left. Wall climb to just to the left of the wizard and wait for the crystals to appear. Quickly drop down to the lower left to avoid the fireballs and they’ll open up the path for you. Jump over the wizard, making sure to leave it alive, and climb up the wall above. Stand at the top of the platform and wait for the crystals to appear again. Quickly sprint to the right and drop down to the switch. You’ll see two cracked blocks here. One down low that you can break and another up high that you can’t. The wizard’s fireballs will break the higher one, revealing the Doom Cult To-Do List artifact. Pick it up. Now flip the switch and break the lower block. Fall down and you’ll find yourself at the entrance of the cave, don’t leave yet though! Now head to the right. This path is really straight forward, just follow the path while avoiding the lava. You’ll reach a large robot blocking your path. Jump over the block above it and break it from the left side. Quickly wall jump and keep jumping so you don’t touch the robot. The lava will drip onto it and wake it up. Once it passes to the right, drop down and continue to the left. Flip the switch and the end and climb up the path that is now open. Head to the right at the top of this path and avoid the fireballs from the wizards. You’ll see a set of sand blocks that will block your way. Back track a little bit and lure a fireball from the wizard to shoot at the sand blocks. You have to actually break the sand blocks before the fireballs hit them so the fireball will wake up a robot to the right. Get out of the robots way with a hookshot to the ceiling and continue along the path. Another robot will soon block your path. Just hook shot to the far upper right corner of the path with the robot and wait for another set of fireballs. Drop down to avoid the fireballs and they’ll wake up the robot, killing the wizards below. You’ll find this cave’s upgrade cog just after the wizards. Fall down to the left and break the block, then fall down to exit this cave. |
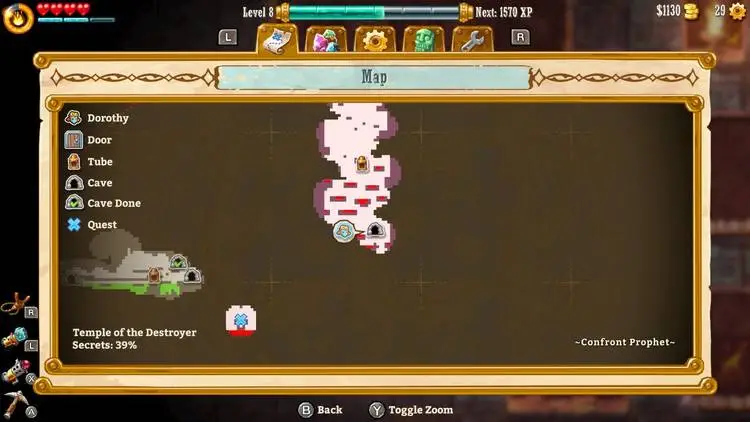
Start digging down and you’ll find a lot of explosive barrels and cult members. This area is really tough as those barrels will explode if you stay near them long enough and deal a lot of damage. You could hit them with a pickaxe and they’ll explode a couple seconds later. This is definitely the safest way to deal with them. If you get caught in an explosion, it could push you down a pit, taking fall damage, and into another cultist who could blow up a barrel. You could easily die in this area even if you have full health so be very careful. As you keep digging, you’ll reach an area with a lot of lava pools. If you haven’t seen a pneumatic tube yet, head to the upper right of this lava pool section. The hanging lava gardens pneumatic tube will be here. Keep digging down, making sure not to fall into lava, and hug the right wall. You will soon find the Spikes & Conveyors cave. The cave will be located in the screenshot below.
| Spikes & Conveyors Ride the conveyor belts to the right and avoid the spikes. Feel free to use hook shots on the ceiling to just get around them when it’s easier. Now you’ll reach an area with a big pit below you. Jump across the conveyor belt platforms here. Use hook shots to save yourself if you fall. At the end, don’t climb up yet. Drop below the last conveyor belt and use hook shots along the bottom of this platform to head to the far bottom right corner. Wall climb straight up this wall for a hidden upgrade cog. Slide back down the wall and hook shot back up to where you came from. Use hook shots to climb up this area with conveyor belts and avoid the spikes. At the top, start heading to the left. Use the hook shot to ride conveyor belts and avoid the spikes and lava here. When you drop down and ride a conveyor belt to the right, you’ll see a single block without a spike on the left wall. Jump and hook shot through it for a secret with an artifact. The screenshot below will show where it is exactly. Follow the path up with more conveyor belts and hook shots to avoid spikes. Be careful, these conveyor belts move very quickly! Pick up the Hallo Katze Chainsaw artifact. Fall down to the left and break the block to return to where you entered this secret area. Follow the conveyor belts to the right and avoid the spikes with hook shots as needed. You’ll drop down and head back to the left. Jump over the lava at the end and pick up the upgrade cog. Dig through the blocks to your left to exit this cave. |
Keep digging down while remaining safe from the lava and explosive barrels. You’ll fall through to an open area with a switch that doesn’t do anything just yet. To the right of that switch is the temple bowels pneumatic tube you should open up. Head to the left along the lower path and towards the Combuster’s Station. Before you head in, make sure to grab an upgrade cog. You’ll have to go through water and will need several hearts to do so without dying. The mod to not take initial damage from lava helps too. Just drop to the left into the lava and go under and to the left. You can come out the other side and blow up a cracked block with a pressure bomb. Just hook shot to the left to get to the upgrade cog. Now go up to get out of here through another cracked block and enter the cave.
| Combuster’s Station Head to the right and you’ll enter a brief cutscene with the Great Prophet. You will now enter the boss battle against him. Movements: He will only teleport randomly. If you pay attention to when he teleports away, a little dust animation will appear showing the direction he teleports to. Attacks: Stage 1 – He fires off fireballs like the wizards you faced in the Grim Hollow cave. Stage 2 – Again, similar to the fireball like the wizards but instead of just firing in 4 directions, it shoots diagonally too, firing in 8 directions. The cannons found throughout this room will also fire off as well. Strategy: You’ll want to start by taking your time and clearing the room as much as possible. Use your pickaxe and the boss’ fireballs to clear out as many blocks as you can early. When you get close, quickly attack it a few times with your pickaxe until it teleports away. Looks for the smoke animation as it teleports away to know exactly where it’s going. Just keep following it around. Once it’s down to only a third health left, it’ll start firing off 8 shots instead of 4 so you want to hurry up and kill him at this point. This is why I recommend clearing the room as much as possible early on. The cannons also start firing off at this point as well. Keep fighting him off as quickly as you can during this phase to finish him off before his attacks become overwhelming. After you defeat the Great Prophet, fall down the opening that appears in the cutscene and pick up the Ignition Axe. Head to the left and hit the robot with your axe to get it to move. Continue along the path to the left and use the ignition axe to move any other robots you need to move. The second robot you hit, you’ll have to hit a few times. Fall into the small hole underneath it when it’s safe and hit it again to move it once more to the right. Continue up the path here and move the last robot to the far left wall. Jump on its back while it stopped at the far left and break the brick block on the wall with your jackhammer for a hidden upgrade cog. Now head to the right to exit this cave. |
Disable Device/Talk to Rosie
Head back to the right until you get to the large room with the switch. There are three braizers that you need to light to activate power to the switch. The first is in the upper left corner of this room, the second is just to the left of the switch, and the third is in the upper right corner. The switch in the upper right will require you to move the robot by hitting it with your pickaxe. Once all three braizers are lit, head back to the switch and activate it. Drop down into the open door. You’ll fall around a cave called Device of Doom. Enter that cave.
| Device of Doom Simply jump to the left and enter a conversation with Fen. Just hit the device a few times with your pickaxe and it’ll be disabled. That was easy! Head back out of the cave the same way you entered. |
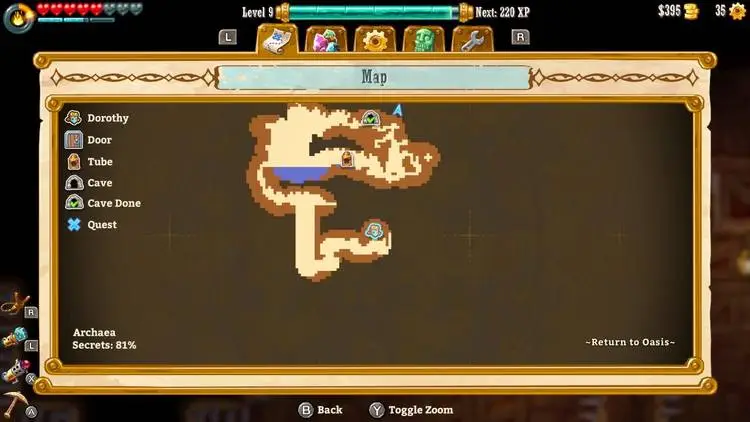
Climb out of this pit area and enter the pneumatic tube at the top. Head to the Oasis which is just to the left of where you are now. Talk to Rosie once you get there.
Explore Vectron
Leave the Oasis via the door to Archaea to the left. Dig straight down. You’ll go through quite a bit of digging while collecting ores and fighting pesky birds that like to charge at you. Your best bet to deal with these birds is to just use pressure bombs and run away from them. Try to tag them with a bomb early as they can outrun you. After quite a bit of digging, you’ll run into a pneumatic tube named Lower Mining Outpost around the middle of it. Below the pneumatic tube you’ll find a ladder with some water right below it. Directly beneath the water is an upgrade cog. You’ll see a cracked block below that is blocked by a stone block. Just break the sand beneath it to drop it down and use a pressure bomb on that cracked block. Below is a screenshot of the pneumatic tube and the upgrade cog’s location. Dorothy is standing on the upgrade cog here. I included the edge of the Temple of the Destroyer map as a point of reference.
Continue digging downward while being careful of all cacti and collecting as much ore as possible. The path will soon become very narrow. You’ll drop into a big cavern at the bottom. Don’t worry about taking damage, you’ll land in a large pool of water. Swim to the right and break open the Bottom of the Mine pneumatic tube. You’ve now officially reach the bottom of Archaea! Continue to the right and you’ll see a cracked block that you can’t break from this side. Keep jumping up and to the right. Jump into the small opening on the right side and wall jump up to the upper right corner of this section to reveal a secret containing the Monster Face Plushy artifact. Continue climbing up and enter the small opening on the left when you reach it. You’ll see a cracked block in the ceiling in the upper left corner of this alcove. Shoot it with a pressure bomb and you’ll reveal a secret containing an upgrade cog. Pick it up. Now continue up to the top of this path and go left to enter the Mysterious Cave.
| Mysterious Cave This cave is really straight forward to begin with. Just follow the path through the clay blocks. The only spot where it splits is to backtrack. At the end of the path, you’ll find the portal to Vectron. Dorothy is brave enough to enter it, even if Fen refuses to, so head in! The intro to Vectron is very straight forward. Just follow the path until you reach a wide area with clay. Be careful falling down here and slowly move to the left wall. You’ll find an expensive ore on this side but it’s easy to miss as you don’t have much time to avoid the crumbling clay. After you fall through the rest, just slide down the left wall. You’ll see some floating spirits and TVs near them. When you get close to one, they’ll quickly enter the TV and self destruct. If there’s no TV nearby, they’ll just explode in place. Once at the bottom, head to the middle. Lure the spirit into the TV and drop into the new opening. Just keep moving quickly through this next area to the right to avoid all of the spirits. Stay on the upper path until you reach the end and drop down. Have the spirit down there destroy the TV and run to the far right. Don’t worry, your game isn’t crashing, it’s part of an animation here. Continue climbing the walls to the right and over the dirt mound ahead. Before continuing, clear out the dirt for the little opening. You’ll need to hide in here soon. Head to the right and a robot will block your path. Lure the spirit here into the robot and run to the left into the little hole. When the robot passes, climb out and run to the right without slowing down until the robot can no longer chase you. Slide down this long wall so you don’t take fall damage. This part can be rather tricky. Head to the far right without triggering any spirits to head to robots. If you do, just run! Don’t slow down, don’t think about stopping for anything.. Run and jump at the end of the path. You’ll land in water and the robots will keep going. Just keep wall climbing in the top right corner until the robots power themselves down. Now head to the left and climb up the wall. Enter the first opening you see. Follow this path and avoid the spirits. Just dig as quickly as you can and run to the left when you reach the bottom. You’ll enter a cutscene before you die and you’ll return to the mysterious cave. Start climbing the platforms to the left and enter the contraption to unlock the Jet Engine. This is a jetpack that only works for a couple of seconds and you can use it by holding B. Work your way to the top of this cave by jumping from platform to platform. At the top, break the blocks to the left and follow this path to reunite with Fen. Climb out of this cave using your jetpack and breaking the sandblocks to free your way. Before leaving the cave, jet pack to the opening in the upper right corner. Use a hook shot on the dirt up there to refill your jet pack to use again. You’ll find an upgrade cog up here. Now leave the cave to return to Archaea. |
Return to Oasis
The objective is now to return to the oasis but let’s backtrack a bit first to grab some more goodies with the jetpack. Break the blocks to the left when you leave the mysterious cave. Fall into the water to the left. Head to the far left wall and use your jetpack to wall climb to the top left corner of this area. Break the cracked block up here for an upgrade cog. Drop down and fall to the left. You’ll see some signs reading danger, don’t worry about them! Look under the brick blocks and you’ll see spikes on the walls. This area is riddled with spikes and requires some quick reactions. Break the bricks and fall down. Use your jet pack when you start gaining speed to slow yourself down and move to the right at the bottom, hook shot to safety. Let your jet pack refuel and use it along with your hook shot to head to the platform to the right. Keep alternating between jetpack and hook shot as you progress to the right without hitting any spikes. Soon, you will see a single stone block, aside from the wooden crates you want to hook shot. Hook shot into that for a secret area with an upgrade cog. The screenshot below will have that upgrade cog.
Continue to the right while using hook shots. Don’t be afraid to use your jet pack to scout ahead a bit and go back to where you started. Work your way slowly to the right and then straight up. Once at the top, head to the left and you’ll be rewarded with another upgrade cog and some rare ore. Head back up and to the bottom of the mine pneumatic tube. Don’t go to the Oasis quite yet. Instead, go to the Below the Wall pneumatic tube and head down to the Rupture Rock Cave.
| Rupture Rock Cave (Revisited) You’ve been here before and should know the trick. In case you need reminding, fall to the left and break the cracked block in the lower right. Climb back out and head to the right. Break the next cracked block and race to the upper right corner. Wait for the cracked blocks to catch up and climb on top of them immediately once you can. At the next section that the cracked blocks go up again a little bit, jet pack straight up and hook shot up right as your jet pack is about to run out of fuel. Quickly head to the left and break the cracked block in the upper left corner of this room to reveal a hidden upgrade cog up here. Now head out of the cave. |
From here, you can either go down to the door to the Oasis or climb back up to the Below the Wall pneumatic tube and enter the Oasis that way. Whichever way you prefer, take it, and talk to Rosie. You’ll see that there are three more devices to destroy. One in the west temple, one in the east temple, and the last in Yarrow. Let’ start tackling them from left to right, working in the order the objectives display in the map.
Unlocking Long Range Grappler
This isn’t an objective at the moment but we have the ability and it makes traveling around the world much easier. The long range grappler is in the temple of doom and requires lighting a few braizers to unlock. Head to a pneumatic tube and go to the Golem altar in the temple of the destroyer. Head to the left and move the robot by hitting it with your pickaxe. Climb up the wall and wait for it to fall so you can safely pass. Light the braizer here with the pickaxe. You can follow the path to the left to enter a secret area in Archaea for an upgrade cog but if you’ve been following this guide, you already got that one. Head back to the pneumatic tube when you’re ready and go to the conveyor maze pneumatic tube. Move the robot to the left and light the braizer on the other side of the wall. Head to that pneumatic tube again to head to the temple entrance. Use your jetpack to fly straight up from the pneumatic tube and enter the door up here. Light the final braizer in this room. Now use a pneumatic tube again to return to the temple bowels. Fall down towards the device of doom cave and follow the path to the left. Flip the switch at the end of this path and enter the cave here.
| Ronald’s Treasure Chamber Head to the left and pick up the ore there. There’s one little alcove in the ceiling that doesn’t have a torch here, just fly up into it. At the end of this path, you’ll find a contraption to unlock the long range grappler as well as three upgrade cogs and a rare ore. Pick them all up and leave the cave. |
Destroy Devices [West Temple]
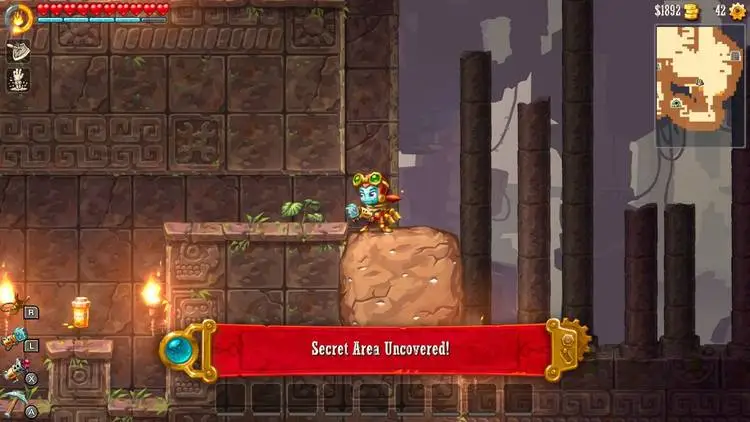
Let’s start destroying these devices going from left to right. Take a pneumatic tube to the Above the Wall pneumatic tube. Head to the left to enter Yarrow. Follow the path to the left by dropping down in the water and circling around to the upper left corner. After you mine through the reappearing dirt blocks to the left, use your jet pack to fly upwards. When you climb up, follow the path, and soon you’ll see a small hole three blocks wide under the ground. Hit the right most block there to reveal a secret. You’ll find Luke Yanker in here. You’ll find the Thrillseeker’s Tale item in here. This item will give you twice as much XP from killing enemies but they’ll only drop orbs from creative kills such as getting a beetle to drop into water or getting them to kill themselves. After you enter that secret area, continue to the left to enter the catacombs of the Temple of Guidance. Fall to the left and start digging through the sand. The game will tell you that you’ve found a secret area even if it is really obvious. Follow this path to the end to enter a cave.
| Chamber of Secrets This cave starts off with a big maze. Just follow the path and do the following at each split in the path: Drop Down Go Right Go Right Break the sand block at the end of this path and go back to the last split you came from. Go Up Go Left For reference, you should be back near the start, go right where you cleared the path. Go right at the next split You’ll see a switch in the room at the end here and a room below with a block of ore. Flip the switch to open the door to the ore and close the door to the room you’re in. Just fly out in the top right corner to reveal a secret. Loop back to where that ore is and pick it up. Now head back to the left and drop down. When the path splits, go to the right. Go down immediately at the next path split. The floor will break and you’ll fall into some water. Swim through the water without hitting any spikes and pick up the ore at the end of this path. Break open the cracked block to your left. Climb up here, go left and then down. Look at the button on the ground and jetpack over it. It’ll shoot an arrow from your right. Follow the path and there will be another button when you drop down. Avoid that as well to avoid an arrow shot from your left. Follow the path and you’ll soon reach a series of switches that controls multiple doors. Flip the switches in the following order: 4, 3, 2. You’ll see all the doors open up. Head to the left and break open the cracked block. Follow the path back to the doors and continue to the left to enter a contraption to unlock the grenade launcher. You can now turn your pressure bomb launcher into a grenade launcher. The explosive has a much bigger radius but it’s a little harder to aim. Just fire it at the boxes to the left to clear the path. The wall to the left is actually fake but don’t run through it or you’ll step on a switch that fires arrows at you. Just jetpack through the wall and drop down the pit ahead for the Old Unopened Invitations artifact. Now backtrack and go up where you went through the wall. Now follow the path up while avoiding the spikes along the way. You’ll soon reach another wall of crates, use your new grenade launcher to make quick work of it. You’ll now be rewarded with an upgrade cog! Continue a bit further and use your pressure bomb to break the next crates and then just break the rest with your pickaxe. Break open that cracked block down below to open up the path to the exit. |
Now start flying upwards with the jetpack. You’ll find a large shaft here. You’ll end up on the right side of it. Just keep wall climbing up here and wall jet pack up the upper right most block here. You’ll enter a secret area. Break the blocks below the large stone and follow it down. Fall down to it and break a block to the left of where it lands to reveal a secret with an artifact. Below is a screenshot of its location.
Now head back up to where this rock was but enter that tall shaft to the left. Climb up here to unlock a pneumatic tube entitled Lower Temple Shaft. If you continue to the left, you’ll fall in the beginning area. There’s no need to go back here so fall back down the shaft where you came from. Start off this area by heading to the far left wall. About half way up, you’ll see an upgrade cog on the other side of the wall with a single sand block between you and the cog. Break it with a pressure bomb and pick up the cog. After you pick up that upgrade cog, head straight down and dig through all the dirt here while collecting some ore. You’ll find a switch at the bottom of this path. Flip it to open up a door above. Climb out of this pit, towards the door, and follow the straightforward path in here. Step on the switch over here and the ground below you will fall apart. There’s a pneumatic tube you can open up in the lower right. You’ll also see two caves here. Fly above the right cave and you’ll see a small opening in the wall. Hit this brick block with your jackhammer to reveal a hidden upgrade cog. View the screenshot below for its location. When ready, enter the cave on the right.
| Chamber of Wheels You’ll see a wagon to the right. If you hit it, you’ll see that it’ll just go in the direction you hit it until there’s something to stop it. Hit it to the right and follow it. Break it by hitting it a few more times. Another will drop to your left now. Just hit it to the left and it’ll fall on the switch. Fly through the open door. Follow this path for another locked door. There will be two openings in the ceiling above here. Fly up the right opening and hit the wagon to the left. Follow it down and hit it to the right for it to land on the switch. Enter the open door to the left. Explore this whole area and you’ll find three mine carts and multiple switches. Head to the upper left most mine cart and hit it to the left. Once it drops, hit it to the right. Now head to the lower mine cart and hit it to the left. Let it drop and head up to the upper right cart. Hit it to the right. Once it drops, fly around so you’re to the right of it and hit it to the left. Follow it and two carts will be standing on top of each other. Hop on the top one and shoot a pressure bomb at the sand block to the left. You’ll find the Wagon Wheel artifact here. Now just hit the bottom mine cart into the hole to the right and when the top mine cart drops, hit that to the right for it to stop on the switch. Drop down and open up your upgrade cog reward for clearing the cave and exit the door to the right. |
Step on the switch above you to open part of the path to the device of devastation in the temple of guidance. Drop down and enter the cave on the left to enter the Chamber of Arrows cave.
| Chamber of Arrows Head to the right and you’ll quickly find an ore in the ceiling. Break it free with a pressure bomb. Drop down slowly and you’ll see some arrows shooting out of an opening in the left wall. All of these arrows will shoot in bursts of 3 and then pause for a couple seconds. Follow the path, timing your movements to avoid the arrows. The arrows will move faster than you so try to jump behind the 3 right away and sprint forward until you find a spot for cover. Soon you’ll have to go straight towards the arrows. You’ll want to hook shot to the openings in the ceiling to avoid these arrows. The path will continue upward but you want to keep going left towards the where the arrows are coming from. At the wall, hookshot straight up for a secret area with the Toy Rocket artifact. Now head to the right and enter that opening in the path above. Refill your water tank when you reach the pool of water. At the end of this path, you’ll reach a round room with a switch on the platform above. This room is really dangerous. You’ll see holes all over the walls for arrows to come out of. Stepping on the switch will trigger a sequence of arrows. You want to focus on using this platform for cover from the arrows by using your hook shot. The arrows will fire in a pattern. First it’ll be half the room covered in one direction, then the whole room covered in that same direction. Then it’ll change directions and repeat that. It’ll start going clockwise starting in the bottom left, then bottom to top, then top to bottom, then left to right, then right to left. A path will open to the left heading to an upgrade cog and the exit. |
Step on the switch above and enter the open path to the right. It might be a little tricky so use your jet pack and hook shot as needed. Enter the cave up here when ready.
| Device of Devasation Simply break the device of devastation for a brief cutscene. |
Before continuing on to the next temple, you may want to visit El Machino. Go straight to the top, up the ladder and up the platforms to talk to Clifford Heisenberg. He’ll sell you a more powerful pressure bomb to go along with your new grenade launcher for 500 gold and then equip it at the work bench for 3 upgrade cogs. If you don’t have 500 gold yet, just start saving it grab it for your next upgrade.
Destroy Devices [Yarrow]
Head to the upper part of Yarrow, preferably from the door in the Temple of Guidance. Go straight down and you’ll reach that room of mushrooms. Bounce up them and continue to the left to start digging deeper into Yarrow. When you reach the dripping pipe that Fen talks above, drop straight down and you’ll find a pneumatic tube, break it open. You’ll have quite a bit of digging from here so start working your way downwards while going left and right to pick up as much ore as possible. You’ll soon find a cave. If you’re having trouble finding it, dig straight down along the right wall. When you reach a pool of water, dig straight to the left and you’ll see it.
| Swim Swam Sway This cave is a bit tricky, especially for all the secrets. It’s mostly swimming and very straight forward. The first half is just avoiding spikes in the water and the second half is avoiding spikes and those little pink monsters that shoot at you. Start to go down the first half and sink to the bottom. Hug the left wall as much as possible and you’ll see an opening big enough for you to fit between the spikes on. Hook shot there and slowly work your way down the left wall until you find a cracked block. Break it open for the Amiigo Figurine artifact. View the screenshot below for the location of this artifact on the minimap. Follow the path downward and collect the topaz when you pass it. Break the cracked block vein at the bottom to continue downward. Avoid the shooting monster ahead and break the next set of cracked blocks. Continue through the path and move quickly while avoiding the spikes so you don’t get hit by the pink spitting monsters. When you reach the top left corner, drop to the left of the spike blocks and break the sand here for some more ore. Now swim upwards and hug the left wall. You’ll quickly see another cracked block. You want to swim a little to the right to get the pink shooting monster to start shooting at you. Quickly swim in front of that block so the shots home in on it to break the block so you can pick up an upgrade cog. Now just swim up as quickly as you can to avoid being shot, just be mindful of all the spikes. You’ll be rewarded with another upgrade cog once you get out of the water. Head to the right to break a block so you can reach the exit above. |
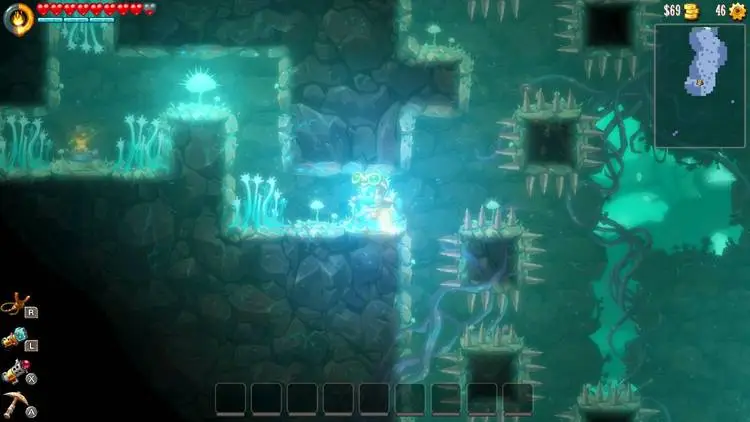
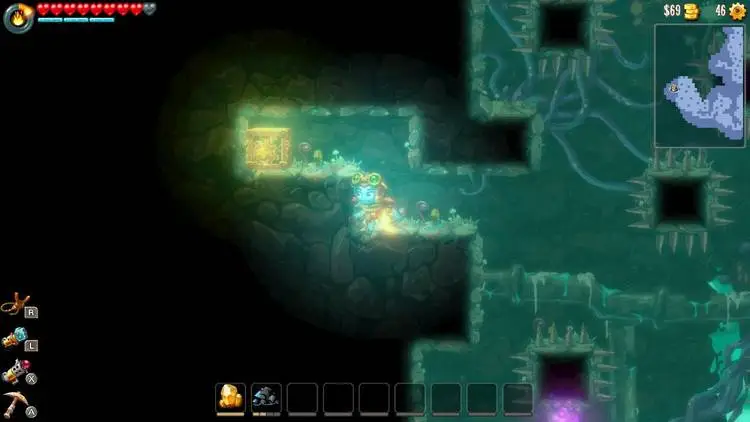
There’s nothing else of note while you dig down a bit more. Hug the right side a bit while you collect ore and you’ll find another pneumatic tube entitled Above the Acid Swamp. This area is very dangerous. There’s lot of acid dripping from ceilings, there’s acid pools all over, and the blocks are regenerating. Furthermore, when the acid drips onto a block, it’ll explode and cause some splash damage. If you’re touching a block when it disintegrates from the acid, you will take damage. You’ll see there’s a path to the right but there’s nothing you can do there just yet so keep heading straight down. Hug the right side more as you head downwards for another pneumatic tube named Below the Acid Swamp. Once you reach that pneumatic tube, you can’t dig any further and will have to head to the left to enter the Leaky Lodge cave.
| Leaky Lodge Drop down and quickly kill the snail below. Follow the path until you reach a large rock. Don’t let it drop, instead, break down two blocks and go under it completely. You’ll see a cracked block you can break open here for the Radiant Orchid artifact. View the screenshot below to see how to reach it. Keep jumping across the platforms to the left while avoiding the acid. Continue to the far left while avoiding the acid to break a vein of cracked blocks. This will destroy a lot of the acid drippers in the ceiling. Head back to the right and climb up the stones that fell. Climb up the path here and continue to the left. There’s an Ametrine ore under the snail you can pick up. At the end of this path, you’ll find a pool of water. Refill your water tank and you’ll see a large stone just to the left of the water. Shoot a pressure bomb to break it loose so it falls. Drop down onto it and shoot another pressure bomb to the right so that one falls. You guessed it, now drop onto the last stone that fell and shoot a pressure bomb to the right. Collect the ore in this area while dealing with the snail. Continue a little further to the right and you’ll enter a large cavern. Jetpack up for a hidden ore up here. Continue to the right while avoiding the acid drippers and climb onto the regenerating dirt blocks. This area is tricky, especially if you fall below the dirt blocks that regenerate.Count how many acid drippers you go past once you start on the regenerating blocks. In between the second and third acid dripper, you’ll see a small dirt block in between the rocks below where the acid pools are. Drop down and break it to reveal a secret for an upgrade cog. Below is a screenshot showing where you want to start digging down. Climb back up and try to get above the regenerating blocks. Keep going to the right as it’s safe to do so. Slide down the walls at the end and snails will break loose from little alcoves on each side. You’ll have to deal with them at the bottom but it’s not as daunting as it seems. Simply lure one and hook shot straight up. Let them keep breaking the blocks below you and they’ll open up a path to the left to reach an upgrade cog and the end of this cave. |
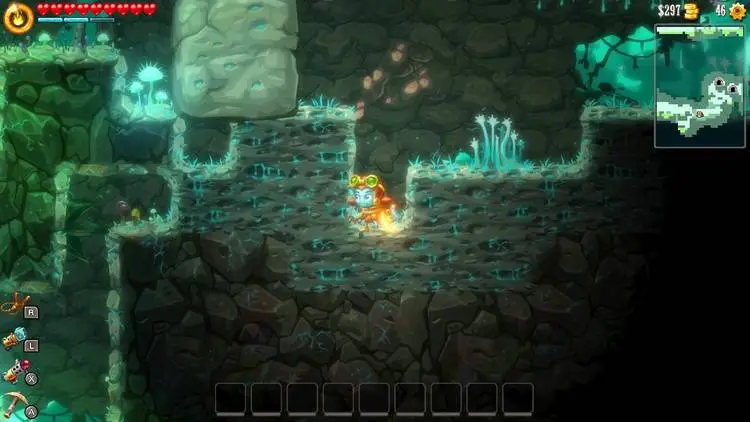
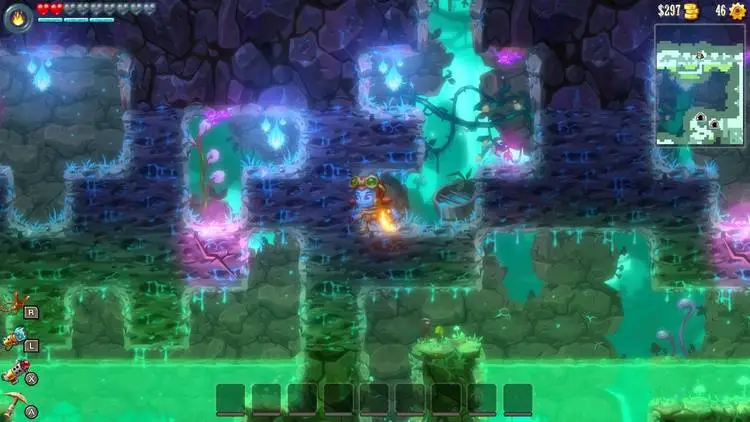
Start digging down going side to side to collect ore. You’ll soon find a section along the left wall with a 4 block stone and a single stone on top of it. Break the sand blocks below it it for them to drop and jump on top of them. Just run through the wall to the left to reveal a secret containing the Sacred Documentation artifact. View the screenshot below for the location of this secret entrance.
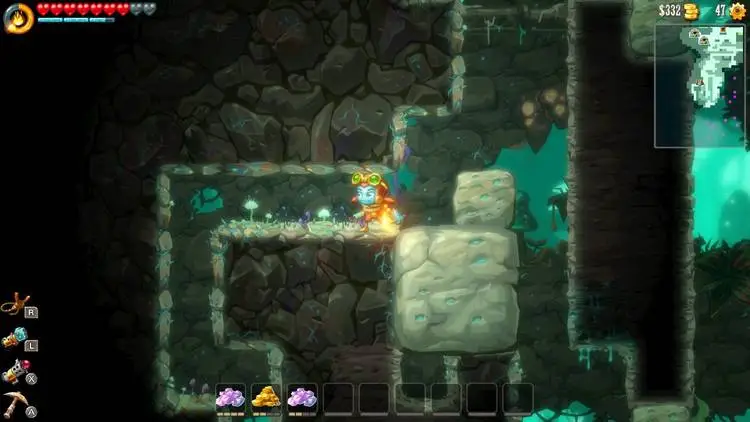
You’ll have to climb out of this secret area after collecting the artifact. There’s plenty of more digging to go to collect ore until the next landmark. There are new monsters here, a pink blob. If you jump on it, you’ll bounce off but it’ll begin to explode. Hitting it will also cause it to begin exploding. Once it explodes, all the blocks around it will become pink and explode as well, which causes splash damage. They’re easy to run from but once it start sto explode, make sure you’re nowhere close to them. More towards the right hand side, just a little further below the secret, you’ll see a new cave entitled Hodge-Podge Hang.
| Hodge-Podge Hang Fall down the platforms here and you’ll reach an area of platforms you have to jump across. Before you start jumping, fall under the platform you’re on and hook shot as far as you can until you reach the metal panels on the ceiling. Jet pack across those panels and hook shot at the end. Climb the far right wall and you’ll find a secret area with the Scented Candle artifact. Look at the screenshot below with the minimap for reference. That’s the entrance to the cave in the top left corner of the screen and you can see in the minimap where I went to reach the artifact. Just fall to restart the cave and you’ll keep the artifact. Fall back down to the platforms with the pink blobs. The path is very straight forward. I would try to avoid hitting the pink blobs as best as you can to give yourself some more time to work with. There are clay blocks here that will crumble once you touch the top or sides but not if you hookshot to the bottom. Make use of that to refill your jetpack fuel as needed and to slow down a bit. If you touch a pink blob, it’ll destroy the platform it’s on so make sure to avoid them as best as possible. In the top left corner, when you start going right again, jetpack to the left for a small platform with a rare ore on it. Now just head to the right along the top platforms. You’ll have to bounce across some pink blobs which will destroy their own platforms so make sure not to turn back! At the end, you’ll slide down a narrow pit. The bottom is full of pink blobs. Try to just activate one and get back into this narrow shaft. Hook shot to a wall and just wait until all the blobs are destroyed. Pick up the upgrade cog at the end and break the block below to exit the cave. |
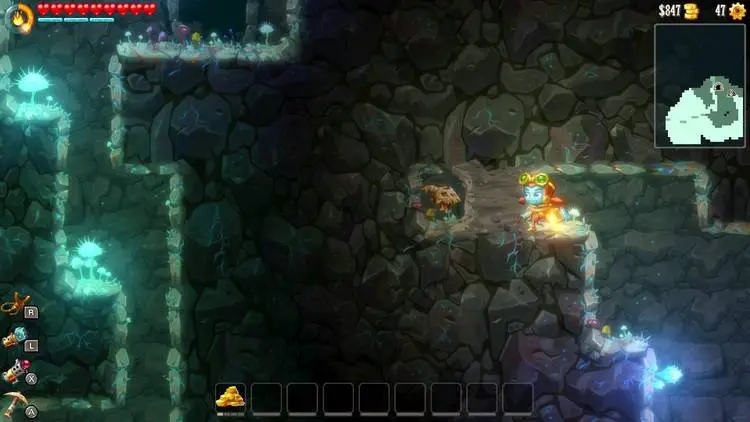
Start digging downward even further. You’ll soon reach a big area in the center that is all stone that you can’t dig through. Each side is regenerating blocks so it’ll be hard to escape this area, although not impossible with the help of shooters down below that can clear the path for you. You could also bounce on the jellyfish down here and break the blocks with your head if you need to escape. Just be very careful in this area. It’s hard to control Dorothy with all these jellyfish and avoiding the shooting blobs at the same time. In the middle of this area, right at the ceiling, you’ll find a single sand block. Bounce into it from a jellyfish below to break it open to reveal an upgrade cog. Now keep heading downward and you’ll find the Mushi Mushi Snuggery cave in the middle down below. If you reach a pool of water or acid, you’ve gone down too far. A screenshot below shows the hidden upgrade cog in this area.
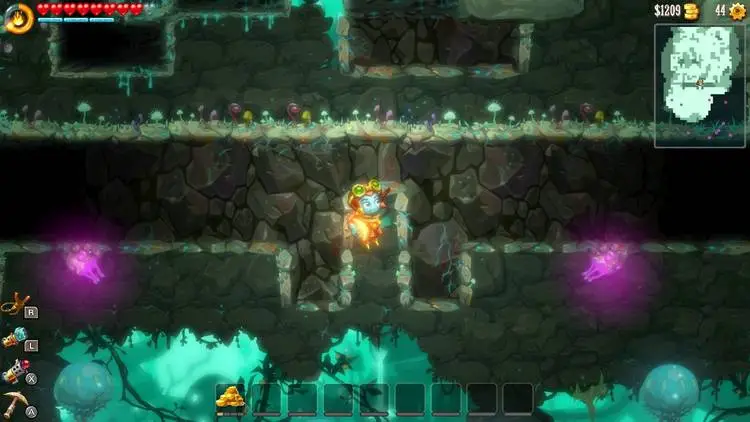
| Mushi Mushi Snuggery This cave is very straight forward and there’s no tricks or puzzles. It’s just tough with all the spikes, bounce pads, and shooters to hurt you. Simply follow the path and you’ll find a diamond in plain sight along the way. Make sure to use your hook shots to stabilize yourself and get through tight areas safely. There’s a point where you’ll see some sand blocks to your left when you go down and have to start going right. You’ll have to head a little to the right to lure some shooters to shoot at you and then have them go for the sand blocks. Head over there for the Bowl of Cereal artifact. View the screenshot below for its location. Just continue along the path from here to the right and you’ll find an upgrade cog just before the exit. |
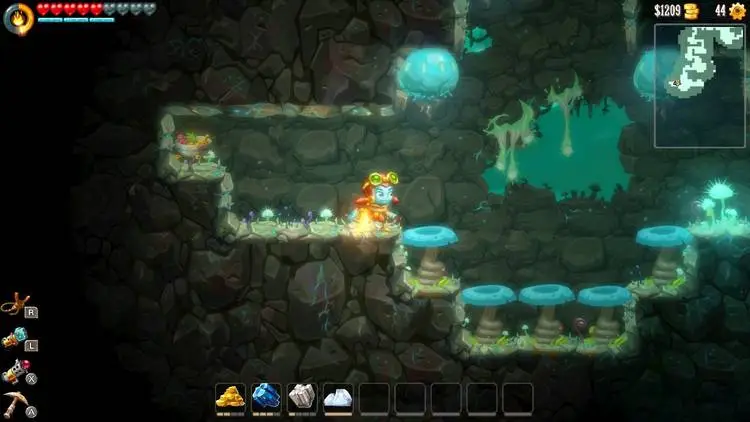
Keep digging straight downward from here and you’ll soon reach the mushroom pond pneumatic tube. Dig down just a little further, along the right wall, and you’ll find the Bushwack Beehive cave.
| Bushwack Beehive Follow the path down and you’ll see some bees. These don’t fly to you, they’ll fly in a set pattern constantly. If you hit them, they’ll fly away from you and explode when they hit something else. All the blocks within their explosion will also slowly explode so stay away and make sure not to hit them right into a wall you’re next to. Take a look at the ceiling as you follow the path to the left. You’ll see a cracked block you can’t break and to the left of it, some sand blocks in the ceiling. To break this, you’ll need the sky assailant mod on your pressure bomb. This requires you to have the level 4 pressure bomb which has a required level of 14. You’ll need a total of $1,400 to upgrade this to tier 4 and then 3 upgrade cogs to unlock the mod. You may have to come back for this one at this point but just fly up and shoot a pressure bomb up at the right sand block here. The Still Life, Stil Hope artifact is up here. Follow the path to the lower left and break open the ore down here. Break the cracked vein to clear up most of the cave. Work your way back to the entrance/exit door while killing the bees safely. Break the path open for the upgrade cog at the end. |
Start digging even further down while collecting more ore. The next point of interest here is along the left wall but it’s quite a bit down. It’s a cave called Lime Loop.
| Lime Loop This room is all about speed and will likely take you a couple of tries. Head down to the switch at the bottom and keep going as far right as you can. Break the ground tile and you’ll see when you fall through this hole, you’ll end up in the top of the room. Climb back to the switch and open the gate about. Fall down quickly and enter the door before it closes for the upgrade cog. Break the cracked block vein below and fall down. Instead of going left to the exit, just jump to the right to reveal another secret. Run off the screen to the right and you’ll end up at the artifact to the left. Now head for the exit. |
You’ll see a small acid pool to the right. You’ll need some extra health but you can swim through it and find an upgrade cog on the left side of it. The cave on the left in the screenshot below is the Lime Loop cave.
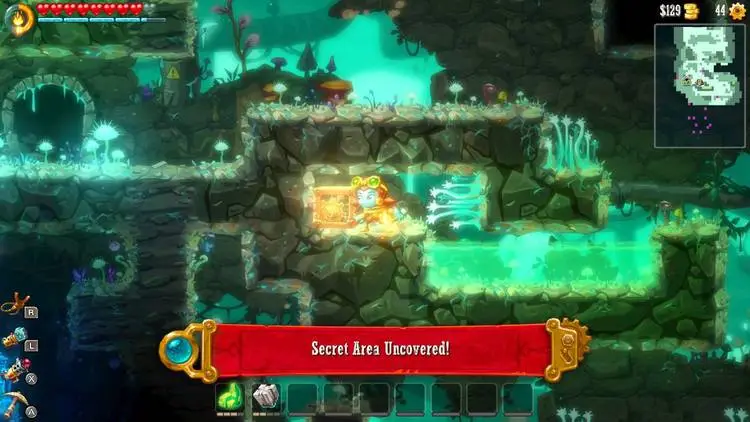
Keep digging downward, being mindful of all the bees, until you reach the Aeronaut’s Station cave. You can’t miss this one.
| Aeronaut’s Station Follow this path until you reach a split. The left will lead to a set of regenerating dirt blocks up high that you can break if you have the sky assailant pressure bomb mod. You want to break the regenerating dirt blocks below though. Enter the contraption for the Ramjet Vigor which will allow you to break blocks above your head by flying into them with your jetpack. Fly back up and get out of here. You can fly to the left and follow this path. Your ramjet will also kill enemies so just fly past the spitter that gets in your way. Once you get back to the entrance, fly up through the dirt blocks in the upper right. Break open the upgrade cog chest there. Before leaving the cave, fly straight up and you’ll see some dirt blocks here. Fly up there for a hidden upgrade cog. |
Just below you is the Mosquito Minefield pneumatic tube. This is the bottom of Yarrow. There are a ton of different ores in here and they’re all expensive so now’s the time to build up your bank account! Keep heading side to side and collecting everything you can. You’ll have to make a few trips to the surface just to clear up your inventory. The cave for the Device of Disaster is in the lower left section of this area but don’t enter it yet. Instead, jump up above it and go left. You’ll find a small opening here. Just fly up through all the sand blocks with your ramjet to find the Birdie Num Num Seeds artifact. Head back down to the lower right corner now. You’ll have to fly under this acid pool and above the other. Be careful because there are a lot of spitters here. At the end of this path is the cave entrance along with a vein of cracked blocks you can destroy to get out of here later.
| Device of Disaster Simply break the device of disaster in here. |
Destroy Devices [East Temple]
It’s finally time to destroy the last device! Take a pneumatic tube to the Temple Bowels in the Temple of the Destroyer. Begin this quest by heading to the right. Once you reach the open area of lava, jet pack straight up and you’ll find an upgrade cog here. Just jetpack up the left most block to get to it. Now drop to the ground and head to the far right. You’ll reach the edge with a pool of lava. Jetpack to the right and hookshot there for a cracked block with a secret area. Pick up the ore and head back to the left. Now just sprint jump and jetpack back to the right to reach the higher platform. This next section is very straight forward. The floor everywhere is lava and there are walking robots in it along with lava drippers in the ceiling. Just keep working your way to the right with hook shots and your jetpack. There is a health pick up midway through if you’re running low on health. When you reach the end of this are and have to start going down, go to the top right corner for a rare ore. Drop down along the right alcove and you’ll see a sand block to the right. Break it with a pressure bomb and go in there for an upgrade cog.
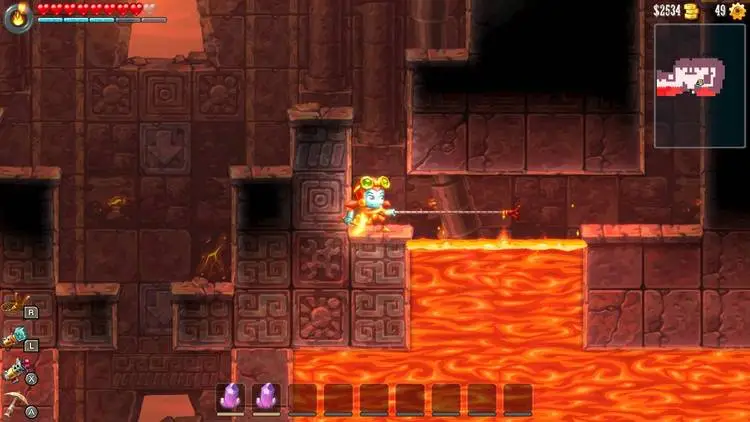
Wall slide down this long pit below. Don’t just fall because there’s nothing to stop you from dying at the bottom. Open up the pneumatic tube down below for another fast travel point. Start heading to the left but go up the first chance you get to find a diamond ore. Now just keep digging to the left. You can use your ramjet to burn any sand blocks that block your way making it pretty easy to stay along the top of the room. You’ll want to stay in the top of the room because you’ll soon run into the Infernal Crates cave.
| Infernal Crates Jump up to the left and break the sand block between both conveyor belts. Flip the switch for the crate to fall onto the pressure plate below. Enter the now open door to the right. Pick up the topaz as you continue to the right and fly up above where the crates are flying into lava. Break the block here and ride the conveyor belt to the left. Hit the switch here. Break all the crates that block your path as you move upwards. At the split, go to the right and then go up at the next immediate split. You’ll be standing at a switch and overlooking the entire room. This switch will stop all the conveyor belts. You want to stop it right before the crate flies off the top conveyor belt. Then quickly flip it so it drops slowly to the next conveyor belt. The trick here is you have to get it stopped on the left edge of the right most conveyor belt. Once you time it right to stop there, turn it on and don’t touch the switch again. It’ll end up on a pressure plate that you passed. Before you follow the crate, head to the upper right corner of this room and blow up the dirt block with your pressure bomb if you have the sky assailant mod. If you don’t have it yet, you’ll need to come back here. There’s a switch at the top of the room that controls the conveyor belts. you want to manipulate it so it stops at the edge of each conveyor belt before a crusher blocks it, but activate it again before a crusher crushes it. It’s all about timing but you do want to stop it at the end of each conveyor belt, even if just for a brief moment. This will open up a room for the Holt Toast artifact. Now, head to where that crate from the previous room wound up and fly straight up. You’ll end up at another switch overlooking a room. This switch will only control the two upper conveyor belts. Stop the conveyor belts so the crate doesn’t get smashed by the crushers as you let it progress through the room. Stop the crate when it’s on the left edge of the middle conveyor belt. Turn the switch on once you see the lowest crusher begin shaking. It’ll come out to another pressure plate below. Head through the open doors below and fly into the clay block to reach the upgrade cog. Head down to the exit. |
From here, just keep working your way to the left while staying out of the lava. There will be a lot of cultists from here so just be mindful of that. They can see you through blocks and can break blocks to reach you. Once you reach the left end, slide down this shaft to another pneumatic tube entitled Basement Entrance. Follow the path down and to the right. Once you reach the area with a lot more dirt to mine through, head down below the platform you’re on and go straight to the left with your hook shot. Just run into the wall down here and you’ll find an upgrade cog. Head back to the right and go straight up once you can. The path will split here. Go left for some rare ore and then head back to the right for a cave called Mine Cart Madness
| Mine Cart Madness Use your jet pack to fly through the clay block to your right. There are two mine carts in this room. Hit the upper mine cart to the right and then go to the left minecart. Hit that to the right as well. Follow it down and go to the right through the open door. Use your jet pack to enter the next mine cart puzzle room. Hit the left mine cart to the left and then the right mine cart to the right. They should both be in the same area. Hit the right mine cart to the left so it stops at the left mine cart. Now break the left mine cart and it will respawn just above you. Hit the new mine cart to the right and then the left mine cart to the right to open the next switch. Grab the upgrade cog through the door. Now continue to the right for the last puzzle of this cave. This last puzzle involves a lot of steps so just do the following: > Hit the top most cart to the right and then to the left. Break the cart just to the left of that cart that you just moved and quickly hit it to the right before the one you just broke respawns. It should stop on the far right ledge. > From the current position of all the carts, hit the upper most cart to the right and then hit the left most cart to the right. > All 3 should now be very close to each other, destroy the middle cart of the 3. > When the cart respawns above you, hit it to the left. Now drop down and hit the middle cart to the left. > Destroy the left most cart. When it respawns in the upper right, hit it to the right and then to the left. It’ll drop through the first clay block. > Break the upper left most cart. When it respawns to the left, hit the new cart to the right. Follow it down and hit it to the left when it stops. > You should now have two carts right next to each other just to the left of the lower clay block above the switch. Break the left most cart down there. > The upper right cart should respawn, hit it to the right twice until it’s on the lowest platform and then hit it to the left so it falls onto the switch, opening the path for the last upgrade cog and artifact in this cave. |
Keep digging to the right while you collect more ore. There are some prophets in here which can be a pain to deal with, just be careful with them. The map will funnel you into another cave called The Sun Armory, enter it.
| The Sun Armory This cave is really short and not much of a puzzle. Just follow the path to get the ultra composite armor. It’ll allow you to take less damage. Don’t leave yet though! Just jump up the blocks to the right and hit the wall at the top of the blocks with your pickaxe to reveal a secret with a rare ore in it. Pick it up and leave the cave. |
After you grab the ultra composite armor, jump to the left to open up the armory entrance pneumatic tube. Now head straight down and go left behind you hit the lava. Jump through the upper left block in this wall and you’ll enter a secret area. Follow this to the left and you’ll find the Cake artifact. Now head back along the ceiling and go left. You’ll find an opening in the ceiling with a sand block. Fly through it and you’ll find the INCREA Product Manual artifact. Head back down and to the upper right corner of this area. Hit the block in the far upper right to reveal a secret with an upgrade cog. Fly out of here and drop down to the left for the last pneumatic tube here. Head to the right and enter the Device of Destruction after avoiding some more lava.
| Device of Destruction Simply break the device to the right. |
Confront Rosie
Now head for a pneumatic tube and head to the Above the Acid Swamp pneumatic tube in the middle of Yarrow. Head down a little bit and go to the right. Jet pack straight up through these blocks and you’ll find a closed off sewer grate at the end of this path. Break it open with your pickaxe and enter it.
| Sludge River Bend Fall down to the right and hit the bomb to the left with your pickaxe. Pick up the ore to the left that dropped. The bomb should drop behind you again, hit it to the right. Go through the open path and climb the platform to the top while avoid the acid drippers. You’ll see some dirt blocks to the left when you reach the top of these platforms. Break the first one with a pressure bomb and dig through the rest for an ore. Jump to the right of the bomb ahead and hit it to the left. Pick up the ore here and dig down in the newly open area. After you have all the ore, climb up the dirt blocks and head back to that bomb. Hit it to the left by jumping and just using your hook shot at it so it’ll fly to the right. Now head to the left and down the open area you picked up the ore. Go to the right while avoiding all of the acid. When you reach some boxes blocking your way, go back to the left. Fall into the first hole in the ground where the acid dripper is and you’ll find a secret area. Go to the right and break the block above you. Head back to where the boxes were. Once you get past those boxes, climb to the upper left and continue to the left. Break the block at the end of the path and go to the left. Break the sand block under the stone in the upper left and let it drop. Break the cracked block there and head back to the bomb to the left. Use your hook shot to hit it to the right and follow it for the upgrade cog you passed. Now fall back down to where those two boxes were that you dropped and head to the left. Break every sand block you see in your way and keep going until you reach the bomb. Just hit it to the right and it’ll traverse this whole cave to the stone block blocking the upgrade cog at the far right end. Pick it up and exit the cave. |
Break the grates in the sewer when you emerge in the Oasis. You can break open the pneumatic tube again and go wherever you want. You can head to El Machino to get any upgrades you’d like. You should max out all power ups that max out your health and help you survive, including the Gordon Reflexes mod in the light section, Aramid Armor and True Survivors mods in the armor section. You’ll also want the Sky Assailant mod for the pressure bomb. If you don’t have it yet, start farming gold and buy it before continuing. It’s level 4, which will cost you 1400 gold if you haven’t bought anything yet, and then 3 upgrade cogs. It’s worth it! When ready, head to the far right side of the Oasis and enter the door to enter The Reactor.
| The Reactor Simply follow the path until a door closes behind you and you enter a cutscene. You’ll find out Rosie isn’t the nice girl she let on and she has taken Rusty hostage! It’s time to fight her and her mech suit to free Rusty and make the world safe again! There are a few stages to this battle but you deal damage the same way, by hitting a rocket back at her to break her shield and then attack her with your pickaxe. You can actually fly around to avoid her and just hit the rocket with your hook shot to safely hit her with rockets. Just keep in mind that the rockets can go other blocks while you can’t. There’s also health that keeps spawning around the room so collect it as needed. The stages of this boss battle will be as follows: 1. There’s nothing special going on, just hit a rocket at her and attack her when her shield is done. 2. A lot of dirt blocks will appear with beetles everywhere. She’ll fly around for a while that shoot bullets that will fly towards you and disappear when they hit a wall or block. This goes on for a while before she fires another rocket that you can hit back at her to take down her shield and attack her a bit. 3. More blocks will appear but they’re mostly bricks so you’ll need to use your jackhammer to get through a lot of it. There are also those little birds that will charge into you when they spot you. Instead of bullets, she shoots these orbs that will circle around her and bounce off walls so be careful as they can bounce back to you even after you avoid them. There’s also acid on the ground as well. 4. More blocks will appear again but this time, it’s mostly dirt. There are also those charging birds again. The acid will rise and she will start charging with her fist in your direction. After a couple charges, she’ll go back to firing bullets at you. After a while, more blocks will appear and she’ll repeat charging with her fist before more bullet shots. Now she will finally fire rockets at you again. Hit one at her and get some more attacks in to start the next stage. 5. More blocks will appear and she’ll mix all attacks as well as fire off small rockets. These smaller rockets act very similar to the bullets except they will home towards you a little bit. They only home a little bit so they’re definitely avoidable if you have the time and space to avoid them. Once she fires off a big rocket, hit it back at her to hit her a few more times to finish this boss battle. Carry Rusty to safety as you head back to the left. After you reach a wall, Fen will tell you to get in the teleporter to El Machino where you can escape the world before it explodes to complete the game! |
Completing the Rest of the Secrets/Items
But wait, there’s more! if you’ve followed this guide, you have all the important items. The one mod you really need is the Sky Assailant mod for the pressure bomb. If you don’t have it yet, start farming gold and buy it before continuing. It’s level 4, which will cost you 1400 gold if you haven’t bought anything yet, and then 3 upgrade cogs. It’s worth it!
You can backtrack a bit from here to unlock some more items so let’s head back to the West Desert for now. Head to the left and go down the ladder. Climb down the cliffside here and start heading to the left when you reach the bottom. Refer to the following screenshot for where an upgrade cog is on the map:
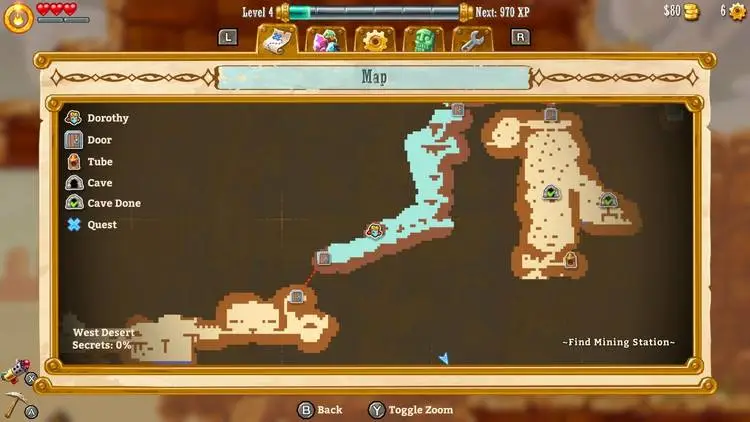
You’ll see a single block above in this area. You’ll have to sprint jump to it from the right side. Once you’re on it, you’ll see a sand block with an upgrade cog on it to the left. Shoot a pressure bomb at it to drop it down. Pick up the upgrade cog. Now continue to the left and enter the door to get back into the Temple of Guidance. Fall down and go to the left, this is the room you fought the Fen near the beginning of the game. If you stay on the ground and go left, you’ll see some brick blocks that you can smash with your jackhammer. Do that and you’ll find a secret for the Acupuncture Straw Doll artifact. Now head out of this room to the left. Once you cross the bridge that collapses under you, fly straight up. You’ll see a dirt block in the upper right corner of this room. Break it for a secret area with an upgrade cog. Head back out to the West Desert the same way you entered. Break the dirt block holding the ladder up and climb up. Use your jet pack to climb up to the top of the platforms to the left for an upgrade cog. Drop down to the ground on the left side and you’ll find a little narrow area you can dig through. At the bottom use your pressure bomb while jumping or a grenade launcher shot to destroy the block to reach the Dr. Groda Children’s Book artifact. Now climb out of this area and run to the right to enter a cave.
| Tenacious Trollies You’ll want to have plenty of water in the tank. Break the block to the left with a pressure bomb and continue until you’re on the mine cart. Hit it to the right and break the block there. Follow the path to the right and you’ll see two mine carts. Hit the lower mine cart to the right. Then hit the upper mine cart to the left and once it lands, hit it to the right. Follow them down and hit both mine carts to the left. Hop on them and shoot a pressure bomb to the dirt block to the left. Destroy both mine carts before continuing. Head back up and wait for both mine carts to reappear. Hit the lower mine cart to the right. Hit the upper mine cart to the left and once it lands, hit it again to the left. Now drop down to the lower mine cart and destroy it. Once it respawns, hit it to the left. Follow it and hit it to the left one more time. There will now be two mine carts right next to each other. Break the right mine cart. Once that respawns to the left, hit it to the left. Hit the right mine cart of these two to the left now. Break the left most minecart and wait for another to spawn. Jump on it and use a pressure bomb to break the cracked block to the left. Pick up the artifact in this secret area. Now head all the way to the upper right and follow the path to the end for an upgrade cog and leave the cave. |
Use your jet pack to just fly to the upper left corner of the West Desert. You’ll find a secret area here with Zebulon Yonker. Head back to El Machino and climb down the ladder to Archaea. Go straight to the left and you’ll be in that area you start mining in. In the bottom left corner of this section, you’ll find a brick block you can break. Break through it to reach the Fertilizer artifact. Head to the nearest pneumatic tube and head to the eastern edge of the Windy Plains and go to the Temple Entrance pneumatic tube. Enter the Temple of the Destroyer to the right and just go as far to the right as you can. Move the giant robot with your molten pickaxe and enter the cave to the right.
| Demon’s Crib This cave is very straight forward and is really just a race to the finish. The lava will keep rising so you have to follow the path to outrace it. There are some cultists here but you can just fly right past all of them. There’s an ore you’ll see on the right as you climb up you can pick up along the way while breaking all the blocks in your way. Once you reach the top, don’t go into the exit. Instead, hook shot to the ceiling. The lava will soon catch up to you and sit there for a few seconds, then it’ll start lowering again. Just head down right back to the beginning of the cave and head to the lower right corner of the beginning room. You’ll see a sand block here. Break it and enter for the Fire Token artifact. Now just head for the entrance to get out of here quicker. |
Leave the temple to and go to the pneumatic tube to head back to El Machino. Talk to Davy Bittenborough to unlock the Sigillum Caelum et Infernum. He’s the archeologist that is always asking to see artifacts. Now that you have all 42, he’ll give you access to the Trials of Heaven and Hell. In order to get to the cave, you’ll need a jetpack with the air cooling mod which costs 4 upgrade cogs and you’ll need to have a level 3 jetpack, which will cost you intotal 3250 gold. Head to the Windy Plains and just use your jet pack to fly along the top of the sky box here to the right until you find a mysterious floating island. The Sigillum Caelum et Internum will open it up for you to enter. Just note, this area is very difficult. You should max out all power ups that max out your health and help you survive, including the Gordon Reflexes mod in the light section, Aramid Armor and True Survivors mods in the armor section.
| Trials of Heaven and Hell There are multiple trials in here to overcome some difficult puzzles. They will occur in a random order. Trial of Acoknights You’ll be on a moving platform over lava while a lot of cultists drop around you. The safest way to deal with them is pressure bombs but you can also keep pushing them with your hook shot to just knock them into the lava so they die. After a while, you’ll see some fireballs falling from the ceiling, avoid them as you progress. Soon, the platforms you’re on will stop because some sand blocks will block your path. Break them up so you can continue to the right. Jump up the wall at the end and you’ll see another set of blocks on a conveyor belt. Just run past the blocks and sprint across the conveyor belt here to run to the exit. Trial of Buttons Break the sand blocks below the stone blocks to the upper right and left here. Now fall down to the left and stand on the switch. Jump back up to the beginning after a brief cutscene and go straight to the right. Hit these blocks to the right with your pickaxe. They don’t look like they should break, but they will. Hit another block down and all the dirt will disappear. Quickly jet pack up to the upper left corner to finish this trial. Next will be a few sets of crushers to avoid. Remember, you can always jump over them to stay out of the lava as needed. Trial of Crushers Wait for the crushers to emerge from the lava to the right and jump across them. Now hop down on the next crushers as they launch you into the air to avoid the spikes. Pay attention to where the next crusher is. A lot of them are just barely visible in the lava and you’ll want to know where to land to prevent taking damage here. After you drop down, quickly jump across the crushers to the right. Climb up the next wall on the left side of the crushers quickly before you get crushed. Don’t go on the right side or you’ll have to loop back around. The next area will be slow moving elevators. Ride them up while avoiding the fireballs and spikes. Wait for the crushers at the top to slam down. Immediately sprint across the top of them to the left. At the end, you’ll bounce up a crusher and jump right up to the exit of this trial. Trial of Escape Use your jet pack and keep just tapping B so you don’t run out of fuel. If you don’t slow down, you can fly faster than the spirits will explode. At the top, you want to head to the right after the spirits start moving the robots but be very careful before they hit you themselves. At the end, drop down and follow the path. Use hook shots in this next area so you can get away from spirits before they explode. Don’t slow down because they’ll just keep respawning. When you drop down a long drop, head to the right. You’ll reach an area with three robots stacked on top of each other. Quickly run away and fly over them when you get the chance. After you drop down, you’ll be in a narrow hallway. Run to the left until some robots activate themselves. Quickly run back to the right to fall in a hole and let them pass. Now quickly jump out and run to the left to drop at the left end of this path. Follow the path a little further to reach the end of this trial. Trial of Flight This is all about just using your jetpack. Fly across the first lava pit while staying in between fireballs and fly up at the end of the first path. Now fly to the left alternating up and down between fireballs here. At the top of this path, head to the right. This area is tough with fireballs going all over the place, just do your best while you go to the right. Jump over the prophet at the end and flip the switch to kill him Bowser style! Head for the door to the right to proceed. Trial of Rockets Head to the right and you’ll see a spawning box at the top of the stone blocks. Rockets will continuously spawn from here. Stand on the stones and wait for the rocket to spawn. These rockets will follow you until you hit them, they can go through walls so be very careful. Stand on the stones and when a rocket gets close, quickly jump to the left and hit it to the right with your pickaxe to open this path. Head further to the right until you reach another set of stone blocks. Just wait for another rocket and then use your jet pack to fly over it and to the left of it. Quickly hit it to the right with a hook shot to break these stone blocks. Stand above the next stone blocks while avoiding the drippers and wait for another rocket to appear. Just jet pack straight up before it hits you and hook shot it straight down to break these stones. Drop down and follow the path here. This whole cave is just following the path and using hook shots to hit rockets into stones. It gets a lot tougher as you go, especially after the mushrooms bounce you all over the place. You’ll want to wall jump here along the stone you want to break and quickly jump away to hit them with a hook shot to clear the path. When the area is only one space wide, you want to stay high and hit a rocket straight down. Fly to the large block at the end of this path and hit a rocket into it to reveal the exit door. Trial of Skillness You can’t use a jetpack or hook shot here. Drop down and sprint jump over the lava to the right. Wall climb up here, this part is really tough to jump around the block but just keep trying until you get it. Jump across the platforms to the right up here. Get some momentum and sprint to the left, then jump off the single block and change directions mid jump to wall climb up the wall right above you. You want to sprint to the next wall after you drop and jump across from wall to wall before you hit the steel panels. Again, this part is very tough but there’s no pressure in time to beat it. Now you’ll want to jump across the blocks to the far right wall and wall jump to the clay block to the left. Don’t slow down as you jump to the far left to continue. Sprint jump over a couple more lava pits to reach the exit. |
After you complete all 7 trials, just use your jetpack to reach the Proof of Completion artifact to truly 100% this game!
Secrets
This game has plenty of secrets to uncover and this section of the guide was designed for you to easily find all of them with descriptions on each. If you’re just looking for hints, just view the location of everything on the map for each location in the game. If you’re still having trouble, refer to the charts below the maps for brief descriptions on how to reach each one.
As a side note, if you already completed the main story and are just finishing objectives, I highly recommend getting the following items and mods before collecting the rest of the secrets, it’ll be much easier:
- Jet Engine Mod: Air Cooling
- Pressure Bomb Mod: Sky Assailant
- Hook Shot Mod: Long Range Grappler
With these mods, you’ll be able to reach anywhere in the game with ease. A lot of these secrets can be obtained without all of these mods but it’s certainly a lot easier to get the secrets with them. You won’t have to solve certain puzzles with them, you can just get the secrets using your abilities.
Archaea Secrets

| Map Number | Secret Items | Description |
|---|---|---|
| 1 | Artifact | This is in the very beginning of Archaea but you can’t reach it until you unlock the jackhammer. Once you get the jackhammer, head to the lower left corner of this section and break the brick blocks with it to reveal a secret area with this artifact. |
| 2 | Artifact, Upgrade Cog | This is the first cave you will encounter in the game. Caves are kind of little bonus levels that have goodies inside. You absolutely want to enter every one you find. It’ll always be worth it. You’ll start off by seeing some metal plates on the walls, you won’t be able to wall jump up these. You’ll just slide off. So begin by heading to the left. Climb up and break the sand block, quickly jump out of the way before the large stone above crashes down on you. Climb up and you’ll see a small opening in the top left corner of this room. Climb up there to reveal a secret. Head to the right for an artifact, the Amulet of Baal Ahdahli-Dihla. You’ll see a cracked dirt block directly below the artifact. Just break through it and drop straight down. You’ll conveniently land on an upgrade cog. Break the box open and pick it up. That’s everything in this cave so you can drop back down and leave the cave from the door you entered. |
| 3 | Upgrade Cog | Just hug the left wall in this area and break the different colored block on the left wall to reveal this secret area with an upgrade cog. |
| 4 | Artifact, Ore, Upgrade Cog | Start off by heading to the left and killing the beetle. Break down the sand block that blocks your way ahead. Drop down and kill another beetle down here. Slowly work your way down here and avoid the cacti on the edges. If a beetle charges at you, just jump over it and let them drop down. They’ll drop straight into water and drown for an easy kill. Once you reach the bottom of this path, stand on the red clay block on the right and it’ll crumble under you. Enter the large contraption to unlock the Pressure Bomb! The pressure bomb is a handy item that will allow you to throw a bomb in any direction that will stick to a block and then destroy it. This is the only way to break blocks you can’t normally reach. You will see two small blue bars in the top left corner below your health. This is your pressure bomb charges. You can refill it by just standing in water at any time. Break down the sand blocks to the right using your pressure bomb to continue.Break through the next sand block in your way and head to the right. Swim through the water and wall climb up to the next platform. Kill off this beetle and follow the platforms to the left and then straight up. When you’re on the upper left block here, shoot a pressure bomb straight up. You’ll see a beryl block that will drop on your head. Jump up to the next platform to the right and kill the beetle here. Break the dirt blocks on this platform so you can shoot a pressure bomb to the dirt block to your right, which will drop the large stone. Drop down on the stone and shoot another pressure bomb at the sand block to the right to open up this path. Drop back down into the water to recharge your pressure bombs before you continue through that opening. Halfway up this block, you’ll see a platform with some wooden floors. There will be a cracked block to the right. Break it and drop down for an upgrade cog. Refer to the screenshot below for its exact location, the mini map in the top right will give you a great idea of where this secret is hidden. Kill the two beetles at the top of this path and you will see a platform you can climb onto above the second beetle. Climb up there and fire a pressure bomb straight up at the sand block. Climb up there to reveal the Rattus norvegicus artifact. When you’re ready, drop back down and head to the left. Break the sand block to reach the exit to leave this cave. |
| 5 | Upgrade Cog | In between the stairs to the cave entitled Burster’s Room, you’ll see a cracked block to the right. Break it with your pick axe and step on the pressure plate in here. This will open the door below you so you can reach the upgrade cog. |
| 6 | Upgrade Cog | When you get the pressure bomb, head to the area with the marker on the map. Destroy the dirt blocks in the upper left corner here and wall jump to the platform above. Break the block to the right with a pressure bomb to open a secret area with this upgrade cog. |
| 7 | Upgrade Cog | Just hug the right wall on the marker on the map and break the different colored block to reveal an upgrade cog here. |
| 8 | Ore | Head towards the marker on the map and break the different colored block for a hidden ore. |
| 9 | Artifact, Upgrade Cog | Head to the right and go under all of the cracked blocks. Break the last block in the row, where the crack begins, and quickly sprint back to the left before the stones above crush you! Now climb up the platforms and break the next cracked block. Continue to the right once the path is clear. You will see the beginning of the cracked blocks here again at the far end. Use a pressure bomb on it to give you some extra time as you run back to the left for safety. Once all the stones clear, head to the far right for an upgrade cog. Now start heading back to the beginning of this cave. At the left end of the stones that all dropped, you will see a wall you can sprint jump to and wall climb up. Go up there and break the sand block to reveal a secret containing the Spelunky Diary artifact. View the screenshot below to find where you should wall jump up. Once you grab that artifact, head back down to the entrance of the cave to leave it. |
| 10 | Artifact | This area can be reached with a pressure bomb to open the path and sprint jumping up into it. A hook shot or jet pack could be used to. You could also always enter from the Windy Plains by going through the dirt blocks along the ground to the far left side of the Windy Plains. |
| 11 | Upgrade Cog | Head to the right under the wooden platforms with the stones on them. You have to be quick here. Quickly fire a pressure bomb down and jump up and out to the left before it goes off. If you didn’t get out in time, you’ll have to break the rest of the sand, leave the cave, and reenter it to reset the room. If you do get out before the pressure bomb goes off, stand on the top stone that will fall with the wooden platforms. You can now break the sand block to the right. The upgrade cog in this cave is right up here in the top right corner of this small cave. Leave the room when you complete it. |
| 12 | Ore | This cave is really easy. Simply drop down below and break the sand block in your way. Hop up back to the entrance of the cave and enjoy the fireworks! All of the cacti will destroy each other and clear the rest of the room, leaving a nice, shiny azurite for you at the top of the room. Leave the cave when you pick it up. |
| 13 | Upgrade Cog | When you have the jackhammer, just break the brick blocks below the upper door to Yarrow and go to the left once you can. You’ll see the upgrade cog right there. |
| 14 | Upgrade Cog | A beetle will drop to the platform above, let it step on the switch and quickly run through the door to the right. Climb up to where the beetle is from the right side. Jump over it and try to get it to charge at you while you’re to its left. You want it to drop off the edge of the platform with its charge. You may have to keep jumping at the edge so it doesn’t charge you too early. Once it drops, stand on the switch so it can pass through the door below and to the right. Now head down to the lower right and lure it down to the lower switch on the right side. Do the same thing, get it to charge at you off the edge. Once it steps on the switch, enter the door in the top right to reach the upgrade cog. Once you have it, head back out of the exit. |
| 15 | Artifact, Ore, Upgrade Cog | Step on the switch to your right and drop through the open hatch. Head to the left to kill a beetle. Climb up the platforms above that beetle and use a pressure bomb on the sand block in the top left corner to release the stone block onto the switch below. Drop down and enter the now open door to your left. Climb all the way to the top of this mineshaft here. Once you reach the top, enter that small alcove in the top right. Just run through the stone to the right to reveal a secret which holds the Photo of a Missing Love artifact. Head out of this secret area and jump over the gap to the left to the clay block. Fall through it and begin climbing the ladders to the top. At the top of the last ladder in sight, you’ll see some platforms to the right you can jump across. Jump across them and climb another ladder up to the top of this area. Kill the beetle and use a pressure bomb on the sand block to the left to drop the large stone.Follow the stone downward but be careful not to take damage from the fall. You may want to backtrack down the ladders you came up. Step on the switch next to the stone to drop it another level. Don’t follow it this time. Instead, go to the left and use a pressure bomb on the sand block on the left wall. Drop down and break the dirt block here. You should land to the left of the stone block. Step on the switch here and follow it down. Drop down as low as you can and head to the left through the open door. Drop through the clay block and enter the contraption here to unlock the Jackhammer! This useful tool will smash through blocks you otherwise couldn’t break. Before continuing, climb the contraption and shoot a pressure bomb at the ore above the machine to pick it up. Climb up the platforms to the right and use the jackhammer to power through these bricks. Continue to the right through the next set of bricks when you reach the mineshaft for some more ore and an upgrade cog. You can now exit this cave. |
| 16 | Secret Character | Just outside the Mason’s Station cave, after you get the jackhammer, just break the brick blocks to teh right to reveal a secret area with Josh Yonker who will give you the Blood Quest mod. |
| 17 | Upgrade Cog | Hug the left wall in the marker on the map and break the different colored block to reveal this secret area. |
| 18 | Ore | Hug the right wall in the marker on the map and break the different colored block to reveal a secret area with some ore in it. |
| 19 | Artifact, Upgrade Cog (2) | In order to get everything in this cave, you’ll need the upgrade hook shot and/or the jet pack. The first section below is for your first time running into this cave, before you get those upgrades, the second is after you unlock those items. You’ll still want to follow both walkthroughs to get all the items in this cave.There are a few hidden items in this cave so you’ll have to run it a few times. You’ll notice a lot of cracked blocks, it’s really a race to the finish. Drop down to the left and head to the right. Break the beginning of the crack line and head back to the entrance by quickly wall jumping back up. Collect the ore when the path opens up and continue to the right. Break the next crack line and race the crumbling blocks to the right. When you reach the far right wall that you have to wall climb up, just stand next to the wall and fall when the blocks below you crumble. You’ll land on a hidden platform below containing the Glowing Goo artifact. After you get that, just drop down to reset the cave. Get to the same point but this time, wall climb up to the top. Keep moving to the left and keep wall climbing in place before you fall down from the crumbling blocks. Once you get past this sequence, continue to the left and break the last block to reveal a path below to an upgrade cog. Pick it up, break the sand, and return to the exit.You’ve been here before and should know the trick. In case you need reminding, fall to the left and break the cracked block in the lower right. Climb back out and head to the right. Break the next cracked block and race to the upper right corner. Wait for the cracked blocks to catch up and climb on top of them immediately once you can. At the next section that the cracked blocks go up again a little bit, jet pack straight up and hook shot up right as your jet pack is about to run out of fuel. Quickly head to the left and break the cracked block in the upper left corner of this room to reveal a hidden upgrade cog up here. Now head out of the cave. |
| 20 | Upgrade Cog | You can either head for this area from the door in the Temple of the Destroyer. You’ll see a corner of this area with three blocks for the ceiling. Just hook shot or jet pack up the center block there to reveal this secret area with the upgrade cog in it. |
| 21 | Ore | You’ll see the door to the Oasis with a large wall around the right and bottom side of it that you can’t break. Head to the bottom right of that wall along the right side, break the odd looking block there to reveal a secret area with a rare ore in it. |
| 22 | Upgrade Cog | Go below the pneumatic tube in the map where this marker is. You’ll see a platform with some water on it. Get underneath it and bounce up into the one sand block there from the bouncing platforms to reveal a secret area with this upgrade cog. |
| 23 | Upgrade Cog | Just fly to the upper left corner of this section with your jet pack after you get it to find a small opening in the wall for an upgrade cog. |
| 24 | Upgrade Cog | This cave is really straight forward to begin with. Just follow the path through the clay blocks. The only spot where it splits is to backtrack. At the end of the path, you’ll find the portal to Vectron. Dorothy is brave enough to enter it, even if Fen refuses to, so head in! The intro to Vectron is very straight forward. Just follow the path until you reach a wide area with clay. Be careful falling down here and slowly move to the left wall. You’ll find an expensive ore on this side but it’s easy to miss as you don’t have much time to avoid the crumbling clay. After you fall through the rest, just slide down the left wall. You’ll see some floating spirits and TVs near them. When you get close to one, they’ll quickly enter the TV and self destruct. If there’s no TV nearby, they’ll just explode in place. Once at the bottom, head to the middle. Lure the spirit into the TV and drop into the new opening.Just keep moving quickly through this next area to the right to avoid all of the spirits. Stay on the upper path until you reach the end and drop down. Have the spirit down there destroy the TV and run to the far right. Don’t worry, your game isn’t crashing, it’s part of an animation here. Continue climbing the walls to the right and over the dirt mound ahead. Before continuing, clear out the dirt for the little opening. You’ll need to hide in here soon. Head to the right and a robot will block your path. Lure the spirit here into the robot and run to the left into the little hole. When the robot passes, climb out and run to the right without slowing down until the robot can no longer chase you. Slide down this long wall so you don’t take fall damage. This part can be rather tricky. Head to the far right without triggering any spirits to head to robots. If you do, just run! Don’t slow down, don’t think about stopping for anything.. Run and jump at the end of the path. You’ll land in water and the robots will keep going. Just keep wall climbing in the top right corner until the robots power themselves down. Now head to the left and climb up the wall. Enter the first opening you see. Follow this path and avoid the spirits. Just dig as quickly as you can and run to the left when you reach the bottom. You’ll enter a cutscene before you die and you’ll return to the mysterious cave.Start climbing the platforms to the left and enter the contraption to unlock the Jet Engine. This is a jetpack that only works for a couple of seconds and you can use it by holding B. Work your way to the top of this cave by jumping from platform to platform. At the top, break the blocks to the left and follow this path to reunite with Fen. Climb out of this cave using your jetpack and breaking the sandblocks to free your way. Before leaving the cave, jet pack to the opening in the upper right corner. Use a hook shot on the dirt up there to refill your jet pack to use again. You’ll find an upgrade cog up here. Now leave the cave to return to Archaea. |
| 25 | Upgrade Cog | While climbing up to the Mysterious Cave, you’ll see a small opening to the left. Head through it and follow the path to the end, breaking odd colored blocks and running through fake walls to find this secret area. |
| 26 | Artifact | While climbing up to the Mysterious Cave, you’ll see an odd colored block to the right. Break it open to reveal a secret area with this artifact. |
| 27 | Upgrade Cog | This is in plain sight after you get through this spike room. It’s easiest to get through this after you’ve upgraded your jet pack and hook shot. |
| 28 | Upgrade Cog | Towards the beginning of this spike room, pay attention to the ceiling. There will be one spot without spikes on it. Fly up there with a jet pack or hook shot to reveal a secret area with an upgrade cog. |
The Oasis Secrets

| Map Number | Secret Items | Description |
|---|---|---|
| 1 | Artifact | Just use a hook shot or jet pack to reach the ceiling in the upper left corner of the Oasis town area. You’ll see one small section that looks like an opening. Head for that for a secret area that has an artifact. |
| 2 | Artifact, Ore, Upgrade Cog | Fall to the left and just follow the path down to the contraption in the lower left corner. This will unlock the Hook Shot. You can use this by using the Right trigger. Head to the right a little and you’ll be under the bridge. Use the hook shot straight up to launch yourself onto it. Now head to the right and use your hook shot straight up again to the next bridge. Head to the right again and you’ll see another bridge above. Don’t hold your hook shot too much because you want to stop in between the bridges. If you went too far, just drop down to the left and try again. Once you’re on the lower bridge, break the block to the right and climb up to get the Rosie’s Dumbbells artifact. Now climb to the top of these bridges and use your hook shot on the cactus to your left. You’ll see this is a great tool to destroy cacti. Jump to the left and sprint jump over this next large gap to continue to the left. You’ll see some more cacti straight above. Break them with your hook shot and climb up there for some more ore to collect. Now drop down, pick up the upgrade cog to your left. |
Temple of the Destroyer Secrets
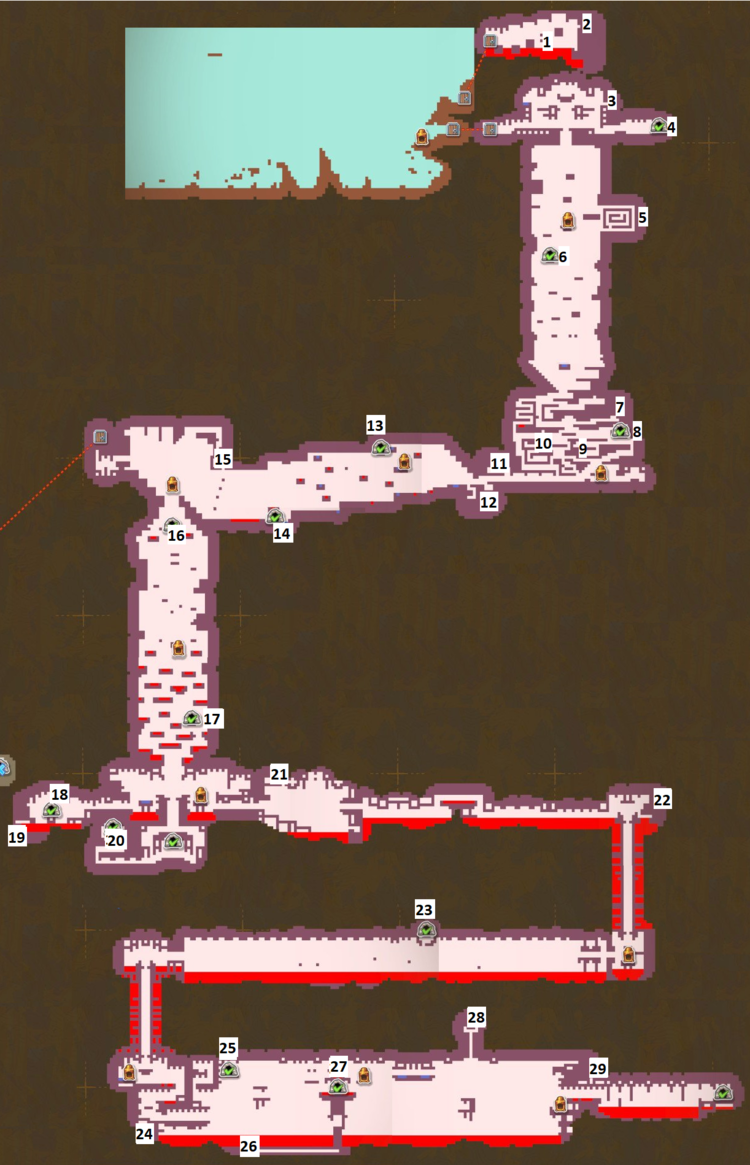
| Map Number | Secret Items | Description |
|---|---|---|
| 1 | Upgrade Cog | This upgrade cog will be in plain sight on the middle platform. You can get to this room by using the jetpack or hookshot up from the Temple Entrance pneumatic tube or by completing the Demon’s Crib cave. |
| 2 | Upgrade Cog | In the same room as the above upgrade cog but slide down the far right wall. Break the right most block on the ground to reveal a secret area with an upgrade cog. |
| 3 | Upgrade Cog | Fly up to the top right corner of this room and break the stone block with your jackhammer to reveal a hidden upgrade cog. |
| 4 | Artifact, Ore | Enter the Demon’s Crib by moving the robot after you get the ignition pickaxe mod. This cave is very straight forward and is really just a race to the finish. The lava will keep rising so you have to follow the path to outrace it. There are some cultists here but you can just fly right past all of them. There’s an ore you’ll see on the right as you climb up you can pick up along the way while breaking all the blocks in your way. Once you reach the top, don’t go into the exit. Instead, hook shot to the ceiling. The lava will soon catch up to you and sit there for a few seconds, then it’ll start lowering again. Just head down right back to the beginning of the cave and head to the lower right corner of the beginning room. You’ll see a sand block here. Break it and enter for the Fire Token artifact. Now just head for the entrance to get out of here quicker. |
| 5 | Upgrade Cog | Enter that maze area. You’ll see in the map where the openings are, just hit them open and grab the upgrade cog in the middle. |
| 6 | Artifact, Upgrade Cog | Head to the right side of this cave and you’ll see some fireflies. If there’s more than one, kill them both. There’s a spot they’ll respawn from in the top right corner. When there’s only one, lead it down to the middle of this room. You want to get directly under it and hit it straight up the center to break some sand blocks up there. Once the path is clear, hook shot up there and wall jump to the top for an upgrade cog. Drop back down and lead a firefly up to here. Once you get a firefly in this area, stand on the block where the upgrade cog was. Hit it straight to the left to reveal a secret containing the Ginsa Shark Tooth artifact. Head back out of this cave. |
| 7 | Ore | Jump up to the upper right corner of this conveyor belt maze room. Break the sand block there to reveal a hidden path that loops around to the beginning of the room with an ore in it. |
| 8 | Artifact, Upgrade Cog | You’ll see a lot of floor switches in this room. Stepping on a single one will close the next door and you have to turn the lever to open them again. There’s an artifact in this cave that you can only get if you don’t touch any switches throughout the whole cave. Keep that in mind. You’ll have to leave the cave and reenter it to reset it for that artifact. Start by sprint jumping over the first batch. Now drop down and wall climb along the left. Just use hook shots to move your way to the far right wall here along the floating blocks. At the end of this set, move to the left and climb up this narrow passage. Hook shot the ceiling as you move up to the upper right here while avoiding all of the switches. Break the sand block in the top left of this room to release the stone below. Fall onto it and use a pressure bomb on the sand block to the left. Drop down through the new opening for an upgrade cog. The door to the artifact at the end will remain open only if you didn’t touch any switches. It is the Piece of Red Cloth. Once you’re done here, break the sand block in the ground and leave the cave. |
| 9 | Upgrade Cog | From the Floor is Lava cave, just head down and to the left. Break the block at the end of the conveyor belt to open up this secret area for an upgrade cog. |
| 10 | Ore | There’s one platform in the middle of this maze room that doesn’t move. Hop on it and jump to the left. Break the odd block there to enter this crusher room to the left for some rare ore. |
| 11 | Upgrade Cog | When leaving the conveyor belt maze, jump up into this little alcove. Break the odd looking block here with a pressure bomb and enter the secret area to get this upgrade cog. |
| 12 | Artifact | This one is kind of tough, the crusher is there. Hop down and quickly break the center block. Once you drop down there, you’ll see the artifact. |
| 13 | Artifact, Upgrade Cog (x2) | Slide down the wall to the left in between lava drops. You’ll notice sliding is the same speed as the lava drops which is rather convenient. Once at the bottom, hook shot onto the conveyor belt on the ceiling to pass over all the lava down there. Climb up the wall to the left in between lava shots and alternate left and right to avoid the spikes when they get in your way. Now start heading to the right and avoid the fireballs here. At the end of this path, slide down the conveyor belts. The second will be rather tricky with lava dropping down. You want to let go of the wall to drop faster and quickly hold on to slow down before you hit the lava shot. Once you reach the bottom, jump across the blocks to the right to find a platform with an upgrade cog. Now head back the way you came and go to the left along the lower conveyor belt while dropping to avoid the lava shots and quickly hook shotting back up. Climb up the path here while avoiding the alternating fireballs. Another upgrade cog will be at the end of this path. Don’t head for the exit just yet. Instead, keep climbing up to the right where the fireballs are coming from but be careful not to get hit. At the top, break the stone block with the crack in it to open a secret to attain the Fossil artifact. Break the stone block at the end of this path and head for the exit of the cave. |
| 14 | Upgrade Cog (x2) | This part can be kind of tricky. Platforms will rise and drop in the lava. You have to time your jumps across them without touching the lava to reach the end of this section. At the end, drop beneath the fists popping out of the wall. Once they start pushing out, jump up to the left of the fists and break the cracked block at the top. Collect the upgrade cog up here. Hook shot up and go right. Break the block at the end to leave this secret area. Collect some ore and continue to your right. These platforms below will act as trampolines and shoot you up when you touch them. Work your way to the right while avoiding the spikes. At the end of the path, stand on the top crusher and the crushers below you will push in before you fall. Just stay put and you will slowly drop down. After the first set of crushers, another set will try to actually crush you. Just drop down without grabbing a wall and you’ll be fine. Head to the right and grab the other upgrade cog in this cave. Now head for the exit to your left. |
| 15 | Artifact | Once you get the upgraded jet pack that refuels as you don’t use it, you can just fly up to this top area. If you don’t have that yet, you can wall jump up the far left wall and hook shot your way across the ceiling to the right. Just be mindful of the steel plates that will make you fall as you head to the right. |
| 16 | Artifact, Upgrade Cog | Begin this long cave by heading to the left. You will soon see a wizard that will have crystals circle around a spot you’re in and then shoot fireballs in every direction when they form together. Just make sure to avoid the fireballs for now and keep heading to the left. Wall climb to just to the left of the wizard and wait for the crystals to appear. Quickly drop down to the lower left to avoid the fireballs and they’ll open up the path for you. Jump over the wizard, making sure to leave it alive, and climb up the wall above. Stand at the top of the platform and wait for the crystals to appear again. Quickly sprint to the right and drop down to the switch. You’ll see two cracked blocks here. One down low that you can break and another up high that you can’t. The wizard’s fireballs will break the higher one, revealing the Doom Cult To-Do List artifact. Pick it up. Now flip the switch and break the lower block. Fall down and you’ll find yourself at the entrance of the cave, don’t leave yet though! Now head to the right. This path is really straight forward, just follow the path while avoiding the lava. You’ll reach a large robot blocking your path. Jump over the block above it and break it from the left side. Quickly wall jump and keep jumping so you don’t touch the robot. The lava will drip onto it and wake it up. Once it passes to the right, drop down and continue to the left. Flip the switch and the end and climb up the path that is now open. Head to the right at the top of this path and avoid the fireballs from the wizards. You’ll see a set of sand blocks that will block your way. Back track a little bit and lure a fireball from the wizard to shoot at the sand blocks. You have to actually break the sand blocks before the fireballs hit them so the fireball will wake up a robot to the right. Get out of the robots way with a hookshot to the ceiling and continue along the path. Another robot will soon block your path. Just hook shot to the far upper right corner of the path with the robot and wait for another set of fireballs. Drop down to avoid the fireballs and they’ll wake up the robot, killing the wizards below. You’ll find this cave’s upgrade cog just after the wizards. Fall down to the left and break the block, then fall down to exit this cave. |
| 17 | Artifact, Upgrade Cog (x2) | Ride the conveyor belts to the right and avoid the spikes. Feel free to use hook shots on the ceiling to just get around them when it’s easier. Now you’ll reach an area with a big pit below you. Jump across the conveyor belt platforms here. Use hook shots to save yourself if you fall. At the end, don’t climb up yet. Drop below the last conveyor belt and use hook shots along the bottom of this platform to head to the far bottom right corner. Wall climb straight up this wall for a hidden upgrade cog. Slide back down the wall and hook shot back up to where you came from. Use hook shots to climb up this area with conveyor belts and avoid the spikes. At the top, start heading to the left. Use the hook shot to ride conveyor belts and avoid the spikes and lava here. When you drop down and ride a conveyor belt to the right, you’ll see a single block without a spike on the left wall. Jump and hook shot through it for a secret with an artifact. The screenshot below will show where it is exactly. Follow the path up with more conveyor belts and hook shots to avoid spikes. Be careful, these conveyor belts move very quickly! Pick up the Hallo Katze Chainsaw artifact. Fall down to the left and break the block to return to where you entered this secret area. Follow the conveyor belts to the right and avoid the spikes with hook shots as needed. You’ll drop down and head back to the left. Jump over the lava at the end and pick up the upgrade cog. Dig through the blocks to your left to exit this cave. |
| 18 | Ore, Upgrade Cog | Head to the right and you’ll enter a brief cutscene with the Great Prophet. You will now enter the boss battle against him. Movements: He will only teleport randomly. If you pay attention to when he teleports away, a little dust animation will appear showing the direction he teleports to. Attacks: Stage 1 – He fires off fireballs like the wizards you faced in the Grim Hollow cave. Stage 2 – Again, similar to the fireball like the wizards but instead of just firing in 4 directions, it shoots diagonally too, firing in 8 directions. The cannons found throughout this room will also fire off as well. Strategy: You’ll want to start by taking your time and clearing the room as much as possible. Use your pickaxe and the boss’ fireballs to clear out as many blocks as you can early. When you get close, quickly attack it a few times with your pickaxe until it teleports away. Looks for the smoke animation as it teleports away to know exactly where it’s going. Just keep following it around. Once it’s down to only a third health left, it’ll start firing off 8 shots instead of 4 so you want to hurry up and kill him at this point. This is why I recommend clearing the room as much as possible early on. The cannons also start firing off at this point as well. Keep fighting him off as quickly as you can during this phase to finish him off before his attacks become overwhelming. After you defeat the Great Prophet, fall down the opening that appears in the cutscene and pick up the Ignition Axe. Head to the left and hit the robot with your axe to get it to move. Continue along the path to the left and use the ignition axe to move any other robots you need to move. The second robot you hit, you’ll have to hit a few times. Fall into the small hole underneath it when it’s safe and hit it again to move it once more to the right. Continue up the path here and move the last robot to the far left wall. Jump on its back while it stopped at the far left and break the brick block on the wall with your jackhammer for a hidden upgrade cog. Now head to the right to exit this cave. |
| 19 | Upgrade Cog | This one will require you to have a lot of health. Simply fall into the lava to the left of the Combuster’s Station cave and swim under the lava to the left for a hidden area with an upgrade cog. |
| 20 | Ore, Upgrade Cog (x3) | Head to the left and pick up the ore there. There’s one little alcove in the ceiling that doesn’t have a torch here, just fly up into it. At the end of this path, you’ll find a contraption to unlock the long range grappler as well as three upgrade cogs and a rare ore. Pick them all up and leave the cave. |
| 21 | Upgrade Cog | Once you enter this large open area in the map, simply wall climb up the left wall and you’ll find the upgrade cog behind an oddly placed block you destroy. |
| 22 | Upgrade Cog | At the far end of the first lava pit you have to jump across, as indicated in the map, jump into the small opening in the lower right. |
| 23 | Artifact, Ore, Upgrade Cog | Jump up to the left and break the sand block between both conveyor belts. Flip the switch for the crate to fall onto the pressure plate below. Enter the now open door to the right. Pick up the topaz as you continue to the right and fly up above where the crates are flying into lava. Break the block here and ride the conveyor belt to the left. Hit the switch here. Break all the crates that block your path as you move upwards. At the split, go to the right and then go up at the next immediate split. You’ll be standing at a switch and overlooking the entire room. This switch will stop all the conveyor belts. You want to stop it right before the crate flies off the top conveyor belt. Then quickly flip it so it drops slowly to the next conveyor belt. The trick here is you have to get it stopped on the left edge of the right most conveyor belt. Once you time it right to stop there, turn it on and don’t touch the switch again. It’ll end up on a pressure plate that you passed. Before you follow the crate, head to the upper right corner of this room and blow up the dirt block with your pressure bomb if you have the sky assailant mod. If you don’t have it yet, you’ll need to come back here. There’s a switch at the top of the room that controls the conveyor belts. you want to manipulate it so it stops at the edge of each conveyor belt before a crusher blocks it, but activate it again before a crusher crushes it. It’s all about timing but you do want to stop it at the end of each conveyor belt, even if just for a brief moment. This will open up a room for the Holt Toast artifact. Now, head to where that crate from the previous room wound up and fly straight up. You’ll end up at another switch overlooking a room. This switch will only control the two upper conveyor belts. Stop the conveyor belts so the crate doesn’t get smashed by the crushers as you let it progress through the room. Stop the crate when it’s on the left edge of the middle conveyor belt. Turn the switch on once you see the lowest crusher begin shaking. It’ll come out to another pressure plate below. Head through the open doors below and fly into the clay block to reach the upgrade cog. Head down to the exit. |
| 24 | Upgrade Cog | When you enter the basement of the temple of the destroyer and start digging to the right for the first time, drop down the first chance you can and start heading to the left using hook shots. You’ll find an upgrade cog at the end of this path behind a block you have to break. |
| 25 | Artifact, Ore, Upgrade Cog (x2) | Use your jet pack to fly through the clay block to your right. There are two mine carts in this room. Hit the upper mine cart to the right and then go to the left minecart. Hit that to the right as well. Follow it down and go to the right through the open door. Use your jet pack to enter the next mine cart puzzle room. Hit the left mine cart to the left and then the right mine cart to the right. They should both be in the same area. Hit the right mine cart to the left so it stops at the left mine cart. Now break the left mine cart and it will respawn just above you. Hit the new mine cart to the right and then the left mine cart to the right to open the next switch. Grab the upgrade cog through the door. Now continue to the right for the last puzzle of this cave. This last puzzle involves a lot of steps so just do the following: > Hit the top most cart to the right and then to the left. Break the cart just to the left of that cart that you just moved and quickly hit it to the right before the one you just broke respawns. It should stop on the far right ledge. > From the current position of all the carts, hit the upper most cart to the right and then hit the left most cart to the right. > All 3 should now be very close to each other, destroy the middle cart of the 3. > When the cart respawns above you, hit it to the left. Now drop down and hit the middle cart to the left. > Destroy the left most cart. When it respawns in the upper right, hit it to the right and then to the left. It’ll drop through the first clay block. > Break the upper left most cart. When it respawns to the left, hit the new cart to the right. Follow it down and hit it to the left when it stops. > You should now have two carts right next to each other just to the left of the lower clay block above the switch. Break the left most cart down there. > The upper right cart should respawn, hit it to the right twice until it’s on the lowest platform and then hit it to the left so it falls onto the switch, opening the path for the last upgrade cog and artifact in this cave. |
| 26 | Artifact | From The Sun Armory, go straight down along the right side. Break the dirt block at the platform below and fall down the pit. Go to the left until you reach the end and jump up for the artifact. |
| 27 | Ore | This cave is really short and not much of a puzzle. Just follow the path to get the ultra composite armor. It’ll allow you to take less damage. Don’t leave yet though! Just jump up the blocks to the right and hit the wall at the top of the blocks with your pickaxe to reveal a secret with a rare ore in it. Pick it up and leave the cave. |
| 28 | Artifact | Just look at the ceiling in the indicated area on the map. Use a pressure bomb to break the sand block and jump up here for an artifact. |
| 29 | Upgrade Cog | Jump up to the upper right corner of the basement. Just follow the path, breaking any blocks in your way, until you reach the upgrade cog. |
Temple of Guidance Secrets
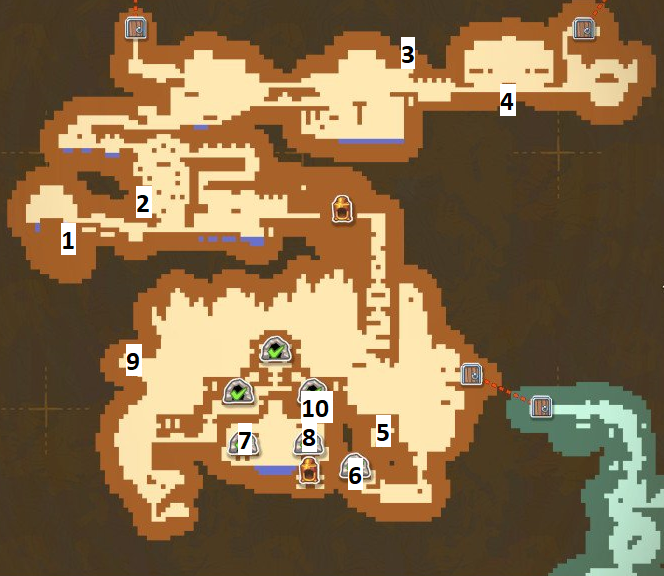
| Map Number | Secret Items | Description |
|---|---|---|
| 1 | Artifact | This can be achieved the first time you visit this room, this is the room you get the sprint hydraulics in. You’ll see two pools of water, one on each side of the machine you get the sprint hydraulics in. The second block to the right of the right pool of water is really dark. If you hit it with your pickaxe, you’ll reveal a secret area with an artifact. If you’re having trouble, just keep hitting the ground to the right of the sprint hydraulic machine while moving to the right until you break a floor piece. It’s in the same room so you don’t have to go too far. |
| 2 | Upgrade Cog | You can also get this item the first time you reach it. In the first section of the game where you start digging through a lot of dirt, going straight down, just hug the left wall. Keep digging as far to the left as you go down and you’ll find it. |
| 3 | Upgrade Cog | This upgrade cog can’t be reached on your first pass through here. You’ll have to come back later with a hook shot or jet pack. Just hook shot or jet pack up into that spot relative to the map above and use a pressure bomb to break the sand block in your way. Climb up here to reach the upgrade cog. |
| 4 | Artifact | Here’s another item you can’t reach on your first pass through this area. It’s in the room with the first boss battle against the Guiding Light. You’ll need the jackhammer, which is unlocked later, to break the different colored blocks on the ground to reveal a secret area that has this artifact. |
| 5 | Artifact | This artifact can be opened in one of two ways. The easier way is if you have the sky assailant mod for your jet pack, just fly up and shoot the cracked block midway up the wall with a pressure bomb and fly into the room. If you don’t have that artifact, fly up the right wall to the area in the top right corner. Keep flying into the ceiling and you’ll find a secret area. Just shoot the sand block holding the large stone with a pressure bomb and follow it down. You can stand on it to break the cracked block with your pickaxe to get this artifact. |
| 6 | Artifact, Ore, Upgrade Cog | To reach this secret area, just break the dirt blocks to the right of the cave. All of these items are in the cave.This cave starts off with a big maze. Just follow the path and do the following at each split in the path: > Drop Down > Go Right > Go Right > Break the sand block at the end of this path and go back to the last split you came from. > Go Up > Go Left > For reference, you should be back near the start, go right where you cleared the path. > Go right at the next split You’ll see a switch in the room at the end here and a room below with a block of ore. Flip the switch to open the door to the ore and close the door to the room you’re in. Just fly out in the top right corner to reveal a secret. Loop back to where that ore is and pick it up. Now head back to the left and drop down. When the path splits, go to the right. Go down immediately at the next path split. The floor will break and you’ll fall into some water. Swim through the water without hitting any spikes and pick up the ore at the end of this path. Break open the cracked block to your left. Climb up here, go left and then down. Look at the button on the ground and jetpack over it. It’ll shoot an arrow from your right. Follow the path and there will be another button when you drop down. Avoid that as well to avoid an arrow shot from your left. Follow the path and you’ll soon reach a series of switches that controls multiple doors. Flip the switches in the following order: 4, 3, 2. You’ll see all the doors open up. Head to the left and break open the cracked block. Follow the path back to the doors and continue to the left to enter a contraption to unlock the grenade launcher. You can now turn your pressure bomb launcher into a grenade launcher. The explosive has a much bigger radius but it’s a little harder to aim. Just fire it at the boxes to the left to clear the path. The wall to the left is actually fake but don’t run through it or you’ll step on a switch that fires arrows at you. Just jetpack through the wall and drop down the pit ahead for the Old Unopened Invitations artifact. Now backtrack and go up where you went through the wall. Now follow the path up while avoiding the spikes along the way. You’ll soon reach another wall of crates, use your new grenade launcher to make quick work of it. You’ll now be rewarded with an upgrade cog! Continue a bit further and use your pressure bomb to break the next crates and then just break the rest with your pickaxe. Break open that cracked block down below to open up the path to the exit. |
| 7 | Ore, Upgrade Cog | Head to the right and you’ll quickly find an ore in the ceiling. Break it free with a pressure bomb. Drop down slowly and you’ll see some arrows shooting out of an opening in the left wall. All of these arrows will shoot in bursts of 3 and then pause for a couple seconds. Follow the path, timing your movements to avoid the arrows. The arrows will move faster than you so try to jump behind the 3 right away and sprint forward until you find a spot for cover. Soon you’ll have to go straight towards the arrows. You’ll want to hook shot to the openings in the ceiling to avoid these arrows. The path will continue upward but you want to keep going left towards the where the arrows are coming from. At the wall, hookshot straight up for a secret area with the Toy Rocket artifact. Now head to the right and enter that opening in the path above. Refill your water tank when you reach the pool of water. At the end of this path, you’ll reach a round room with a switch on the platform above. This room is really dangerous. You’ll see holes all over the walls for arrows to come out of. Stepping on the switch will trigger a sequence of arrows. You want to focus on using this platform for cover from the arrows by using your hook shot. The arrows will fire in a pattern. First it’ll be half the room covered in one direction, then the whole room covered in that same direction. Then it’ll change directions and repeat that. It’ll start going clockwise starting in the bottom left, then bottom to top, then top to bottom, then left to right, then right to left. A path will open to the left heading to an upgrade cog and the exit. |
| 8 | Upgrade Cog | You’ll see a wagon to the right. If you hit it, you’ll see that it’ll just go in the direction you hit it until there’s something to stop it. Hit it to the right and follow it. Break it by hitting it a few more times. Another will drop to your left now. Just hit it to the left and it’ll fall on the switch. Fly through the open door. Follow this path for another locked door. There will be two openings in the ceiling above here. Fly up the right opening and hit the wagon to the left. Follow it down and hit it to the right for it to land on the switch. Enter the open door to the left. Explore this whole area and you’ll find three mine carts and multiple switches. Head to the upper left most mine cart and hit it to the left. Once it drops, hit it to the right. Now head to the lower mine cart and hit it to the left. Let it drop and head up to the upper right cart. Hit it to the right. Once it drops, fly around so you’re to the right of it and hit it to the left. Follow it and two carts will be standing on top of each other. Hop on the top one and shoot a pressure bomb at the sand block to the left. You’ll find the Wagon Wheel artifact here. Now just hit the bottom mine cart into the hole to the right and when the top mine cart drops, hit that to the right for it to stop on the switch. Drop down and open up your upgrade cog reward for clearing the cave and exit the door to the right. |
| 9 | Upgrade Cog | Just fly towards the area indicated on the map. You’ll see a dirt block to break to reach a secret area with an upgrade cog in it. |
| 10 | Upgrade Cog | In the area of the map indicated in the screenshot, just above the entrance to the Chamber of Wheels cave, you’ll find a small hole in the wall with a brick block. Just hit it with a jackhammer to reveal the secret area with the upgrade cog. View the screenshot below for its exact location. |
West Desert Secrets
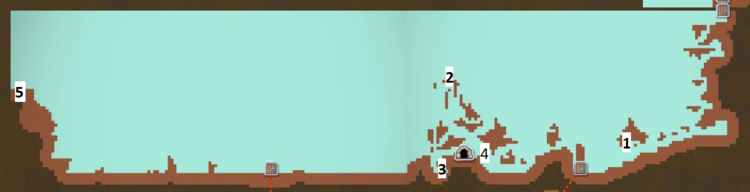
| Map Number | Secret Items | Description |
|---|---|---|
| 1 | Upgrade Cog | You’ll want to hook shot up just to the right of the marker in this location. You can stand on the small block to the right of where the upgrade cog is. Shoot a pressure bomb to the left to break the sand block so the upgrade cog will drop for you. |
| 2 | Upgrade Cog | To the left of the door to the Temple of Guidance, you’ll see a dirt block blocking a ladder. Destroy it with a pressure bomb and climb the ladder. Just climb up to the top of all the platforms to the left and you’ll see the upgrade cog at the very top here. |
| 3 | Artifact, | The artifact is in plain sight in this area. Just dig through some sand and you’ll see it. You’ll need to blow up the sand block with a pressure bomb with either the sky assailant mod or grenade launcher mod. Either will destroy the block for you to reach the artifact. |
| 4 | Artifact, Ore, & Upgrade Cog | You’ll want to have plenty of water in the tank. Break the block to the left with a pressure bomb and continue until you’re on the mine cart. Hit it to the right and break the block there. Follow the path to the right and you’ll see two mine carts. Hit the lower mine cart to the right. Then hit the upper mine cart to the left and once it lands, hit it to the right. Follow them down and hit both mine carts to the left. Hop on them and shoot a pressure bomb to the dirt block to the left. Destroy both mine carts before continuing. Head back up and wait for both mine carts to reappear. Hit the lower mine cart to the right. Hit the upper mine cart to the left and once it lands, hit it again to the left. Now drop down to the lower mine cart and destroy it. Once it respawns, hit it to the left. Follow it and hit it to the left one more time. There will now be two mine carts right next to each other. Break the right mine cart. Once that respawns to the left, hit it to the left. Hit the right mine cart of these two to the left now. Break the left most minecart and wait for another to spawn. Jump on it and use a pressure bomb to break the cracked block to the left. Pick up the artifact in this secret area. Now head all the way to the upper right and follow the path to the end for the upgrade cog. |
| 5 | Hidden Character | Zebulon Yonker will be hiding behind a wall you can just run through. You’ll need the jetpack to get here. This is definitely a secret you’ll go for after you’re (mostly) done with the game and should have most of the upgrades so actually reaching this area will be easy. |
Windy Plains Secrets
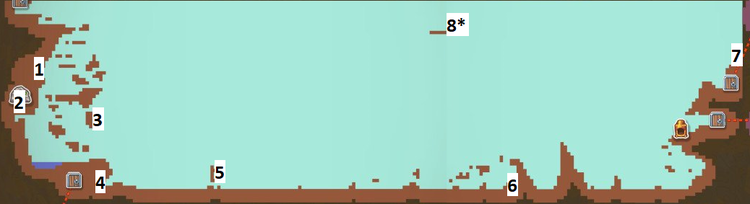
| Map Number | Secret Items | Description |
|---|---|---|
| 1 | Ore | Just use a jet pack or hook shot in this area to find a secret area behind a sand block. Collect all of the ore here to mark this secret complete in your in game stats. |
| 2 | Artifact, Ore, Upgrade Cog | You’ll want to have plenty of water in the tank. Break the block to the left with a pressure bomb and continue until you’re on the mine cart. Hit it to the right and break the block there. Follow the path to the right and you’ll see two mine carts. Hit the lower mine cart to the right. Then hit the upper mine cart to the left and once it lands, hit it to the right. Follow them down and hit both mine carts to the left. Hop on them and shoot a pressure bomb to the dirt block to the left. Destroy both mine carts before continuing. Head back up and wait for both mine carts to reappear. Hit the lower mine cart to the right. Hit the upper mine cart to the left and once it lands, hit it again to the left. Now drop down to the lower mine cart and destroy it. Once it respawns, hit it to the left. Follow it and hit it to the left one more time. There will now be two mine carts right next to each other. Break the right mine cart. Once that respawns to the left, hit it to the left. Hit the right mine cart of these two to the left now. Break the left most minecart and wait for another to spawn. Jump on it and use a pressure bomb to break the cracked block to the left. Pick up the artifact in this secret area. Now head all the way to the upper right and follow the path to the end for an upgrade cog and leave the cave. |
| 3 | Artifact | Slide down the right side of this rock formation. You’ll see the artifact in plain sight. |
| 4 | Secret Area | Just dig through the lower dirt blocks to the left here. There’s no item here but you have to travel in this area to mark this secret as found. It’s simply a door to the middle of Archaea. |
| 5 | Upgrade Cog | There’s an upgrade cog in plain sight here. Just jump up and grab it. |
| 6 | Upgrade Cog | This upgrade cog is also in plain sight. Just stay on the ground in this area and you’ll see it. |
| 7 | Artifact | Hidden above the pneumatic tube on the right side of the Windy Plains, you’ll find an artifact. Just jet pack up here to reach it. You could reach it without a jetpack if you just hook shot up there. |
| 8* | Artifact | You need to collect all 42 artifacts to unlock this cave. The cave will send you on multiple trials that are very difficult to complete. Upon completing those trials, you are given the 43rd artifact, despite the fact that the game tells you there are only 42, to prove you have completed the game 100%. |
Yarrow Secrets
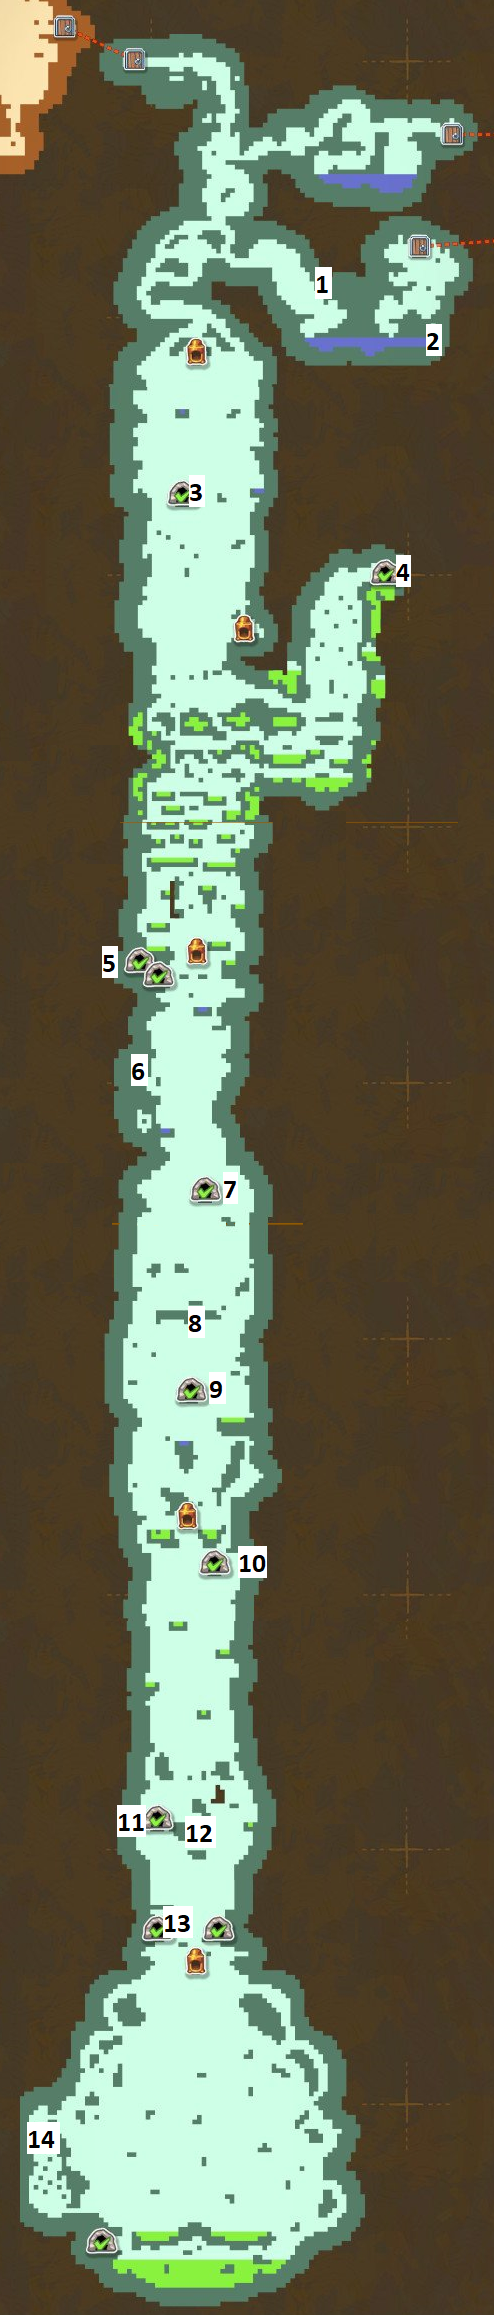
| Map Number | Secret Items | Description |
|---|---|---|
| 1 | Artifact | In the area with the marker above there will be a shooter on the ceiling. Have it shoot at the dirt blocks on the wall and quickly climb through to reach the artifact. If you come back later, you can always use the ramjet upgrade or the sky assailant mod to break the blocks yourself. |
| 2 | Upgrade Cog | When you’re first in Yarrow, you have to go underwater here. Just break the odd block here and continue to the right. Climb through this path for an upgrade cog. |
| 3 | Artifact, Ore, Upgrade Cog (x2) | This cave is a bit tricky, especially for all the secrets. It’s mostly swimming and very straight forward. The first half is just avoiding spikes in the water and the second half is avoiding spikes and those little pink monsters that shoot at you. Start to go down the first half and sink to the bottom. Hug the left wall as much as possible and you’ll see an opening big enough for you to fit between the spikes on. Hook shot there and slowly work your way down the left wall until you find a cracked block. Break it open for the Amiigo Figurine artifact. View the screenshot below for the location of this artifact on the minimap. Follow the path downward and collect the topaz when you pass it. Break the cracked block vein at the bottom to continue downward. Avoid the shooting monster ahead and break the next set of cracked blocks. Continue through the path and move quickly while avoiding the spikes so you don’t get hit by the pink spitting monsters. When you reach the top left corner, drop to the left of the spike blocks and break the sand here for some more ore. Now swim upwards and hug the left wall. You’ll quickly see another cracked block. You want to swim a little to the right to get the pink shooting monster to start shooting at you. Quickly swim in front of that block so the shots home in on it to break the block so you can pick up an upgrade cog. Now just swim up as quickly as you can to avoid being shot, just be mindful of all the spikes. You’ll be rewarded with another upgrade cog once you get out of the water. Head to the right to break a block so you can reach the exit above. |
| 4 | Ore (x3), Upgrade Cog (x2) | Fall down to the right and hit the bomb to the left with your pickaxe. Pick up the ore to the left that dropped. The bomb should drop behind you again, hit it to the right. Go through the open path and climb the platform to the top while avoid the acid drippers. You’ll see some dirt blocks to the left when you reach the top of these platforms. Break the first one with a pressure bomb and dig through the rest for an ore. Jump to the right of the bomb ahead and hit it to the left. Pick up the ore here and dig down in the newly open area. After you have all the ore, climb up the dirt blocks and head back to that bomb. Hit it to the left by jumping and just using your hook shot at it so it’ll fly to the right. Now head to the left and down the open area you picked up the ore. Go to the right while avoiding all of the acid. When you reach some boxes blocking your way, go back to the left. Fall into the first hole in the ground where the acid dripper is and you’ll find a secret area. Go to the right and break the block above you. Head back to where the boxes were. Once you get past those boxes, climb to the upper left and continue to the left. Break the block at the end of the path and go to the left. Break the sand block under the stone in the upper left and let it drop. Break the cracked block there and head back to the bomb to the left. Use your hook shot to hit it to the right and follow it for the upgrade cog you passed. Now fall back down to where those two boxes were that you dropped and head to the left. Break every sand block you see in your way and keep going until you reach the bomb. Just hit it to the right and it’ll traverse this whole cave to the stone block blocking the upgrade cog at the far right end. Pick it up and exit the cave. |
| 5 | Artifact, Ore (x2), Upgrade Cog (x2) | Drop down and quickly kill the snail below. Follow the path until you reach a large rock. Don’t let it drop, instead, break down two blocks and go under it completely. You’ll see a cracked block you can break open here for the Radiant Orchid artifact. View the screenshot below to see how to reach it. Keep jumping across the platforms to the left while avoiding the acid. Continue to the far left while avoiding the acid to break a vein of cracked blocks. This will destroy a lot of the acid drippers in the ceiling. Head back to the right and climb up the stones that fell. Climb up the path here and continue to the left. There’s an Ametrine ore under the snail you can pick up. At the end of this path, you’ll find a pool of water. Refill your water tank and you’ll see a large stone just to the left of the water. Shoot a pressure bomb to break it loose so it falls. Drop down onto it and shoot another pressure bomb to the right so that one falls. You guessed it, now drop onto the last stone that fell and shoot a pressure bomb to the right. Collect the ore in this area while dealing with the snail. Continue a little further to the right and you’ll enter a large cavern. Jetpack up for a hidden ore up here. Continue to the right while avoiding the acid drippers and climb onto the regenerating dirt blocks. This area is tricky, especially if you fall below the dirt blocks that regenerate.Count how many acid drippers you go past once you start on the regenerating blocks. In between the second and third acid dripper, you’ll see a small dirt block in between the rocks below where the acid pools are. Drop down and break it to reveal a secret for an upgrade cog. Below is a screenshot showing where you want to start digging down. Climb back up and try to get above the regenerating blocks. Keep going to the right as it’s safe to do so. Slide down the walls at the end and snails will break loose from little alcoves on each side. You’ll have to deal with them at the bottom but it’s not as daunting as it seems. Simply lure one and hook shot straight up. Let them keep breaking the blocks below you and they’ll open up a path to the left to reach an upgrade cog and the end of this cave. |
| 6 | Artifact | Break the odd looking block on the left wall near the marker on the map. You’ll drop down a bit in this secret area for a hidden artifact. |
| 7 | Artifact, Ore, Upgrade Cog | Fall down the platforms here and you’ll reach an area of platforms you have to jump across. Before you start jumping, fall under the platform you’re on and hook shot as far as you can until you reach the metal panels on the ceiling. Jet pack across those panels and hook shot at the end. Climb the far right wall and you’ll find a secret area with the Scented Candle artifact. Look at the screenshot below with the minimap for reference. That’s the entrance to the cave in the top left corner of the screen and you can see in the minimap where I went to reach the artifact. Just fall to restart the cave and you’ll keep the artifact. Fall back down to the platforms with the pink blobs. The path is very straight forward. I would try to avoid hitting the pink blobs as best as you can to give yourself some more time to work with. There are clay blocks here that will crumble once you touch the top or sides but not if you hookshot to the bottom. Make use of that to refill your jetpack fuel as needed and to slow down a bit. If you touch a pink blob, it’ll destroy the platform it’s on so make sure to avoid them as best as possible. In the top left corner, when you start going right again, jetpack to the left for a small platform with a rare ore on it. Now just head to the right along the top platforms. You’ll have to bounce across some pink blobs which will destroy their own platforms so make sure not to turn back! At the end, you’ll slide down a narrow pit. The bottom is full of pink blobs. Try to just activate one and get back into this narrow shaft. Hook shot to a wall and just wait until all the blobs are destroyed. Pick up the upgrade cog at the end and break the block below to exit the cave. |
| 8 | Upgrade Cog | There’s a single sand block under this long platform you can bounce up into to break. If you’re having trouble bouncing into it, just head back when you finish Yarrow and have the ramjet vigor upgrade to your jet pack. |
| 9 | Artifact, Ore, Upgrade Cog | This cave is very straight forward and there’s no tricks or puzzles. It’s just tough with all the spikes, bounce pads, and shooters to hurt you. Simply follow the path and you’ll find a diamond in plain sight along the way. Make sure to use your hook shots to stabilize yourself and get through tight areas safely. There’s a point where you’ll see some sand blocks to your left when you go down and have to start going right. You’ll have to head a little to the right to lure some shooters to shoot at you and then have them go for the sand blocks. Head over there for the Bowl of Cereal artifact. View the screenshot below for its location. Just continue along the path from here to the right and you’ll find an upgrade cog just before the exit. |
| 10 | Artifact, Ore, Upgrade Cog | Follow the path down and you’ll see some bees. These don’t fly to you, they’ll fly in a set pattern constantly. If you hit them, they’ll fly away from you and explode when they hit something else. All the blocks within their explosion will also slowly explode so stay away and make sure not to hit them right into a wall you’re next to. Take a look at the ceiling as you follow the path to the left. You’ll see a cracked block you can’t break and to the left of it, some sand blocks in the ceiling. To break this, you’ll need the sky assailant mod on your pressure bomb. This requires you to have the level 4 pressure bomb which has a required level of 14. You’ll need a total of $1,400 to upgrade this to tier 4 and then 3 upgrade cogs to unlock the mod. You may have to come back for this one at this point but just fly up and shoot a pressure bomb up at the right sand block here. The Still Life, Stil Hope artifact is up here. Follow the path to the lower left and break open the ore down here. Break the cracked vein to clear up most of the cave. Work your way back to the entrance/exit door while killing the bees safely. Break the path open for the upgrade cog at the end. |
| 11 | Artifact, Upgrade Cog | This room is all about speed and will likely take you a couple of tries. Head down to the switch at the bottom and keep going as far right as you can. Break the ground tile and you’ll see when you fall through this hole, you’ll end up in the top of the room. Climb back to the switch and open the gate about. Fall down quickly and enter the door before it closes for the upgrade cog. Break the cracked block vein below and fall down. Instead of going left to the exit, just jump to the right to reveal another secret. Run off the screen to the right and you’ll end up at the artifact to the left. Now head for the exit. |
| 12 | Upgrade Cog | You’ll see a pool of acid here, jump in it and break the block on the left side of it. Pick up the upgrade cog that was hidden here. |
| 13 | Ore, Upgrade Cog (x2) | Follow this path until you reach a split. The left will lead to a set of regenerating dirt blocks up high that you can break if you have the sky assailant pressure bomb mod. You want to break the regenerating dirt blocks below though. Enter the contraption for the Ramjet Vigor which will allow you to break blocks above your head by flying into them with your jetpack. Fly back up and get out of here. You can fly to the left and follow this path. Your ramjet will also kill enemies so just fly past the spitter that gets in your way. Once you get back to the entrance, fly up through the dirt blocks in the upper right. Break open the upgrade cog chest there. Before leaving the cave, fly straight up and you’ll see some dirt blocks here. Fly up there for a hidden upgrade cog. |
| 14 | Artifact | Simply enter the lower opening to this left area down here and head upwards until you reach the artifact. |
Caves
In this section, I will list all of the caves by location and by name. I know a lot of people may come here looking for just how to solve a cave so this section is for you! Look for the cave name for where you are, you can use the map at the top of each section for reference, and read the description on how to solve that cave.
Each chart is in alphabetical order rather than the order for how you will approach caves.
Archaea Caves

| Burster’s Room | Start off by heading to the left and killing the beetle. Break down the sand block that blocks your way ahead. Drop down and kill another beetle down here. Slowly work your way down here and avoid the cacti on the edges. If a beetle charges at you, just jump over it and let them drop down. They’ll drop straight into water and drown for an easy kill. Once you reach the bottom of this path, stand on the red clay block on the right and it’ll crumble under you. Enter the large contraption to unlock the Pressure Bomb! The pressure bomb is a handy item that will allow you to throw a bomb in any direction that will stick to a block and then destroy it. This is the only way to break blocks you can’t normally reach. You will see two small blue bars in the top left corner below your health. This is your pressure bomb charges. You can refill it by just standing in water at any time. Break down the sand blocks to the right using your pressure bomb to continue.Break through the next sand block in your way and head to the right. Swim through the water and wall climb up to the next platform. Kill off this beetle and follow the platforms to the left and then straight up. When you’re on the upper left block here, shoot a pressure bomb straight up. You’ll see a beryl block that will drop on your head. Jump up to the next platform to the right and kill the beetle here. Break the dirt blocks on this platform so you can shoot a pressure bomb to the dirt block to your right, which will drop the large stone. Drop down on the stone and shoot another pressure bomb at the sand block to the right to open up this path. Drop back down into the water to recharge your pressure bombs before you continue through that opening. Halfway up this block, you’ll see a platform with some wooden floors. There will be a cracked block to the right. Break it and drop down for an upgrade cog. Refer to the screenshot below for its exact location, the mini map in the top right will give you a great idea of where this secret is hidden. Kill the two beetles at the top of this path and you will see a platform you can climb onto above the second beetle. Climb up there and fire a pressure bomb straight up at the sand block. Climb up there to reveal the Rattus norvegicus artifact. When you’re ready, drop back down and head to the left. Break the sand block to reach the exit to leave this cave. |
| Cave-In Catacomb | Head to the right and go under all of the cracked blocks. Break the last block in the row, where the crack begins, and quickly sprint back to the left before the stones above crush you! Now climb up the platforms and break the next cracked block. Continue to the right once the path is clear. You will see the beginning of the cracked blocks here again at the far end. Use a pressure bomb on it to give you some extra time as you run back to the left for safety. Once all the stones clear, head to the far right for an upgrade cog. Now start heading back to the beginning of this cave. At the left end of the stones that all dropped, you will see a wall you can sprint jump to and wall climb up. Go up there and break the sand block to reveal a secret containing the Spelunky Diary artifact. View the screenshot below to find where you should wall jump up. Once you grab that artifact, head back down to the entrance of the cave to leave it. |
| Mason’s Station | Step on the switch to your right and drop through the open hatch. Head to the left to kill a beetle. Climb up the platforms above that beetle and use a pressure bomb on the sand block in the top left corner to release the stone block onto the switch below. Drop down and enter the now open door to your left. Climb all the way to the top of this mineshaft here. Once you reach the top, enter that small alcove in the top right. Just run through the stone to the right to reveal a secret which holds the Photo of a Missing Love artifact. Head out of this secret area and jump over the gap to the left to the clay block. Fall through it and begin climbing the ladders to the top. At the top of the last ladder in sight, you’ll see some platforms to the right you can jump across. Jump across them and climb another ladder up to the top of this area. Kill the beetle and use a pressure bomb on the sand block to the left to drop the large stone.Follow the stone downward but be careful not to take damage from the fall. You may want to backtrack down the ladders you came up. Step on the switch next to the stone to drop it another level. Don’t follow it this time. Instead, go to the left and use a pressure bomb on the sand block on the left wall. Drop down and break the dirt block here. You should land to the left of the stone block. Step on the switch here and follow it down. Drop down as low as you can and head to the left through the open door. Drop through the clay block and enter the contraption here to unlock the Jackhammer! This useful tool will smash through blocks you otherwise couldn’t break. Before continuing, climb the contraption and shoot a pressure bomb at the ore above the machine to pick it up. Climb up the platforms to the right and use the jackhammer to power through these bricks. Continue to the right through the next set of bricks when you reach the mineshaft for some more ore and an upgrade cog. You can now exit this cave. |
| Mysterious Cave | This cave is really straight forward to begin with. Just follow the path through the clay blocks. The only spot where it splits is to backtrack. At the end of the path, you’ll find the portal to Vectron. Dorothy is brave enough to enter it, even if Fen refuses to, so head in! The intro to Vectron is very straight forward. Just follow the path until you reach a wide area with clay. Be careful falling down here and slowly move to the left wall. You’ll find an expensive ore on this side but it’s easy to miss as you don’t have much time to avoid the crumbling clay. After you fall through the rest, just slide down the left wall. You’ll see some floating spirits and TVs near them. When you get close to one, they’ll quickly enter the TV and self destruct. If there’s no TV nearby, they’ll just explode in place. Once at the bottom, head to the middle. Lure the spirit into the TV and drop into the new opening.Just keep moving quickly through this next area to the right to avoid all of the spirits. Stay on the upper path until you reach the end and drop down. Have the spirit down there destroy the TV and run to the far right. Don’t worry, your game isn’t crashing, it’s part of an animation here. Continue climbing the walls to the right and over the dirt mound ahead. Before continuing, clear out the dirt for the little opening. You’ll need to hide in here soon. Head to the right and a robot will block your path. Lure the spirit here into the robot and run to the left into the little hole. When the robot passes, climb out and run to the right without slowing down until the robot can no longer chase you. Slide down this long wall so you don’t take fall damage. This part can be rather tricky. Head to the far right without triggering any spirits to head to robots. If you do, just run! Don’t slow down, don’t think about stopping for anything.. Run and jump at the end of the path. You’ll land in water and the robots will keep going. Just keep wall climbing in the top right corner until the robots power themselves down. Now head to the left and climb up the wall. Enter the first opening you see. Follow this path and avoid the spirits. Just dig as quickly as you can and run to the left when you reach the bottom. You’ll enter a cutscene before you die and you’ll return to the mysterious cave.Start climbing the platforms to the left and enter the contraption to unlock the Jet Engine. This is a jetpack that only works for a couple of seconds and you can use it by holding B. Work your way to the top of this cave by jumping from platform to platform. At the top, break the blocks to the left and follow this path to reunite with Fen. Climb out of this cave using your jetpack and breaking the sandblocks to free your way. Before leaving the cave, jet pack to the opening in the upper right corner. Use a hook shot on the dirt up there to refill your jet pack to use again. You’ll find an upgrade cog up here. Now leave the cave to return to Archaea. |
| Patch Wall Groto | This is the first cave you will encounter in the game. Caves are kind of little bonus levels that have goodies inside. You absolutely want to enter every one you find. It’ll always be worth it. You’ll start off by seeing some metal plates on the walls, you won’t be able to wall jump up these. You’ll just slide off. So begin by heading to the left. Climb up and break the sand block, quickly jump out of the way before the large stone above crashes down on you. Climb up and you’ll see a small opening in the top left corner of this room. Climb up there to reveal a secret. Head to the right for an artifact, the Amulet of Baal Ahdahli-Dihla. You’ll see a cracked dirt block directly below the artifact. Just break through it and drop straight down. You’ll conveniently land on an upgrade cog. Break the box open and pick it up. That’s everything in this cave so you can drop back down and leave the cave from the door you entered. |
| Prickly Panorama | This cave is really easy. Simply drop down below and break the sand block in your way. Hop up back to the entrance of the cave and enjoy the fireworks! All of the cacti will destroy each other and clear the rest of the room, leaving a nice, shiny azurite for you at the top of the room. Leave the cave when you pick it up. |
| Rupture Rock Hollow | In order to get everything in this cave, you’ll need the upgrade hook shot and/or the jet pack. The first section below is for your first time running into this cave, before you get those upgrades, the second is after you unlock those items. You’ll still want to follow both walkthroughs to get all the items in this cave.There are a few hidden items in this cave so you’ll have to run it a few times. You’ll notice a lot of cracked blocks, it’s really a race to the finish. Drop down to the left and head to the right. Break the beginning of the crack line and head back to the entrance by quickly wall jumping back up. Collect the ore when the path opens up and continue to the right. Break the next crack line and race the crumbling blocks to the right. When you reach the far right wall that you have to wall climb up, just stand next to the wall and fall when the blocks below you crumble. You’ll land on a hidden platform below containing the Glowing Goo artifact. After you get that, just drop down to reset the cave. Get to the same point but this time, wall climb up to the top. Keep moving to the left and keep wall climbing in place before you fall down from the crumbling blocks. Once you get past this sequence, continue to the left and break the last block to reveal a path below to an upgrade cog. Pick it up, break the sand, and return to the exit.You’ve been here before and should know the trick. In case you need reminding, fall to the left and break the cracked block in the lower right. Climb back out and head to the right. Break the next cracked block and race to the upper right corner. Wait for the cracked blocks to catch up and climb on top of them immediately once you can. At the next section that the cracked blocks go up again a little bit, jet pack straight up and hook shot up right as your jet pack is about to run out of fuel. Quickly head to the left and break the cracked block in the upper left corner of this room to reveal a hidden upgrade cog up here. Now head out of the cave. |
| Tick Boom Room | Head to the right under the wooden platforms with the stones on them. You have to be quick here. Quickly fire a pressure bomb down and jump up and out to the left before it goes off. If you didn’t get out in time, you’ll have to break the rest of the sand, leave the cave, and reenter it to reset the room. If you do get out before the pressure bomb goes off, stand on the top stone that will fall with the wooden platforms. You can now break the sand block to the right. The upgrade cog in this cave is right up here in the top right corner of this small cave. Leave the room when you complete it. |
| Trilobite Bluff | A beetle will drop to the platform above, let it step on the switch and quickly run through the door to the right. Climb up to where the beetle is from the right side. Jump over it and try to get it to charge at you while you’re to its left. You want it to drop off the edge of the platform with its charge. You may have to keep jumping at the edge so it doesn’t charge you too early. Once it drops, stand on the switch so it can pass through the door below and to the right. Now head down to the lower right and lure it down to the lower switch on the right side. Do the same thing, get it to charge at you off the edge. Once it steps on the switch, enter the door in the top right to reach the upgrade cog. Once you have it, head back out of the exit. |
The Oasis Caves

| Rosie’s Storage | Fall to the left and just follow the path down to the contraption in the lower left corner. This will unlock the Hook Shot. You can use this by using the Right trigger. Head to the right a little and you’ll be under the bridge. Use the hook shot straight up to launch yourself onto it. Now head to the right and use your hook shot straight up again to the next bridge. Head to the right again and you’ll see another bridge above. Don’t hold your hook shot too much because you want to stop in between the bridges. If you went too far, just drop down to the left and try again. Once you’re on the lower bridge, break the block to the right and climb up to get the Rosie’s Dumbbells artifact. Now climb to the top of these bridges and use your hook shot on the cactus to your left. You’ll see this is a great tool to destroy cacti. Jump to the left and sprint jump over this next large gap to continue to the left. You’ll see some more cacti straight above. Break them with your hook shot and climb up there for some more ore to collect. Now drop down, pick up the upgrade cog to your left, and exit the cave. |
Temple of the Destroyer Caves
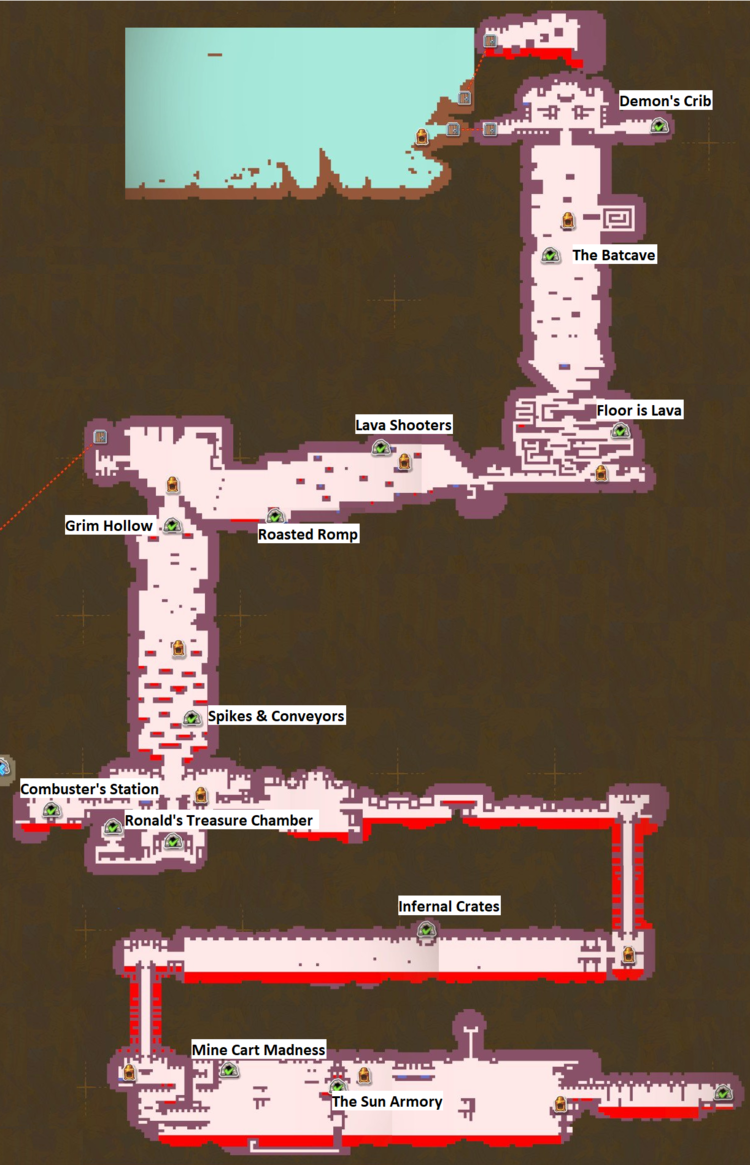
| Combuster’s Station | Head to the right and you’ll enter a brief cutscene with the Great Prophet. You will now enter the boss battle against him. Movements: He will only teleport randomly. If you pay attention to when he teleports away, a little dust animation will appear showing the direction he teleports to. Attacks: Stage 1 – He fires off fireballs like the wizards you faced in the Grim Hollow cave. Stage 2 – Again, similar to the fireball like the wizards but instead of just firing in 4 directions, it shoots diagonally too, firing in 8 directions. The cannons found throughout this room will also fire off as well. Strategy: You’ll want to start by taking your time and clearing the room as much as possible. Use your pickaxe and the boss’ fireballs to clear out as many blocks as you can early. When you get close, quickly attack it a few times with your pickaxe until it teleports away. Looks for the smoke animation as it teleports away to know exactly where it’s going. Just keep following it around. Once it’s down to only a third health left, it’ll start firing off 8 shots instead of 4 so you want to hurry up and kill him at this point. This is why I recommend clearing the room as much as possible early on. The cannons also start firing off at this point as well. Keep fighting him off as quickly as you can during this phase to finish him off before his attacks become overwhelming. After you defeat the Great Prophet, fall down the opening that appears in the cutscene and pick up the Ignition Axe. Head to the left and hit the robot with your axe to get it to move. Continue along the path to the left and use the ignition axe to move any other robots you need to move. The second robot you hit, you’ll have to hit a few times. Fall into the small hole underneath it when it’s safe and hit it again to move it once more to the right. Continue up the path here and move the last robot to the far left wall. Jump on its back while it stopped at the far left and break the brick block on the wall with your jackhammer for a hidden upgrade cog. Now head to the right to exit this cave. |
| Demon’s Crib | This cave is very straight forward and is really just a race to the finish. The lava will keep rising so you have to follow the path to outrace it. There are some cultists here but you can just fly right past all of them. There’s an ore you’ll see on the right as you climb up you can pick up along the way while breaking all the blocks in your way. Once you reach the top, don’t go into the exit. Instead, hook shot to the ceiling. The lava will soon catch up to you and sit there for a few seconds, then it’ll start lowering again. Just head down right back to the beginning of the cave and head to the lower right corner of the beginning room. You’ll see a sand block here. Break it and enter for the Fire Token artifact. Now just head for the entrance to get out of here quicker. |
| Floor is Lava | You’ll see a lot of floor switches in this room. Stepping on a single one will close the next door and you have to turn the lever to open them again. There’s an artifact in this cave that you can only get if you don’t touch any switches throughout the whole cave. Keep that in mind. You’ll have to leave the cave and reenter it to reset it for that artifact. Start by sprint jumping over the first batch. Now drop down and wall climb along the left. Just use hook shots to move your way to the far right wall here along the floating blocks. At the end of this set, move to the left and climb up this narrow passage. Hook shot the ceiling as you move up to the upper right here while avoiding all of the switches. Break the sand block in the top left of this room to release the stone below. Fall onto it and use a pressure bomb on the sand block to the left. Drop down through the new opening for an upgrade cog. The door to the artifact at the end will remain open only if you didn’t touch any switches. It is the Piece of Red Cloth. Once you’re done here, break the sand block in the ground and leave the cave. |
| Grim Hollow | Begin this long cave by heading to the left. You will soon see a wizard that will have crystals circle around a spot you’re in and then shoot fireballs in every direction when they form together. Just make sure to avoid the fireballs for now and keep heading to the left. Wall climb to just to the left of the wizard and wait for the crystals to appear. Quickly drop down to the lower left to avoid the fireballs and they’ll open up the path for you. Jump over the wizard, making sure to leave it alive, and climb up the wall above. Stand at the top of the platform and wait for the crystals to appear again. Quickly sprint to the right and drop down to the switch. You’ll see two cracked blocks here. One down low that you can break and another up high that you can’t. The wizard’s fireballs will break the higher one, revealing the Doom Cult To-Do List artifact. Pick it up. Now flip the switch and break the lower block. Fall down and you’ll find yourself at the entrance of the cave, don’t leave yet though! Now head to the right. This path is really straight forward, just follow the path while avoiding the lava. You’ll reach a large robot blocking your path. Jump over the block above it and break it from the left side. Quickly wall jump and keep jumping so you don’t touch the robot. The lava will drip onto it and wake it up. Once it passes to the right, drop down and continue to the left. Flip the switch and the end and climb up the path that is now open. Head to the right at the top of this path and avoid the fireballs from the wizards. You’ll see a set of sand blocks that will block your way. Back track a little bit and lure a fireball from the wizard to shoot at the sand blocks. You have to actually break the sand blocks before the fireballs hit them so the fireball will wake up a robot to the right. Get out of the robots way with a hookshot to the ceiling and continue along the path. Another robot will soon block your path. Just hook shot to the far upper right corner of the path with the robot and wait for another set of fireballs. Drop down to avoid the fireballs and they’ll wake up the robot, killing the wizards below. You’ll find this cave’s upgrade cog just after the wizards. Fall down to the left and break the block, then fall down to exit this cave. |
| Infernal Crates | Jump up to the left and break the sand block between both conveyor belts. Flip the switch for the crate to fall onto the pressure plate below. Enter the now open door to the right. Pick up the topaz as you continue to the right and fly up above where the crates are flying into lava. Break the block here and ride the conveyor belt to the left. Hit the switch here. Break all the crates that block your path as you move upwards. At the split, go to the right and then go up at the next immediate split. You’ll be standing at a switch and overlooking the entire room. This switch will stop all the conveyor belts. You want to stop it right before the crate flies off the top conveyor belt. Then quickly flip it so it drops slowly to the next conveyor belt. The trick here is you have to get it stopped on the left edge of the right most conveyor belt. Once you time it right to stop there, turn it on and don’t touch the switch again. It’ll end up on a pressure plate that you passed. Before you follow the crate, head to the upper right corner of this room and blow up the dirt block with your pressure bomb if you have the sky assailant mod. If you don’t have it yet, you’ll need to come back here. There’s a switch at the top of the room that controls the conveyor belts. you want to manipulate it so it stops at the edge of each conveyor belt before a crusher blocks it, but activate it again before a crusher crushes it. It’s all about timing but you do want to stop it at the end of each conveyor belt, even if just for a brief moment. This will open up a room for the Holt Toast artifact. Now, head to where that crate from the previous room wound up and fly straight up. You’ll end up at another switch overlooking a room. This switch will only control the two upper conveyor belts. Stop the conveyor belts so the crate doesn’t get smashed by the crushers as you let it progress through the room. Stop the crate when it’s on the left edge of the middle conveyor belt. Turn the switch on once you see the lowest crusher begin shaking. It’ll come out to another pressure plate below. Head through the open doors below and fly into the clay block to reach the upgrade cog. Head down to the exit. |
| Lava Shooters | Slide down the wall to the left in between lava drops. You’ll notice sliding is the same speed as the lava drops which is rather convenient. Once at the bottom, hook shot onto the conveyor belt on the ceiling to pass over all the lava down there. Climb up the wall to the left in between lava shots and alternate left and right to avoid the spikes when they get in your way. Now start heading to the right and avoid the fireballs here. At the end of this path, slide down the conveyor belts. The second will be rather tricky with lava dropping down. You want to let go of the wall to drop faster and quickly hold on to slow down before you hit the lava shot. Once you reach the bottom, jump across the blocks to the right to find a platform with an upgrade cog. Now head back the way you came and go to the left along the lower conveyor belt while dropping to avoid the lava shots and quickly hook shotting back up. Climb up the path here while avoiding the alternating fireballs. Another upgrade cog will be at the end of this path. Don’t head for the exit just yet. Instead, keep climbing up to the right where the fireballs are coming from but be careful not to get hit. At the top, break the stone block with the crack in it to open a secret to attain the Fossil artifact. Break the stone block at the end of this path and head for the exit of the cave. |
| Mine Cart Madness | Use your jet pack to fly through the clay block to your right. There are two mine carts in this room. Hit the upper mine cart to the right and then go to the left minecart. Hit that to the right as well. Follow it down and go to the right through the open door. Use your jet pack to enter the next mine cart puzzle room. Hit the left mine cart to the left and then the right mine cart to the right. They should both be in the same area. Hit the right mine cart to the left so it stops at the left mine cart. Now break the left mine cart and it will respawn just above you. Hit the new mine cart to the right and then the left mine cart to the right to open the next switch. Grab the upgrade cog through the door. Now continue to the right for the last puzzle of this cave. This last puzzle involves a lot of steps so just do the following: > Hit the top most cart to the right and then to the left. Break the cart just to the left of that cart that you just moved and quickly hit it to the right before the one you just broke respawns. It should stop on the far right ledge. > From the current position of all the carts, hit the upper most cart to the right and then hit the left most cart to the right. > All 3 should now be very close to each other, destroy the middle cart of the 3. > When the cart respawns above you, hit it to the left. Now drop down and hit the middle cart to the left. > Destroy the left most cart. When it respawns in the upper right, hit it to the right and then to the left. It’ll drop through the first clay block. > Break the upper left most cart. When it respawns to the left, hit the new cart to the right. Follow it down and hit it to the left when it stops. > You should now have two carts right next to each other just to the left of the lower clay block above the switch. Break the left most cart down there. > The upper right cart should respawn, hit it to the right twice until it’s on the lowest platform and then hit it to the left so it falls onto the switch, opening the path for the last upgrade cog and artifact in this cave. |
| Roasted Romp | This part can be kind of tricky. Platforms will rise and drop in the lava. You have to time your jumps across them without touching the lava to reach the end of this section. At the end, drop beneath the fists popping out of the wall. Once they start pushing out, jump up to the left of the fists and break the cracked block at the top. Collect the upgrade cog up here. Hook shot up and go right. Break the block at the end to leave this secret area. Collect some ore and continue to your right. These platforms below will act as trampolines and shoot you up when you touch them. Work your way to the right while avoiding the spikes. At the end of the path, stand on the top crusher and the crushers below you will push in before you fall. Just stay put and you will slowly drop down. After the first set of crushers, another set will try to actually crush you. Just drop down without grabbing a wall and you’ll be fine. Head to the right and grab the other upgrade cog in this cave. Now head for the exit to your left. |
| Ronald’s Treasure Chamber | Head to the left and pick up the ore there. There’s one little alcove in the ceiling that doesn’t have a torch here, just fly up into it. At the end of this path, you’ll find a contraption to unlock the long range grappler as well as three upgrade cogs and a rare ore. Pick them all up and leave the cave. |
| Spikes & Conveyors | Ride the conveyor belts to the right and avoid the spikes. Feel free to use hook shots on the ceiling to just get around them when it’s easier. Now you’ll reach an area with a big pit below you. Jump across the conveyor belt platforms here. Use hook shots to save yourself if you fall. At the end, don’t climb up yet. Drop below the last conveyor belt and use hook shots along the bottom of this platform to head to the far bottom right corner. Wall climb straight up this wall for a hidden upgrade cog. Slide back down the wall and hook shot back up to where you came from. Use hook shots to climb up this area with conveyor belts and avoid the spikes. At the top, start heading to the left. Use the hook shot to ride conveyor belts and avoid the spikes and lava here. When you drop down and ride a conveyor belt to the right, you’ll see a single block without a spike on the left wall. Jump and hook shot through it for a secret with an artifact. The screenshot below will show where it is exactly. Follow the path up with more conveyor belts and hook shots to avoid spikes. Be careful, these conveyor belts move very quickly! Pick up the Hallo Katze Chainsaw artifact. Fall down to the left and break the block to return to where you entered this secret area. Follow the conveyor belts to the right and avoid the spikes with hook shots as needed. You’ll drop down and head back to the left. Jump over the lava at the end and pick up the upgrade cog. Dig through the blocks to your left to exit this cave. |
| The Batcave | Head to the right side of this cave and you’ll see some fireflies. If there’s more than one, kill them both. There’s a spot they’ll respawn from in the top right corner. When there’s only one, lead it down to the middle of this room. You want to get directly under it and hit it straight up the center to break some sand blocks up there. Once the path is clear, hook shot up there and wall jump to the top for an upgrade cog. Drop back down and lead a firefly up to here. Once you get a firefly in this area, stand on the block where the upgrade cog was. Hit it straight to the left to reveal a secret containing the Ginsa Shark Tooth artifact. Head back out of this cave. |
| The Sun Armory | This cave is really short and not much of a puzzle. Just follow the path to get the ultra composite armor. It’ll allow you to take less damage. Don’t leave yet though! Just jump up the blocks to the right and hit the wall at the top of the blocks with your pickaxe to reveal a secret with a rare ore in it. Pick it up and leave the cave. |
Temple of Guidance Caves
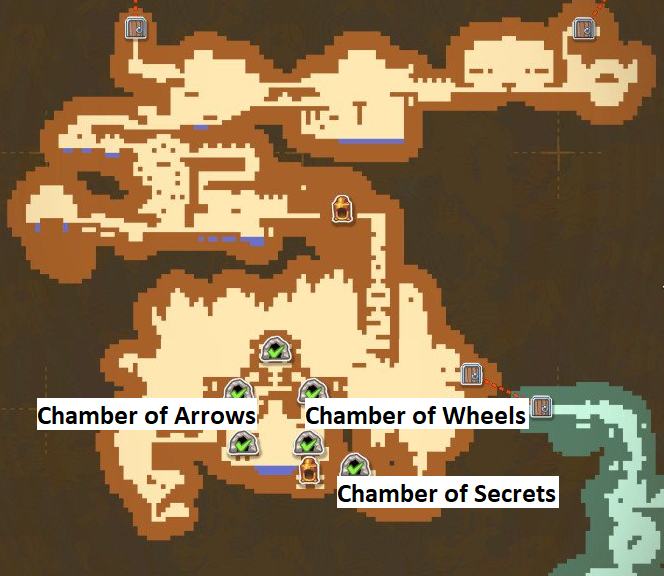
| Chamber of Arrows | Head to the right and you’ll quickly find an ore in the ceiling. Break it free with a pressure bomb. Drop down slowly and you’ll see some arrows shooting out of an opening in the left wall. All of these arrows will shoot in bursts of 3 and then pause for a couple seconds. Follow the path, timing your movements to avoid the arrows. The arrows will move faster than you so try to jump behind the 3 right away and sprint forward until you find a spot for cover. Soon you’ll have to go straight towards the arrows. You’ll want to hook shot to the openings in the ceiling to avoid these arrows. The path will continue upward but you want to keep going left towards the where the arrows are coming from. At the wall, hookshot straight up for a secret area with the Toy Rocket artifact. Now head to the right and enter that opening in the path above. Refill your water tank when you reach the pool of water. At the end of this path, you’ll reach a round room with a switch on the platform above. This room is really dangerous. You’ll see holes all over the walls for arrows to come out of. Stepping on the switch will trigger a sequence of arrows. You want to focus on using this platform for cover from the arrows by using your hook shot. The arrows will fire in a pattern. First it’ll be half the room covered in one direction, then the whole room covered in that same direction. Then it’ll change directions and repeat that. It’ll start going clockwise starting in the bottom left, then bottom to top, then top to bottom, then left to right, then right to left. A path will open to the left heading to an upgrade cog and the exit. |
| Chamber of Secrets | This cave starts off with a big maze. Just follow the path and do the following at each split in the path: > Drop Down > Go Right > Go Right > Break the sand block at the end of this path and go back to the last split you came from. > Go Up > Go Left > For reference, you should be back near the start, go right where you cleared the path. > Go right at the next split You’ll see a switch in the room at the end here and a room below with a block of ore. Flip the switch to open the door to the ore and close the door to the room you’re in. Just fly out in the top right corner to reveal a secret. Loop back to where that ore is and pick it up. Now head back to the left and drop down. When the path splits, go to the right. Go down immediately at the next path split. The floor will break and you’ll fall into some water. Swim through the water without hitting any spikes and pick up the ore at the end of this path. Break open the cracked block to your left. Climb up here, go left and then down. Look at the button on the ground and jetpack over it. It’ll shoot an arrow from your right. Follow the path and there will be another button when you drop down. Avoid that as well to avoid an arrow shot from your left. Follow the path and you’ll soon reach a series of switches that controls multiple doors. Flip the switches in the following order: 4, 3, 2. You’ll see all the doors open up. Head to the left and break open the cracked block. Follow the path back to the doors and continue to the left to enter a contraption to unlock the grenade launcher. You can now turn your pressure bomb launcher into a grenade launcher. The explosive has a much bigger radius but it’s a little harder to aim. Just fire it at the boxes to the left to clear the path. The wall to the left is actually fake but don’t run through it or you’ll step on a switch that fires arrows at you. Just jetpack through the wall and drop down the pit ahead for the Old Unopened Invitations artifact. Now backtrack and go up where you went through the wall. Now follow the path up while avoiding the spikes along the way. You’ll soon reach another wall of crates, use your new grenade launcher to make quick work of it. You’ll now be rewarded with an upgrade cog! Continue a bit further and use your pressure bomb to break the next crates and then just break the rest with your pickaxe. Break open that cracked block down below to open up the path to the exit. |
| Chamber of Wheels | You’ll see a wagon to the right. If you hit it, you’ll see that it’ll just go in the direction you hit it until there’s something to stop it. Hit it to the right and follow it. Break it by hitting it a few more times. Another will drop to your left now. Just hit it to the left and it’ll fall on the switch. Fly through the open door. Follow this path for another locked door. There will be two openings in the ceiling above here. Fly up the right opening and hit the wagon to the left. Follow it down and hit it to the right for it to land on the switch. Enter the open door to the left. Explore this whole area and you’ll find three mine carts and multiple switches. Head to the upper left most mine cart and hit it to the left. Once it drops, hit it to the right. Now head to the lower mine cart and hit it to the left. Let it drop and head up to the upper right cart. Hit it to the right. Once it drops, fly around so you’re to the right of it and hit it to the left. Follow it and two carts will be standing on top of each other. Hop on the top one and shoot a pressure bomb at the sand block to the left. You’ll find the Wagon Wheel artifact here. Now just hit the bottom mine cart into the hole to the right and when the top mine cart drops, hit that to the right for it to stop on the switch. Drop down and open up your upgrade cog reward for clearing the cave and exit the door to the right. |
West Desert Caves
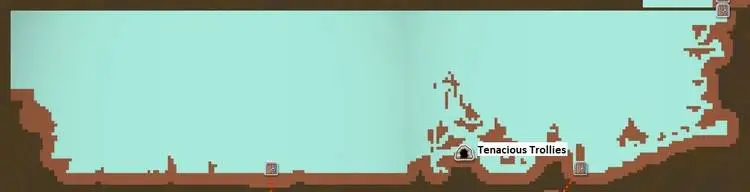
| Tenacious Trolleys | You’ll want to have plenty of water in the tank. Break the block to the left with a pressure bomb and continue until you’re on the mine cart. Hit it to the right and break the block there. Follow the path to the right and you’ll see two mine carts. Hit the lower mine cart to the right. Then hit the upper mine cart to the left and once it lands, hit it to the right. Follow them down and hit both mine carts to the left. Hop on them and shoot a pressure bomb to the dirt block to the left. Destroy both mine carts before continuing. Head back up and wait for both mine carts to reappear. Hit the lower mine cart to the right. Hit the upper mine cart to the left and once it lands, hit it again to the left. Now drop down to the lower mine cart and destroy it. Once it respawns, hit it to the left. Follow it and hit it to the left one more time. There will now be two mine carts right next to each other. Break the right mine cart. Once that respawns to the left, hit it to the left. Hit the right mine cart of these two to the left now. Break the left most minecart and wait for another to spawn. Jump on it and use a pressure bomb to break the cracked block to the left. Pick up the artifact in this secret area. Now head all the way to the upper right and follow the path to the end for an upgrade cog and leave the cave. |
Windy Plains Caves
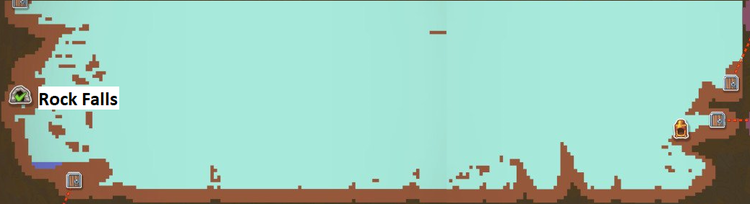
| Rock Falls | Head to the right and you’ll see some stone blocks on top of sand. You have to be quick and break all of the sand blocks while constantly moving to the right. If the stone blocks fall and you don’t pass them, you’ll have to reset the room. Once you get to the water on the right side of the cave, the logical way to proceed would be to wall climb up the right wall but don’t do that! Instead, from the water, hook shot upwards and work your way to the top without breaking the sand block under the three stone blocks in the upper right corner here. Get on top of the stone blocks and break the sand block here to reveal a secret containing the Rocket Black Box artifact. Now jump over the gap to the left and do the same thing, break the sand while you quickly progress under it. Wait under the large boulder at the end of this path for all the smaller stone blocks to fall. Once all the small stone blocks are down, break the sand block under the boulder and quickly run! You can pick up the ore in the upper right here and climb over the large boulder. Follow the path the rest of the way for an upgrade cog and leave the cave. |
Yarrow Caves
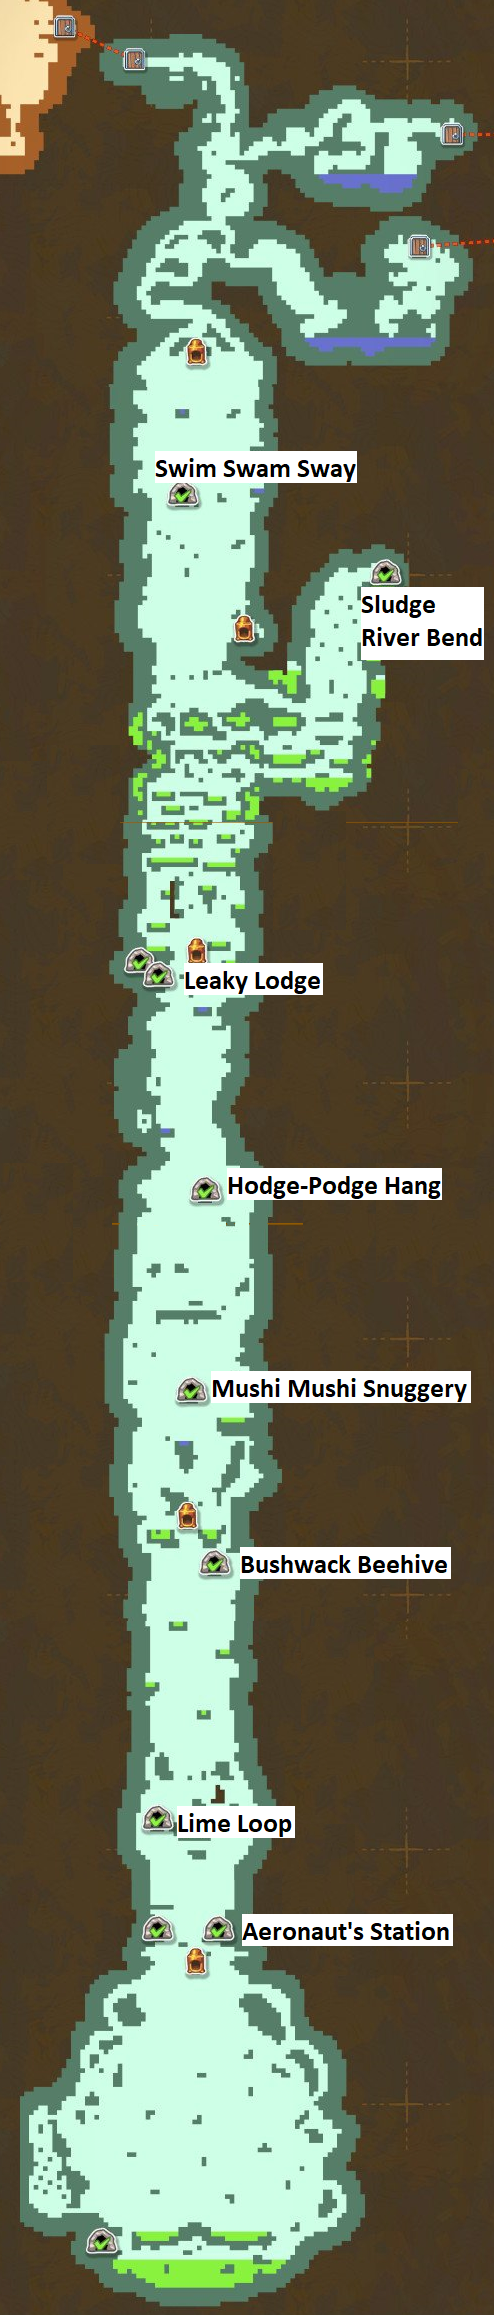
| Aeronaut’s Station | Follow this path until you reach a split. The left will lead to a set of regenerating dirt blocks up high that you can break if you have the sky assailant pressure bomb mod. You want to break the regenerating dirt blocks below though. Enter the contraption for the Ramjet Vigor which will allow you to break blocks above your head by flying into them with your jetpack. Fly back up and get out of here. You can fly to the left and follow this path. Your ramjet will also kill enemies so just fly past the spitter that gets in your way. Once you get back to the entrance, fly up through the dirt blocks in the upper right. Break open the upgrade cog chest there. Before leaving the cave, fly straight up and you’ll see some dirt blocks here. Fly up there for a hidden upgrade cog. |
| Bushwack Beehive | Follow the path down and you’ll see some bees. These don’t fly to you, they’ll fly in a set pattern constantly. If you hit them, they’ll fly away from you and explode when they hit something else. All the blocks within their explosion will also slowly explode so stay away and make sure not to hit them right into a wall you’re next to. Take a look at the ceiling as you follow the path to the left. You’ll see a cracked block you can’t break and to the left of it, some sand blocks in the ceiling. To break this, you’ll need the sky assailant mod on your pressure bomb. This requires you to have the level 4 pressure bomb which has a required level of 14. You’ll need a total of $1,400 to upgrade this to tier 4 and then 3 upgrade cogs to unlock the mod. You may have to come back for this one at this point but just fly up and shoot a pressure bomb up at the right sand block here. The Still Life, Stil Hope artifact is up here. Follow the path to the lower left and break open the ore down here. Break the cracked vein to clear up most of the cave. Work your way back to the entrance/exit door while killing the bees safely. Break the path open for the upgrade cog at the end. |
| Hodge-Podge Hang | Fall down the platforms here and you’ll reach an area of platforms you have to jump across. Before you start jumping, fall under the platform you’re on and hook shot as far as you can until you reach the metal panels on the ceiling. Jet pack across those panels and hook shot at the end. Climb the far right wall and you’ll find a secret area with the Scented Candle artifact. Look at the screenshot below with the minimap for reference. That’s the entrance to the cave in the top left corner of the screen and you can see in the minimap where I went to reach the artifact. Just fall to restart the cave and you’ll keep the artifact. Fall back down to the platforms with the pink blobs. The path is very straight forward. I would try to avoid hitting the pink blobs as best as you can to give yourself some more time to work with. There are clay blocks here that will crumble once you touch the top or sides but not if you hookshot to the bottom. Make use of that to refill your jetpack fuel as needed and to slow down a bit. If you touch a pink blob, it’ll destroy the platform it’s on so make sure to avoid them as best as possible. In the top left corner, when you start going right again, jetpack to the left for a small platform with a rare ore on it. Now just head to the right along the top platforms. You’ll have to bounce across some pink blobs which will destroy their own platforms so make sure not to turn back! At the end, you’ll slide down a narrow pit. The bottom is full of pink blobs. Try to just activate one and get back into this narrow shaft. Hook shot to a wall and just wait until all the blobs are destroyed. Pick up the upgrade cog at the end and break the block below to exit the cave. |
| Leaky Lodge | Drop down and quickly kill the snail below. Follow the path until you reach a large rock. Don’t let it drop, instead, break down two blocks and go under it completely. You’ll see a cracked block you can break open here for the Radiant Orchid artifact. View the screenshot below to see how to reach it. Keep jumping across the platforms to the left while avoiding the acid. Continue to the far left while avoiding the acid to break a vein of cracked blocks. This will destroy a lot of the acid drippers in the ceiling. Head back to the right and climb up the stones that fell. Climb up the path here and continue to the left. There’s an Ametrine ore under the snail you can pick up. At the end of this path, you’ll find a pool of water. Refill your water tank and you’ll see a large stone just to the left of the water. Shoot a pressure bomb to break it loose so it falls. Drop down onto it and shoot another pressure bomb to the right so that one falls. You guessed it, now drop onto the last stone that fell and shoot a pressure bomb to the right. Collect the ore in this area while dealing with the snail. Continue a little further to the right and you’ll enter a large cavern. Jetpack up for a hidden ore up here. Continue to the right while avoiding the acid drippers and climb onto the regenerating dirt blocks. This area is tricky, especially if you fall below the dirt blocks that regenerate.Count how many acid drippers you go past once you start on the regenerating blocks. In between the second and third acid dripper, you’ll see a small dirt block in between the rocks below where the acid pools are. Drop down and break it to reveal a secret for an upgrade cog. Below is a screenshot showing where you want to start digging down. Climb back up and try to get above the regenerating blocks. Keep going to the right as it’s safe to do so. Slide down the walls at the end and snails will break loose from little alcoves on each side. You’ll have to deal with them at the bottom but it’s not as daunting as it seems. Simply lure one and hook shot straight up. Let them keep breaking the blocks below you and they’ll open up a path to the left to reach an upgrade cog and the end of this cave. |
| Lime Loop | This room is all about speed and will likely take you a couple of tries. Head down to the switch at the bottom and keep going as far right as you can. Break the ground tile and you’ll see when you fall through this hole, you’ll end up in the top of the room. Climb back to the switch and open the gate about. Fall down quickly and enter the door before it closes for the upgrade cog. Break the cracked block vein below and fall down. Instead of going left to the exit, just jump to the right to reveal another secret. Run off the screen to the right and you’ll end up at the artifact to the left. Now head for the exit. |
| Mushi Mushi Snuggery | This cave is very straight forward and there’s no tricks or puzzles. It’s just tough with all the spikes, bounce pads, and shooters to hurt you. Simply follow the path and you’ll find a diamond in plain sight along the way. Make sure to use your hook shots to stabilize yourself and get through tight areas safely. There’s a point where you’ll see some sand blocks to your left when you go down and have to start going right. You’ll have to head a little to the right to lure some shooters to shoot at you and then have them go for the sand blocks. Head over there for the Bowl of Cereal artifact. View the screenshot below for its location. Just continue along the path from here to the right and you’ll find an upgrade cog just before the exit. |
| Sludge River Bend | Fall down to the right and hit the bomb to the left with your pickaxe. Pick up the ore to the left that dropped. The bomb should drop behind you again, hit it to the right. Go through the open path and climb the platform to the top while avoid the acid drippers. You’ll see some dirt blocks to the left when you reach the top of these platforms. Break the first one with a pressure bomb and dig through the rest for an ore. Jump to the right of the bomb ahead and hit it to the left. Pick up the ore here and dig down in the newly open area. After you have all the ore, climb up the dirt blocks and head back to that bomb. Hit it to the left by jumping and just using your hook shot at it so it’ll fly to the right. Now head to the left and down the open area you picked up the ore. Go to the right while avoiding all of the acid. When you reach some boxes blocking your way, go back to the left. Fall into the first hole in the ground where the acid dripper is and you’ll find a secret area. Go to the right and break the block above you. Head back to where the boxes were. Once you get past those boxes, climb to the upper left and continue to the left. Break the block at the end of the path and go to the left. Break the sand block under the stone in the upper left and let it drop. Break the cracked block there and head back to the bomb to the left. Use your hook shot to hit it to the right and follow it for the upgrade cog you passed. Now fall back down to where those two boxes were that you dropped and head to the left. Break every sand block you see in your way and keep going until you reach the bomb. Just hit it to the right and it’ll traverse this whole cave to the stone block blocking the upgrade cog at the far right end. Pick it up and exit the cave. |
| Swim Swam Sway | This cave is a bit tricky, especially for all the secrets. It’s mostly swimming and very straight forward. The first half is just avoiding spikes in the water and the second half is avoiding spikes and those little pink monsters that shoot at you. Start to go down the first half and sink to the bottom. Hug the left wall as much as possible and you’ll see an opening big enough for you to fit between the spikes on. Hook shot there and slowly work your way down the left wall until you find a cracked block. Break it open for the Amiigo Figurine artifact. View the screenshot below for the location of this artifact on the minimap. Follow the path downward and collect the topaz when you pass it. Break the cracked block vein at the bottom to continue downward. Avoid the shooting monster ahead and break the next set of cracked blocks. Continue through the path and move quickly while avoiding the spikes so you don’t get hit by the pink spitting monsters. When you reach the top left corner, drop to the left of the spike blocks and break the sand here for some more ore. Now swim upwards and hug the left wall. You’ll quickly see another cracked block. You want to swim a little to the right to get the pink shooting monster to start shooting at you. Quickly swim in front of that block so the shots home in on it to break the block so you can pick up an upgrade cog. Now just swim up as quickly as you can to avoid being shot, just be mindful of all the spikes. You’ll be rewarded with another upgrade cog once you get out of the water. Head to the right to break a block so you can reach the exit above. |
Upgrades
Every item in the game can be upgraded through money and upgrade cogs, which can be found hidden throughout the world. In this section, I will include every upgrade you can get, the cost, the mod it unlocks, that mod’s cost, and the effect the mod gains. I will also include any level requirements as some upgrades will require you to be a certain level to unlock.
PICKAXE
Dorothy’s main digging tool.
| Name | Required Level | Cost | Mod | Mod Cost (Cogs) | Effect |
| Rusty Pickaxe | 1 | N/A | N/A | N/A | N/A |
| Iron Pickaxe | 1 | 25 | Hunter’s Edge | 1 | Gives +5 extra XP per enemy killed with pickaxe. |
| Bardur-Grip Pickaxe | 1 | 80 | Resource Roughhouse | 2 | Deals extra damage to resource tiles. |
| Pickaxe Chu | 1 | 200 | Bounty Hunter | 3 | Nets you a cash prize for taking out enemies with the pickaxe. |
| Alloy Steel Pickaxe | 6 | 350 | Total Recoil | 1 | Pushes enemies back further on impact. |
| Tungesten Pickaxe | 6 | 500 | Healer | 3 | Adds a chance to spawn an extra health orb from enemies defeated with pickaxe. |
| Barren North Pickaxe | 6 | 700 | Return to Sender | 2 | Allows you to hit projectiles in mid-air to flip their direction. |
| Templar Bickaxe | 10 | 1000 | Mid-Tile Express | 3 | Refines aerodynamics to speed up the ol’ swing. |
| Unique Mod | 21 Artifacts | Sharpened Edge | 4 | Deals extra damage to enemies. | |
| Unique Mod | Combuster’s Station Cave | Ignition Axe | N/A | Adds fire and range to your trusty Pickaxe, and makes it deal more damage. May also have other uses… |
BAG
Holds the ores and gems you find.
| Name | Required Level | Cost | Mod | Mod Cost (Cogs) | Effect |
| Miner’s Pack | 1 | N/A | N/A | N/A | N/A |
| Shrewhide Pack | 1 | 8 | Reaper’s Discount | 2 | Makes you lose fewer resources when you die. |
| Bag of Holding | 1 | 30 | Cash on Disposal | 1 | Discarding a resource grants you a share of its monetized value. |
| Trojan Sack | 1 | 75 | Dual Depot | 2 | Lets you store two gems per slot. |
| I-Can’t-Believe-It’s-Just-A-Bag | 1 | 125 | Portal of Pardon | 3 | Let’s you return to El Machino instantly without losing any resources. Activate this ability in the System tab.Disabled in caves and when you are in danger. The ability icon shows you when it can’t be used. |
| Germlin Carry | 6 | 200 | Double Rainbow | 4 | Adds a chance to get two resources out of one single resource tile. |
| Elven Tote | 6 | 300 | Magnetic Separator | 2 | Pulls exposed resources towards you. |
| One Bag to Hold Them All | 6 | 450 | Hobo King | 3 | Gives instant cash when you collect low-value resources. The lower the value, the more money you gain. Does nothing for resources above $7. |
| Mammoth Pack | 10 | 800 | Re-Circle of Life | 1 | Lets you restore a bit of health by discarding resources. Discarding gems restores more health than ore. |
| Bag-Avad Get’a | 10 | 1500 | Yuppie Ki-Yay | N/A | Get 30% more cash when selling resources. |
| Upgrade Mod | 10 Artifacts | Pocket of Freyr | 5 | Lets you store one extra chunk of ore per regular slot. |
LAMP
Lights up your surroundings. Consumes fuel over time, which is replenished in town.
| Name | Required Level | Cost | Mod | Mod Cost (Cogs) | Effect |
| Broken Lamp | 1 | N/A | N/A | N/A | N/A |
| Rock-Bottom Lamp | 1 | 6 | N/A | N/A | N/A |
| Miner’s Brite | 1 | 20 | 1 | Larger Than Light | Increases your lamp light radius. |
| Modified Carbide Lamp | 1 | 50 | 1 | Flames of Kubera | Causes pickups to emit light, which in turn makes them easier to discover. |
| Lodestar | 1 | 100 | 2 | Gordon Reflexes | Increases the chance of you automatically dodging falling rocks and similar death traps. |
| Lantern | 6 | 150 | 2 | Summoner | Adds a chance of spawning an extra light orb from defeated enemies. |
| Pharos Light | 6 | 250 | 3 | Spotless Mind | Prevents your light from dropping below 50%. |
| Sol Invictus | 14 | 500 | 3 | Eye for Weakness | Lets you see the weak parts of walls when shining on them. You don’t need no education and no thought control, just look at the wall. |
ARMOR
The armor protects you from the dangers of the depths.
| Name | Required Level | Cost | Mod | Mod Cost (Cogs) | Effect |
| Plate Armor | 1 | N/A | N/A | N/A | N/A |
| Sturdy Armor | 3 | 25 | Cougar Paws | 2 | Reduces your fall damage. |
| Hard Armor | 3 | 75 | Karma Plates | 1 | Deals damage to anyone that injures you by touch. |
| Tempered Armor | 3 | 150 | Vidar Boots | 3 | Makes you acid and lava resistant for a short while. |
| Famed Armor | 6 | 250 | Aramid Armor | 3 | Deflects the first projectile that hits you. Takes 30 seconds to recharge. |
| Doom Armor | 6 | 400 | N/A | N/A | N/A |
| Full Moon Armor | 6 | 600 | N/A | N/A | N/A |
| Phoenix Armor | 10 | 1200 | True Survivor | 5 | When you first take lethal damage, instead regain full HP. Ability resets in town. |
| Upgrade Mod | The Sun Armory Cave | Ultra Composite Armor | N/A | Reduces damage taken. | |
| Upgrade Mod | 6 Artifacts | Core Diversity | 1 | A fluid, polychromatic armor that provides a small chance of getting 3 Rainbow Orbs every time an enemy is defeated. |
WATER TANK
Many of your tools use water, which is replenished in pockets of water throughout the mine.
| Name | Required Level | Cost | Mod | Mod Cost (Cogs) | Effect |
| Plain Jar | 1 | N/A | N/A | N/A | N/A |
| Melville Regulator | 1 | 75 | Pump Up The Jam | 1 | Absorbs water faster from pools. |
| The Notorious W.E.T. | 1 | 300 | N/A | N/A | N/A |
| The Cisterns of Mercy | 6 | 650 | Storm Chaser | 1 | This condenser contrapment turns Light Orbs into Water Orbs. Does not affect Rainbow Orbs. |
| Nautilus II | 14 | 1400 | Moisture Vaporator | 5 | Transforms moisture into flowing water, constantly replenishing your water supply. |
| Upgrade Mod | 28 Artifacts | Aquatic Regenesis | 5 | Regenerates life when in water pools. |
PRESSURE BOMB
Can be thrown forward, up or down. Consumes water. Press X to throw!
| Name | Required Level | Cost | Mod | Mod Cost (Cogs) | Effect |
| Osmotic Ticker | 1 | N/A | Molotov Vaccination | 1 | Stops pressure bombs from hurting you. |
| Scholander Hytdrostatic | 1 | 100 | Wet Wet Wet Bomb | 3 | Spawns an extra water orb from tiles destroyed by pressure bombs. |
| Acid Bomb | 1 | 300 | Buster Shells | 1 | Makes your pressure bombs shatter even harder rocks than before! |
| Bomp Bah Bomb | 14 | 1000 | Sky Assailant | 3 | Lets you shoot pressure bombs mid-air, so take to teh skies and release your bombs from a safe distance! |
| Upgrade Mod | Chamber of Secrets Cave | Grenade Launcher | N/A | Hold X to launch a grenade in an arc for mass destruction. | |
| Upgrade Mod | 500 from Clifford Heisenberg at the top of El Machino | Threeforce Grenade | 3 | When charging to fire a pressure grenade, this trippy thing lets you shoot three Pressure Grenades instead! |
JACKHAMMER
An exceptional digging tool for destroying hard materials but ineffective against enemies. Runs on water. Hold L for more power!
| Name | Required Level | Cost | Mod | Mod Cost (Cogs) | Effect |
| Gabriel’s Sledge | 1 | N/A | Synthetic Lubricant | 2 | Improves the jackhammer’s windup speed. |
| Titan’s Auger | 6 | 300 | Clapton Damper | 1 | Adds a slower wind-down which keeps the jackhammer revved up longer after use. |
| The “Ivan Drago” Mark IV | 6 | 600 | Slipstream Jet | 2 | Pulls you forward whenever the jackhammer breaks through. |
| Mjolnir Drive | 6 | 1200 | Ancient Justified Cylinder | 3 | Enhanced pneumatic cylinder. Allows for increased maximum operating speed, but at the cost of increased water usage. |
JET ENGINE
To fly, Hold B. This experimental Diesel combustion engine uses no water, but overheats quickly.
| Name | Required Level | Cost | Mod | Mod Cost (Cogs) | Effect |
| Secord Mod 38 | 1 | N/A | Cruise Control | 1 | When the jet engine overheats, keep holding B to reduce your fall speed. |
| Double Cyclone | 10 | 750 | Maverick Afterburner | 1 | Increases your jet engine speed, so just rev up your engine and listen to her howlin’ roar. |
| Le Rhone 69 | 14 | 2500 | Air Cooling | 4 | Release B mid-air to cool down the jet engine. Manufactured by Snow & Fred Ltd. |
| Upgrade Mod | Aeronaut’s Station Cave | Ramjet Vigor | N/A | While using your jet engine burst, enemies and weak tiles that come into contact with you are destroyed. |
HOOK SHOT
Press R to use. Puolls you in the direction you hold. Can be used against enemies for various effects.
| Name | Required Level | Cost | Mod | Mod Cost (Cogs) | Effect |
| Upgrade Mod | Ronald’s Treasure Chamber Cave | Long-Range Grappler | N/A | Further increases the range of that blue sweet hook shot! |
MAP
Keeps track of where you’ve been and where you’re going.
| Name | Required Level | Cost | Mod | Mod Cost (Cogs) | Effect |
| Upgrade Mod | 1 | N/A | Map Markers | N/A | Shows markers on your map to your quest destinations.If you prefer exploration without guidance, disable this cog mod. |
| Upgrade Mod | 1 | 15 Artifacts | More-Hoarder’s Map | 4 | Reveals all resources on the mini-map. |
| Upgrade Mod | 1 | 1 Artifact | Gaze of Odin | 1 | Displays your enemies’ health once you’ve damaged them. |
SPRINT HYDRAULICS
To run, hold Y while moving. Running makes you move faster and jump higher.
FATE ENGINE
Mysterious upgrades that shift the gears powering the universe.
| Name | Required Level | Cost | Mod | Mod Cost (Cogs) | Effect |
| Upgrade Mod | 3 Artifacts | Criss-Cross Combustion | 1 | Breaking resource tiles creates a small burst that damages adjacent tiles. | |
| Upgrade Mod | Josh Yonker (Archaea) | Blood Quest | 1 | Gain bounty at the price of blood! Doubles the chance to get blood stones when enemies die, but also increases the damage they do to you.Activating this cog mod will make your quest much harder. It is only recommended for veterans. | |
| Upgrade Mod | Luke Yonker (Yarrow) | Thrillseeker’s Tale | 1 | Doubles XP from kills, but enemies only drop orbs from creative kills or bonuses.Activating this cog mod will make your quest much harder. It is only recommended for veterans. | |
| Upgrade Mod | Zebulon Yonker (West Desert) | Deathsplosions | 1 | Enemies explode upon dying.Activating this cog mod will make your quest much harder. It is only recommended for veterans. | |
| Upgrade Mod | 42 Artifacts | Sigillum Caelum et Infernum | N/A | Close to the peak of solitudeA howling desert embraceTake to the skies to seal your fatIn a strange and wonderful placeThis is a key required for the Trials of Heaven and Hell cave in the sky of the Windy Plains. This is the final challenge before truly beating the game. |
")
")
Facebook Comments